| KIT #: | 11014 |
| PRICE: | $52.99 SRP |
| DECALS: | One option |
| REVIEWER: | Scott Van Aken |
| NOTES: | New Tool Kit |
Dragon 1/72 Redstone Rocket w/ Mercury Spacecraft
| KIT #: | 11014 |
| PRICE: | $52.99 SRP |
| DECALS: | One option |
| REVIEWER: | Scott Van Aken |
| NOTES: | New Tool Kit |
| HISTORY |
The Mercury-Redstone Launch Vehicle, designed for NASA's Project Mercury, was the first American manned space booster. It was used for six sub-orbital Mercury flights from 1960–61; culminating with the launch of the first, and 11 weeks later, the second American (and the second and third humans) in space.
A member of the Redstone rocket family, it was derived from the U.S. Army's Redstone ballistic missile and the first stage of the related Jupiter-C launch vehicle; but to make it man-rated, its structure and systems were modified to improve safety and reliability.
The four subsequent Mercury manned flights used the more powerful Atlas booster to enter low Earth orbit.
| THE KIT |
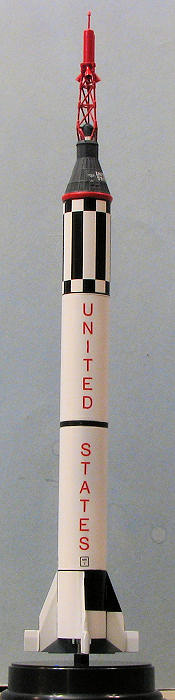
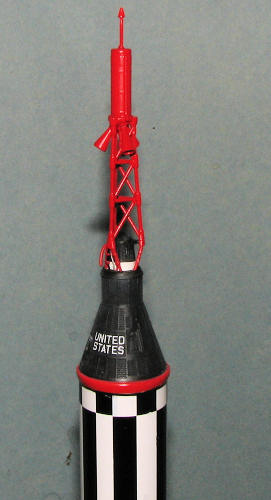
 Dragon is very much committed to providing the real space modeler with some fine kits and that continues with this one of the Mercury-Redstone. This kit's capsule does seem to have a window as used on many of the flights. There are markings for both Freedom 7 and Liberty Bell 7. One thing I did notice is that the lower part of the fins are solid (as in no 'cut out' from the steering portion of the fins to the booster body). I looked at this area as shown for all the Mercury-Redstone flights in Wikipedia and noticed that only rocket designation MR-5 and Alan Shepard's Freedom 7 seemed to have had this more solid look. I'm sure those who know more could chime in on this. The decals also have the little square 'MR7' markings as used on Shepard's flight. Grissom's would have had 'MR8'. Regardless, is nice to have this kit.
Simplicity is the keyword for this kit. So basic is the kit in terms of parts, that the instructions and color guide are printed on the back of the box. What one gets are four plastic tubes on which one attached the fins and the spacecraft. The spacecraft is a single mold as sanding a seam with all those corrugations would be quite a feat. The escape tower with its rocket on top will take up most of the building process.
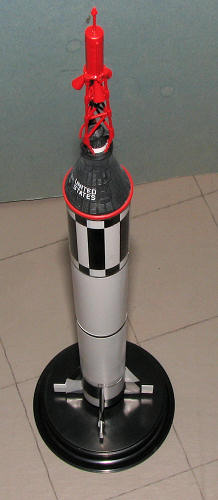
One builds up the lower section of the rocket, then the upper section, the tower, and the rocket pack, assembling them all in the last step. There is a nicely done plastic base (actually three of them but two are not required) and a metal rod on which to put the model. The lower stage has a reinforced area to accept this rod, thanks to modern slide mold technology.
There are decals for one version and while the upper black and white areas are part of the decal, the lower stage sections will need to be painted.
| CONSTRUCTION |
 Every once in a while there are those kits that psychically send 'build me', waves into one's brain. This is one of those kits. As soon as I saw it, I knew that it would be going immediately to the work bench. And that is exactly what happened.
 this one than meets the eye. Naturally, the initial assembly was the lower and upper halves of the rocket body. These have mold seams that will need to be cleaned off before going too far. I also test fit a fin to the lower section, and it showed that one cannot install the rocket nozzle with any fins in place. Basically means that the fins will need to be painted prior to installation.
| COLORS & MARKINGS |
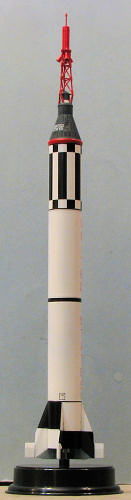 To no one's surprise, the first color to be painted was white. In fact, pretty much everything got at least one coat. This is especially needed for anything that was going to be painted red. The initial coat of white was with Tamiya white primer to be sure the following coats would stick. Then, using Floquil white, I sprayed all of the fins and the main body. The capsule sections were painted flat black. For the red sections on the booster and the tower, I used Tamiya Red.
Much masking was done to get the proper black/white markings on the fins. These were simply slotted into the booster and painted along with the lower booster section. I painted the very upper capsule attachment band in red. When that was done, the fins were removed and then masked for the grey parts. I used Light Aircraft Grey on these areas using Model Master enamels. The rocket nozzle was painted burnt metal. There is a white band on the capsule that needed to be painted and that was masked then painted white.
| FINAL CONSTRUCTION |
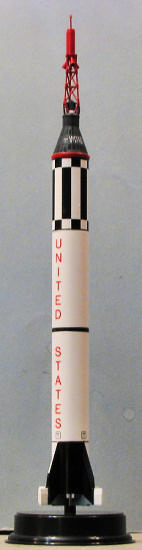 Some detail painting was done on the tower connections and then that was glued on to the capsule. It was really a difficult procedure to get it in place once it was already assembled and much fussing went on in the process. Then the decals were attached. They all fit quite well and reacted well with Mr Mark Softener setting solution. The upper booster band is a bit too large so you will have an area where the stripes are a tad small. There is no decal given for the black stripe at the very top and lower section of the booster, though the broader one half way up is included.
 | CONCLUSIONS |
Despite a few self-inflicted glitches (smearing a decal, for instance), the kit was a pleasure to build. Its quick construction makes for something that will be quite a break from a 700 piece armor kit and it looks great when you are done. Judging by how quickly this kit has been selling out, you might want to grab one while the grabbing is good.
| REFERENCES |
http://en.wikipedia.org/wiki/Mercury-Redstone_Launch_Vehicle
February 2012 Thanks towww.dragonmodelsusa.com for the preview kit. Get yours today at your local shop. If you would like your product reviewed fairly and fairly quickly, please contact the editor or see other details in the