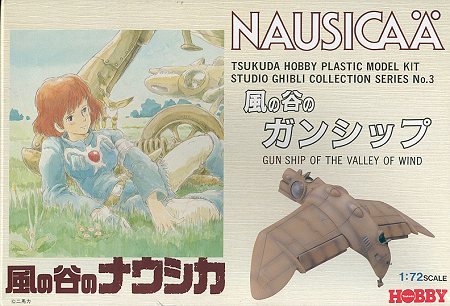
Tsukuda 1/72 Nausicaä - Gunship of the Valley of the Wind *
|
KIT # |
GC-03 |
|
PRICE: |
¥700 or $11.95 |
|
DECALS: |
None |
|
REVIEW : |
|
|
NOTES: |
|
|
HISTORY |
My knowledge of Anime is almost non-existent, so I went to the web and typed in Nausicaä into a search engine. I was rewarded with quite a bit of stuff, much of it in Japanese! Apparently there is a movie as well as a magna (comic book) based on this character. No where in my reading did I see anything about this craft, so I am not sure if it is part of the movie or the magna on which the movie is based.
Here is a brief synopsis of the character shown on the box art.
NAUSICAÄ - She is the daughter of Jiru, the chief of a small kingdom called the Valley of the Wind. After Jiru was killed, Nausicaä and her troops joined the Torumekian force according to a treaty signed long ago. Nausicaä meanwhile discovered that the Decayed Sea cleaned up the contaminated world, and by communicating with the Ohmu, the giant insects, she foresaw the coming of a great disaster. She fights bravely and hopes to witness the coming of a new world.
(Late Note: I've finally seen Miyazaki's superb anime movie on this and can highly recommend it to you all.)
Anyway, I thought the kit looked pretty cool and since it is obviously sci-fi/fantasy, it is only right that an eclectic modeler such as myself would be interested in building such a thing.
|
THE KIT |
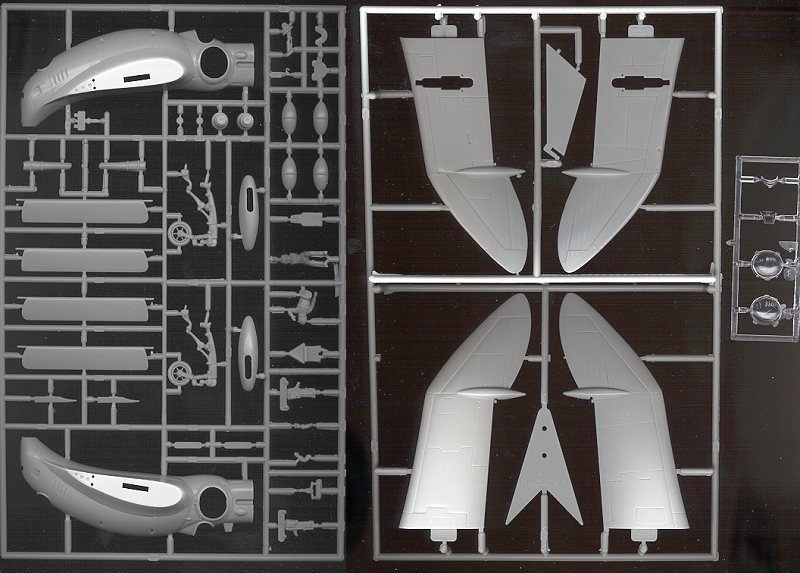
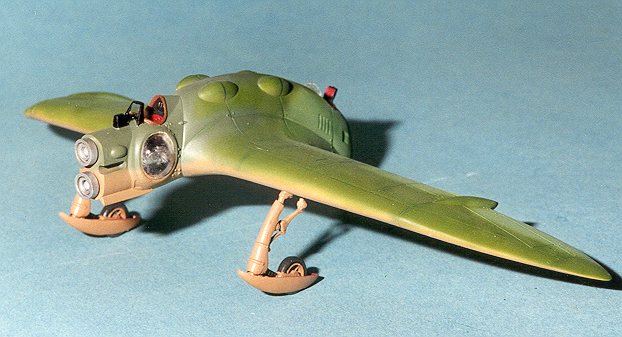
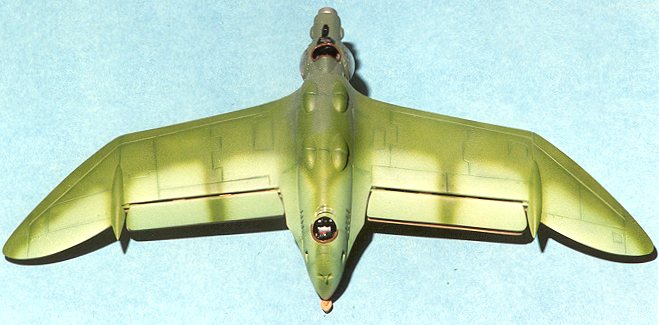
Though for some reason my scanner didn't pick it up, this kit is molded in a greenish grey plastic. All the parts come on two main sprues with a third for the clear bits. Since this is an aircraft of some sort, it has a cockpit fore and aft. In the front there is a seat, side consoles and control stick as well as an instrument panel. However, there is no floor or any fore or aft bulkheads. There is a full figure of Nausicaä to fit into the pilot's seat. The rear compartment has only a seat and instrument panel. There is a figure to fit into the seat as well, though only the top half. Like the front, there is no floor or front/rear bulkhead so the figure really needs to be in there to fill the space. The gunship can be built either wheels up or down. It has moveable wing flaps and a positionable main and tail wheels. A flight stand is included.
It has been a long time since I built a Tsukuda kit and though this one has all the requisite engraved panels and details, there are sink marks in a few locations were locator pins are placed. Parts are relatively flash free, but some do require cleanup before use. The clear bits are really distorted and scratched from floating around in the bag. The clear sprue has also managed to scratch a number of the parts in the kit.
Instructions are almost entirely in Japanese. This includes the color guide, so I hope you know your colors from all those Hasegawa and Tamiya kits! There are cautions and warnings in English (don't stick plastic parts in your ear; stuff like that). One very helpful suggestion was "Before assembling, read instructions carefully". Thanks! Actually the instructions are very good despite being unable to read them. They inform the unwary of any possible parts misalignments or misplacements.
|
CONSTRUCTION |
Construction and previews are two different things for many kits and this one is no exception. Generally the fit of the parts is not bad, but not really good. I understand that this kit has been around for about ten years. Despite that, there is little flash though the mold seams are rather pronounced. The first thing I did was start a major scraping project on all the parts. The next was to build up the interior parts, which fit rather well. These were painted steel and flat black. The seat cushion was done in red. Same with the back seat. All needed cleanup prior to gluing. The interior color is supposed to be a brown. I painted it a very dark brown along with the wheel wells and inside of the flaps.
After additional research and conversations with John Lester of Starship Modeler, I found that this vehicle was supposed to be made of some natural composite materials. That explains the earth tones of the kit. Anyway, once the interior was built up and the rear seat painted, the clear bits for the side of the nose were installed. These distorted clear parts only fit one way, so be sure to follow directions on which goes where. They were held in place using non-fogging superglue.
The interior was then glued in place and when set in properly the fuselage halves were glued together. Since I'm doing mine wheels down, the tail wheel wasn't installed. I also didn't install the front instrument panel as you can't see it when it is in place, though the aft one is very visible.
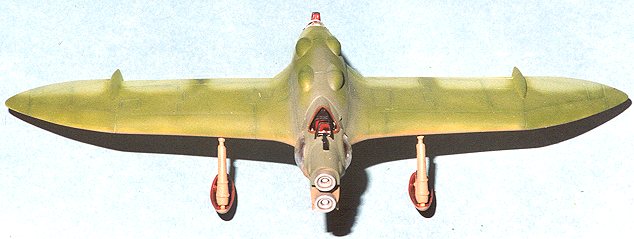
While that was drying, the wings were glued together. There were no real problems with this. The wing flaps look as if they can be installed after the wings are glued on the fuselage so were left off until later. Once they were dry and the sink marks filled in, they were glued to the fuselage. Problems! The right wing root is much thicker than the right wing. The left isn't bad, but this means much filler and destruction of rivet detail. So many days were spent filling and sanding. I know that I could have used Milliput or Superglue to do this job in less time, but I'm used to filler so that is what I used.
Once the wings were smoothed out, it was time to add a few other exterior bits. In the back is a hook that fits into a recess. On top are four lumps that are probably something to do with the power system. Frankly, I have no idea how this thing is supposed to be propelled as I see no exhaust ports at all. In the very front are some strakes that need to be glued in place. The mounting holes for these parts as well as the upper fuselage lumps are way oversize. Unfortunately, the front strake mounting slots need some filler to cover up. I also found a few more sink marks on the wing leading edge and these were attended to at the same time.
At this time the wing flaps/ailerons were installed. They are supposed to be installed when the wings are glued on, but are flexible enough to be bent to fit into the slots provided. The fit is very loose and I suppose they will have to be glued in place or left to droop in the down position. It was then time to start painting the airframe and some of the other bits and pieces.
|
PAINT |
According to the box art, the overall color is a sort of dark sandy brown with the panel lines outlined in an even darker shade. I rarely like to use the suggested scheme if I can think of something a little more interesting. While thinking about what colors to use, the now masked kit was preshaded with panzer grey. When that was dry, the underside was painted using Aeromaster RLM 79 sandy brown. In addition, all the landing gear and doors were painted this color.
Having decided to do a multi-green upper surface color, the rear was painted with Model Master FS 35337 Israeli Green. The middle section and forward wings were painted Model Master FS 35151 Interior Green, while the nose section was painted with Aeromaster Russian Uppersurface Green. All are enamel paints. This pretty well did in the preshading! The usual amount of back and forth painting then commenced as oversprays and such were touched up.
The guns also had to be painted at this time. The kit suggestions of steel and aluminum were followed and the result looked pretty good. I have no idea what these things fire, but I assume it isn't a solid shot so no real dirtying up was done. Same for the rest of the kit.
|
CONSTRUCTION CONTINUES |

Once that was dry, the landing gear was installed as were the 'guns'. The rear seat was installed as well at this time. I didn't fill in the holes under the wings for the lower 'doors' as I felt maybe some positive locking device would have been appropriate. Let's see some judge hit me on that in a contest!!
The landing gear really didn't fit too well at all. While they lined up with the holes, the forward mount on the gear had to be trimmed back quite a bit to fit properly. It was almost as if they were designed to be glued in before the wing halves were cemented together. Once that was taken care of, the upper and lower 'doors' were glued in place. The forward ones fit well, and after a small amount of trimming to let the wheels through, the lower ones fit into place. Not a lot of the wheel drops below this door.
Final prep was to use pastels on the upper surface. I did all the panel lines in a dark green pastel. Initially, I used a yellow-green for the lighter green area, but it didn't look right so it was overdone with the dark green. The lower side got no pastels as the preshading showed through pretty well there. A coat of clear flat sealed in the pastels. Last part to be assembled were the windscreens. The rear one fit well after the mounting tab was cut off. The frame of the front screen and 'gunsight' were painted flat black while the aft screen was left clear. Finally, the tape was taken off the clear bits on the side and it was done.
|
CONCLUSIONS |
This kit was about what I had expected when I bought it. I had expected an interesting kit that would have some fit problems, and that is what I got. Nothing major that any average modeler couldn't handle and certainly it went together better than many US made sci-fi subjects. Biggest disappointment would be the rather poor transparencies that are in the kit. Other problems can be fixed, but not glitches in clear parts.
It makes interesting reading to read how someone who normally builds aircraft models (me) rates this kit compared to someone who regularly builds sci-fi kits (John Lester). John's review raves about the great fit, while mine is less than that enthusiastic. Aircraft modelers (as well as those who model armor and cars), are used to a generally high level of excellence in fit with our Tamiya and Hasegawa kits. Sci-Fi modelers generally don't have it so good as most sci-fi kits I have seen would probably end up in the trash if it were an aircraft or car kit.
Anyway, aside from that little observation, I can recommend this kit to those of average ability who find the shape of this kit to be as intriguing as I did. It is probably one of the neatest-looking kits I have done in a long time. Be interesting to see the reaction at the club when I drag this thing in next month. I was pleased to be awarded Best Science Fiction model at an IPMS Indianapolis show.
Copyright ModelingMadness.com. All rights reserved.
Review copy courtesy of me and my wallet!! If any of you manufacturers or shop owners want to send products for review and building, please contact the editor.