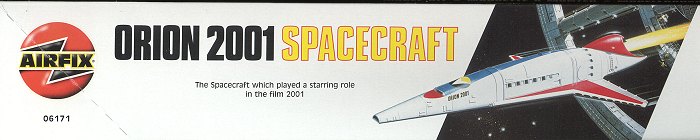
Airfix 1/144 Orion 2001 Spacecraft
| KIT # | 6171 |
| PRICE: | $22.50 |
| DECALS: | Pan Am and ???? |
| REVIEW : | |
| NOTES: | Re-issue |
| HISTORY |

Forever in the annals of great Science Fiction movies is the groundbreaking 2001 of 1968. In this movie so many of the effects that we see everyday on the small and large screen got their start. It is also one of the few sci-fi movies to portray accurately the physics of space. No swooping space fighters, no groaning low frequency noises as gigantic vehicles pass overhead. All motion is determined by reality and not by earthly atmospheric effects. One of the most visually interesting scenes is early in the movie as the Pan Am spaceliner slowly, serenely, and accurately maneuvers itself into position for entry into the space station. It is in many ways quite unfortunate that most modern movies do not portray space in the way it is; instead relying on earth bound physics and fantasy to portray motions in space. Nonetheless, 2001is a movie that I watch frequently; not only for its cinematic import but just to see those neat spacecraft!
For more insight on 2001, LeeKolosna gives a modelers viewpoint.
| THE KIT |
The Orion spaceliner is a kit that has been mass marketed only by Aurora and Airfix, though there have been quite a few garage resin kits available from time to time. Aurora's is now a collector's kit, while this isthe third release from Airfix. The first was in Pan Am markings and the seconding the rather fanciful and ugly ones shown on the box top. Fortunately, the PanAm decals are included in the kit.
 Well, what does
one get in terms of vintage plastic? Actually, despite the size of the box(due to the long fuselage), there are darn few pieces. Including three
clear bits there are 15 parts to the spaceliner and two for the stand. That is it.
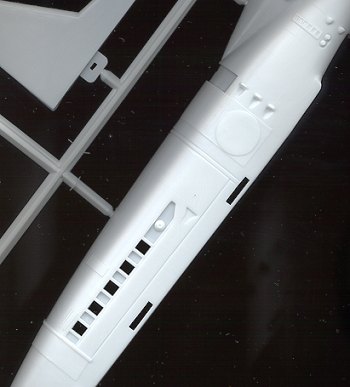
No landing gear, no opening canopy. The kit itself is mostly raised panel lines
with the rest of the detailing a bit overdone and blocky. See the image to the
right. The kit is too big to fit on my scanner for a complete parts rundown.
Again, this is a 25+ year old kit! I won't comment on its accuracy; after all,
it is a movie model. However, it does look just a bit different that what I can
recall from the movie. Mostly the nose, I guess. It seems to me to be more
overland a bit cut back on the top on the movie version. I'll be dragging out the
DVD on this one and doing some stop action comparison before building it.
Well, what does
one get in terms of vintage plastic? Actually, despite the size of the box(due to the long fuselage), there are darn few pieces. Including three
clear bits there are 15 parts to the spaceliner and two for the stand. That is it.
No landing gear, no opening canopy. The kit itself is mostly raised panel lines
with the rest of the detailing a bit overdone and blocky. See the image to the
right. The kit is too big to fit on my scanner for a complete parts rundown.
Again, this is a 25+ year old kit! I won't comment on its accuracy; after all,
it is a movie model. However, it does look just a bit different that what I can
recall from the movie. Mostly the nose, I guess. It seems to me to be more
overland a bit cut back on the top on the movie version. I'll be dragging out the
DVD on this one and doing some stop action comparison before building it.
 The decal
sheet is adequate for the Pan Am version, and why they included the other markings
is beyond me, but they did. Maybe the kiddies will like the nice colors. The
instruction sheet is the standard pictorial diagram version in 5 steps. Color
callouts are by Humbrol paint numbers, without any indication of what the colors
are. Frankly this type of thing is irritating at best. At least Airfix could say
that 33 is flat black and 22 is gloss white. Humbrol paints are not available
everywhere, you know.
The decal
sheet is adequate for the Pan Am version, and why they included the other markings
is beyond me, but they did. Maybe the kiddies will like the nice colors. The
instruction sheet is the standard pictorial diagram version in 5 steps. Color
callouts are by Humbrol paint numbers, without any indication of what the colors
are. Frankly this type of thing is irritating at best. At least Airfix could say
that 33 is flat black and 22 is gloss white. Humbrol paints are not available
everywhere, you know.
Anyway, it is nice to see this one back in circulation. Probably makes the kit collectors cringe now that this kit can be had for less than $50!I plan on getting a few more to tide me over the next 15 year drought after this production run is over with and to try out a few more airline liveries on! With the stand provided, it isn't going to take up much room and will look very cool amongst the other sci-fi movie and TV stuff I have on the shelf.
| CONSTRUCTION |
 Well, no cockpit
or interior on this one, so can't start there. What I did do first was to glue
the wings together. It may be easier for you if you removed the alignment pins as
I did on one wing as they tended not to mate the parts together straight. This
Isa real problem with older kits like this one. Once they were glued, the
inevitable seams and sink marks (mostly around alignment pins) were filled with
putty and left to dry.
Well, no cockpit
or interior on this one, so can't start there. What I did do first was to glue
the wings together. It may be easier for you if you removed the alignment pins as
I did on one wing as they tended not to mate the parts together straight. This
Isa real problem with older kits like this one. Once they were glued, the
inevitable seams and sink marks (mostly around alignment pins) were filled with
putty and left to dry.
The engine exhaust area is a two part assembly that frankly, doesn't fit too well. You are also left with three very difficult seams to fill and sand. The putty was liberally applied there and also left to dry while I contemplated how to sand them down when dry. Since there is no interior to the kit, I installed the clear plastic bits to the inside of the fuselage halves and painted them black on the inside. It was either that or paint the interior black. A few sink marks on the fuselage were filled at this time.
 Once all the filler
had dried, it was a happy sanding party!! Actually it didn't take that long and
the exhaust was sanded down using both sanding sticks and rolled sandpaper. For afew areas, a second coat was needed. Meanwhile, the exhaust area was glued
into the fuselage half and the halves were glued together. Fit was not too bad.
Once all the filler
had dried, it was a happy sanding party!! Actually it didn't take that long and
the exhaust was sanded down using both sanding sticks and rolled sandpaper. For afew areas, a second coat was needed. Meanwhile, the exhaust area was glued
into the fuselage half and the halves were glued together. Fit was not too bad.
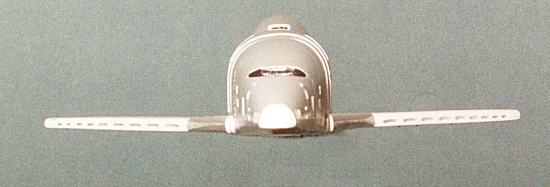
Then all the assemblies were brought together. There is a really neat interlocking arrangement wherein the bottom panel actually locks the wings to the fuselage. The wings fit through slots in the fuselage and pins in the bottom section then fit through tabs attached to the wings. Unfortunately, this gives the wings an anheadral that makes the stabilizers of an F-4 Phantom look flat!! Needless to say, I cut off the pins on the bottom section and just glued the wings and bottom section independently of each other. The fit was better, but not good. The bottom section also includes some exhaust ports and there is a seam that runs right aft of them. It proved to be a real paint to try to clean up.
Bottom line is that you will spend a lot of time fussing over fit and trimming things up to get it somewhat close. Then you'll have to slather filler over all the joints to get things as smooth as possible. It took several sessions with filler to get things smoothed out. At this time I also sanded the nose to a more chisel-like appearance, which effectively removed the 'intake' that is originally there. The upper fuselage has an 'intake' section that fits near the engine exhaust and another large intake on the top of the fuselage. These were glued on and any filler needed was applied then.
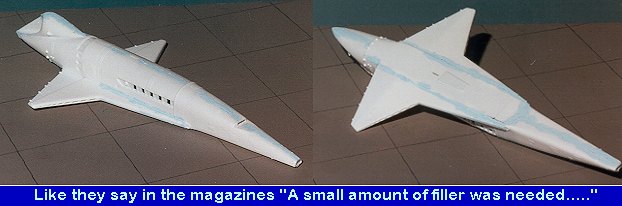
Once all the sanding and filling was done, the windows on the side were masked off and it was off to the paint shop.
| PAINT & DECALS |
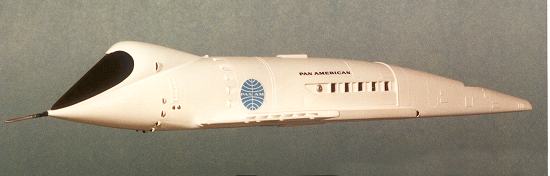
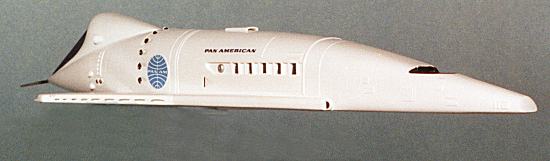
Wasn't really sure if I wanted to do the movie version or not as there are lots of interesting airliner schemes that could apply. However, in the end, I went the conservative route and used the kit Pan Am scheme. This is basically overall gloss white. Several coats of flat white were followed by a couple of gloss white. The exhaust and various intakes were painted flat black while some smaller bits were painted with Metallizer. Then the decals were put on. These fit very well and submitted to setting solutions without a fuss. While not really important for a white airframe, the white on the sheet is off register, so if using the Pan Am scheme on anything other than white, you'll have to take that into consideration.
| CONSTRUCTION CONTINUES |
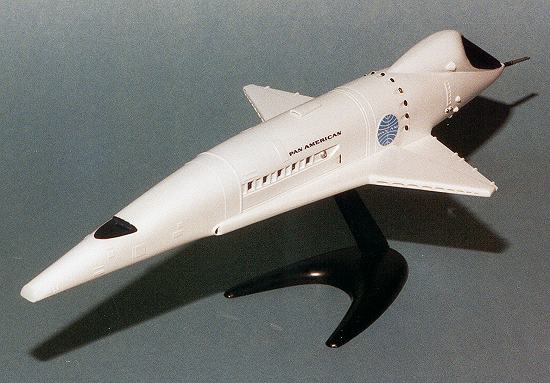
 Once the paint and decals had dried, there were only four
other pieces to add on, two of them being the stand. The windscreen was painted
black on the back and then inserted into the small slot in the front. Actually,
it fell into the kit not once, or twice, but three times before I finally got it
to snap into place! Then the tail antenna was added and painted in several
shades of Metallizer just to give it some interest.
Once the paint and decals had dried, there were only four
other pieces to add on, two of them being the stand. The windscreen was painted
black on the back and then inserted into the small slot in the front. Actually,
it fell into the kit not once, or twice, but three times before I finally got it
to snap into place! Then the tail antenna was added and painted in several
shades of Metallizer just to give it some interest.
Not having any landing gear, the kit must be displayed on a stand. The plastic for the stand is quite soft and weak so the hold back lip on the top of the stand broke off first time I put the kit on the stand. That meant that the kit had to be superglued to the stand in order to display it. I would have rather displayed it with an upward angle but the stand is designed for aircraft so it is level. I must make a decent stand for this some time in the future.
| CONCLUSIONS |
 For a kit with so few parts, it took several weeks to finish. Ican lay the blame on the generally poor fit of the kit. This is very typical
of most Sci-Fi and Fantasy kits not only of 20 years ago, but today as well and
is something one just has to get used to when doing these types of kits. Overall,
I am happy with the results. I have wanted to build this kit for years, but wasn't ready to pay collector's prices for one. It is great that Airfix chose to reissue this kit and to include the Pan Am markings.
For a kit with so few parts, it took several weeks to finish. Ican lay the blame on the generally poor fit of the kit. This is very typical
of most Sci-Fi and Fantasy kits not only of 20 years ago, but today as well and
is something one just has to get used to when doing these types of kits. Overall,
I am happy with the results. I have wanted to build this kit for years, but wasn't ready to pay collector's prices for one. It is great that Airfix chose to reissue this kit and to include the Pan Am markings.
While any competent builder can make a good model of this kit, it isn't recommended for the beginner or the faint of heart!
| REFERENCES |
References were multiple viewings of the movie 2001.
May 2000
Copyright ModelingMadness.com. All rights reserved.
Review copy courtesy of me and my wallet!
If you would like your product reviewed fairly and fairly quickly, please contact the editor or see other details in the Note to Contributors.