Wave 1/20 SK 362 Panzer Spahwagen 'OSKAR'
| KIT #: | MK-042 |
| PRICE: | 5440 yen from www.hlj.com |
| DECALS: | Several options |
| REVIEWER: | Scott Van Aken |
| NOTES: | New tool kit |
| HISTORY |
The OSKAR's history (from the Wave description):
It is October, 2885. Having triumphed in operation Super Hammer, the Strahl were moving rapidly forward with their conversion of the units assigned to the Earth conflict to a completely unmanned force. Despite having gained control of space, it was clear that the conflict would continue to expand. The development and deployment of further unmanned weapons was essential to boosting the power of their limited forces currently deployed.
Acknowledging the reconnaissance abilities of their principal bipedal
tank the Kurote, the Weapons Division of the Strahl Defense Forces Headquarters
sought to deve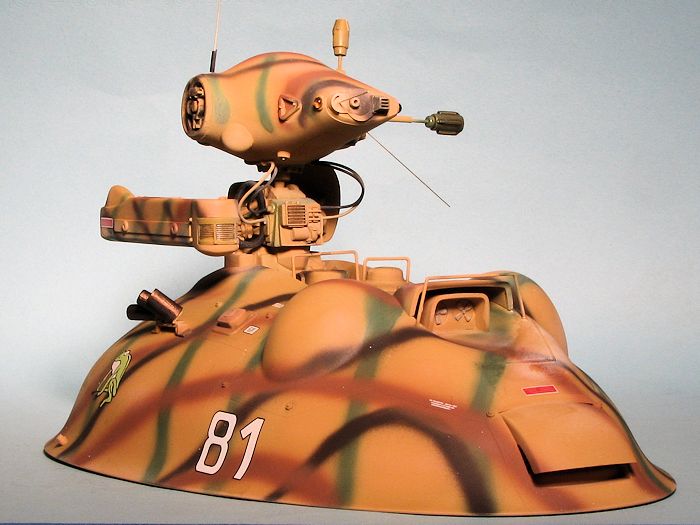 lop a new version which matched the current one's weaponry and
defensive capabilities, while at the same times boosting its reconnaissance
ability, effective range and maximum mission duration.
lop a new version which matched the current one's weaponry and
defensive capabilities, while at the same times boosting its reconnaissance
ability, effective range and maximum mission duration.
The answer created by their Engineering Division was an unmanned vehicle best described as a simplified version of the Neuspotter, employing the hover technology already in wide use among their armored vehicles, together with the same sensor array employed on the Neuspotter. Because of this, the Neuspotter's nearly silent propulsion technology was abandoned, but in trade the machine had a significantly greater payload capability, allowing the mounting of weaponry far heavier than the Neuspotter's light guns. Since the original concept was for a combat/reconnaissance unit, it's noise during movement was never really considered to be a problem. Rather the fact that it could be built for roughly 1/3 the cost of the Neuspotter while retaining the same reconnaissance ability was the focus of attention. As a result, 15 prototypes were built and tested, and following testing the type entered mass production in nearly record time. Protected by 100mm of hardened armor and 20mm of hybrid super ceramics, it was armed with a twin 40mm rocket tube with auto loader, and named "Oskar."
10 prototypes and 50 secondary prototypes went into service in North American and Australia in October of 2885, but the low dependability of the auto-loader mechanism led to the development and deployment of a heavier armed version mounting a linear gun.
| THE KIT |
I have come to realize that WAVE kits are superbly done. They are free of flash, sink areas and pesky ejector pin marks on surfaces where you wish they were not. They also offer some interesting subjects, including this vehicle that is part of a rather extensive series of similar subjects dating back about 20 years. Now I'm not that much up on the series, but this one seems like it is a new tool kit, at least based on the 2014 date on the box.
WAVE has
provided all the bits you need to make an exemplary model. This includes not
only a large photo etch fret for the underfuselage exhaust vents, but also
several sections of brass rod as well as vinyl tubing and some rather long
spring sections (not shown). There is also a sprue of vinyl inserts for
 all the
moving bits that are offered on this one.
all the
moving bits that are offered on this one.
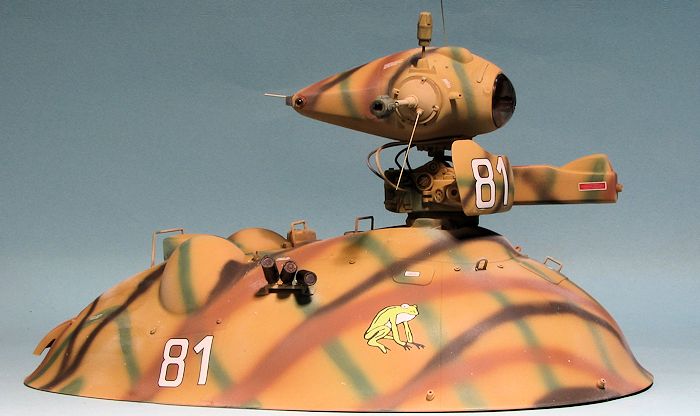
The kit can logically be broken down into two major subassemblies. The first one is the sensor unit and its mount. In fact, this section takes up six of the ten construction steps. I is also where you use the spring sections and the vinyl tubing. Attached to the side of the power unit/mount is an arm that attaches to a long rectangular sensor unit. There are also various antenna attached to these units, which is why you have the several diameters of brass wire included in the kit.
All of the above fits onto the main hull. This has things like grenade/smoke dischargers, exhaust section and is where you use all the rest of the brass rod. There are quite a few handles and hand holds on the upper surface which the modeler will need to bend from the wire. The instructions provide a full size guide to all these bits and offer both front and side views where needed. None of it looks too difficult for those who have done this before. It would have been nice to have had a bending form included to get the interior angles right, but I'm sure most of us will have something we can use for this.
Instructions are nicely drawn and like all WAVE kits, is in Japanese. Included in the box is a card that provides recommendations for three different painting and marking schemes. With kits like this, it is not a requirement that one be a slave to 'accuracy' as anything goes that seems logical. The included decal sheet is very nicely printed and gives the builder plenty to work with. For the stencils, there is a guide provided.
| CONSTRUCTION |
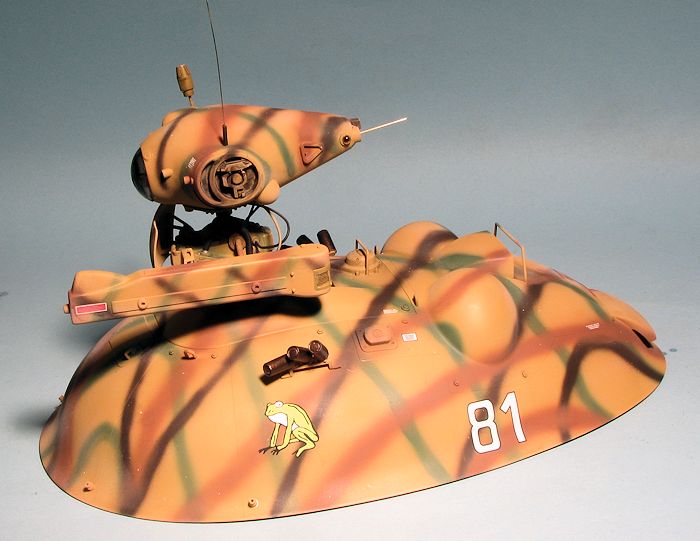 The kit also has a number of rather small parts that need to be
installed. This includes some vent looking bits on the large sensor
turret as well as quite a few bolt heads that go on the main hull. These
are not difficult to install and thanks to the somewhat soft plastic
(harder than Airfix's and softer than Hasegawa's), clean up quickly. One
does have to pay attention to where all these bits go as on some areas
(like the assembly to which the turret attaches), just what goes where
takes a bit of sleuthing.
The kit also has a number of rather small parts that need to be
installed. This includes some vent looking bits on the large sensor
turret as well as quite a few bolt heads that go on the main hull. These
are not difficult to install and thanks to the somewhat soft plastic
(harder than Airfix's and softer than Hasegawa's), clean up quickly. One
does have to pay attention to where all these bits go as on some areas
(like the assembly to which the turret attaches), just what goes where
takes a bit of sleuthing. The underside plate gets the three photo etch pieces. These are held in place by parts that are supposed to represent the blower vanes for the hovercraft.
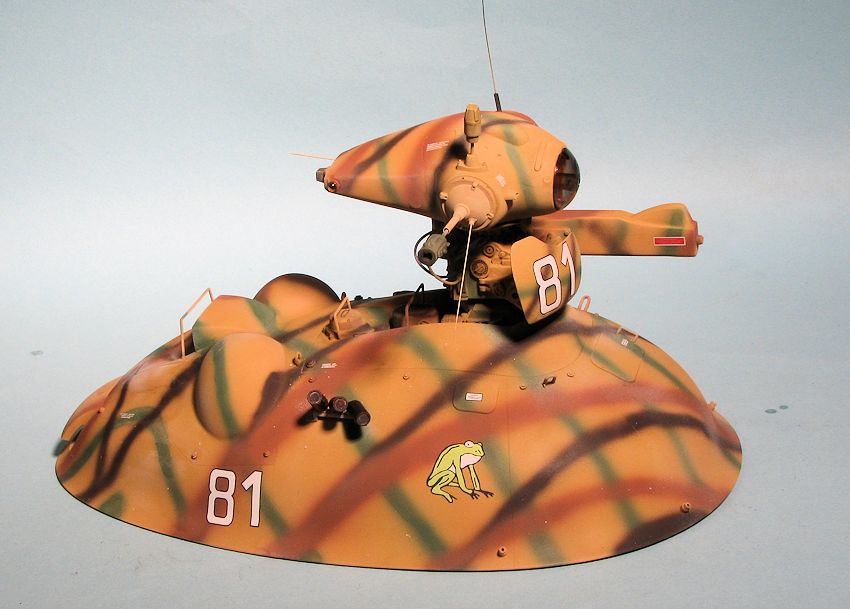
| COLORS & MARKINGS |
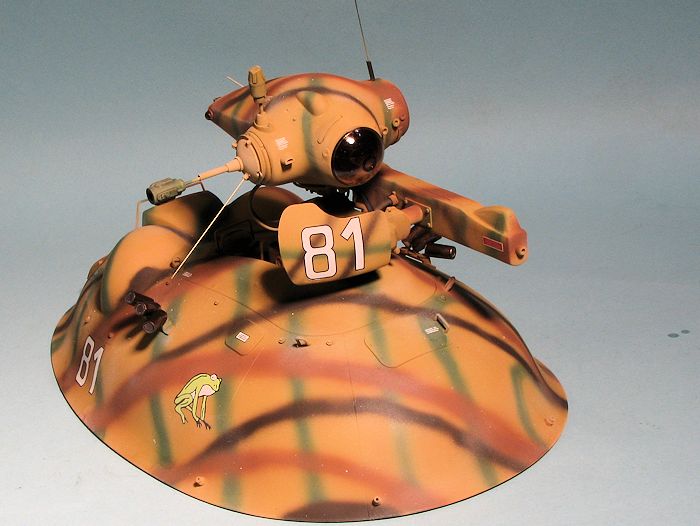 When it came to painting, I first installed the large sensor mount into
the upper hull and then painted everything with a desert tan shade. I
then criss crossed all the pieces with green and browns. I wasn't too
careful and actually got a bit sloppy. These would have been field
painted anyway. I then used various washes to help emphasize some of the
bits and pieces. As for the underside, I just painted it tan and left it
alone. The model will be sitting on this and will rarely be seen unless
you pick it up and look at it.
When it came to painting, I first installed the large sensor mount into
the upper hull and then painted everything with a desert tan shade. I
then criss crossed all the pieces with green and browns. I wasn't too
careful and actually got a bit sloppy. These would have been field
painted anyway. I then used various washes to help emphasize some of the
bits and pieces. As for the underside, I just painted it tan and left it
alone. The model will be sitting on this and will rarely be seen unless
you pick it up and look at it. | CONCLUSIONS |
I don't know how popular the MAK series might be, but most of those I know who build Sci-Fi have done one or have one in their stash. This is a nice one and I have to say that no worrying about accuracy makes a build that much more pleasant. Overall the fit is excellent and aside from having to drill out some attachment holes for the cables, it was a smooth build. A neat subject and if you are into this sort of thing, pick one up.
| REFERENCES |
Skwadron Signal's 'SK 362 in Aktion', Lothar Gundeschildt, 2906.
January 2015
Thanks to www.hlj.com for the preview kit. You can find this kit at this link.
If you would like your product reviewed fairly and fairly quickly, please contact the editor or see other details in the Note to Contributors.