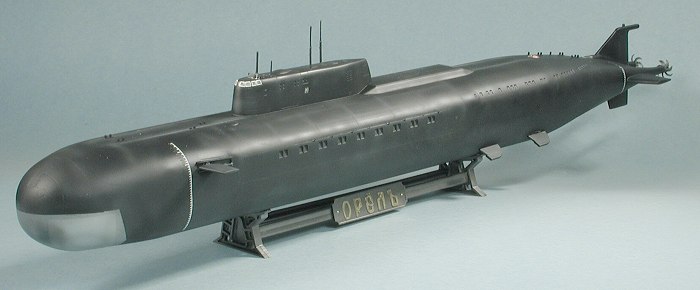
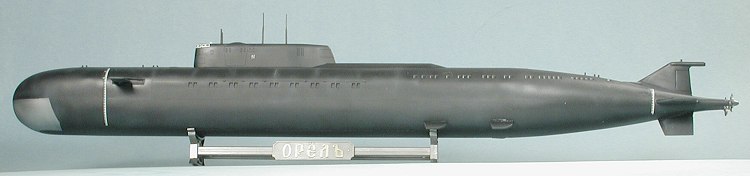
Zvezda 1/350 K-266 'Oriol' submarine
|
KIT # |
9010 |
|
PRICE: |
$30.98 MSRP |
|
DECALS: |
yes |
|
REVIEWER: |
|
|
NOTES: |
As usual with modern subs, not a lot of parts. |
|
BACKGROUND |
Please visit the preview for a look at what
is in the box.
|
CONSTRUCTION |
However, the upper ones
were not so kind. Actually, unless I screwed something up in a big way,
they are either not wide enough or don't have sufficient curve to them to
match the surrounding hull. I suspect a bit of both. The end result was
that I had to use quite a bit of filler on these doors to
Now you are probably wondering why I didn't just match the
upper surface and use plastic strip to fill where it meets the lower door.
The problem here is that the upper and lower door mating surfaces are not
smooth, but an interlocking mesh. I felt it more important to try to keep
that intact rather than to sand it all away and insert the strip. I'm
thinking that would have been the better choice. Anyway,
with that underway, I assembled the conning tower. It consists of two
sides, and inner section to hold the various antenna, and a top piece.
Fitted into the forward edge of the upper piece are clear windows. I glued
these all together and sanded the joins, later polishing out the window
area. During this construction one is given the option of having all the
periscopes and other bits jutting out of various upper hatches. To me, that
would have looked quite cluttered so I chose to have these hatches closed
as it would be on a sub deep under the water. Fit of these hatches is quite
good. Back at the hull, the two vertical fins were glued on
and the join lines filled and sanded. The conning tower was then glued in
place and the join line there also filled where needed. The various radio
masts were then glued in place. On the hull, I decided to have the dive
planes out so that insert was glued on. When on the surface, these are
behind closed doors. There are four of what I guess are stabilizing fins
that were glued to the lower rear hull section. Now all of this took
me about two weeks of work, mostly because of the filler needed for the
hull. At this time, the stand was glued together and it was time to paint. PAINTING
Basically, this boat is overall black. Not exactly a tough paint scheme and
one easily done. First though, the lower forward part was painted aluminum.
I guess it is where there are some sort of sensors that would be hampered
by paint. The props
Zvezda decals worked quite well. They are thin, opaque and reacted well to
setting solutions. What they didn't do was come off the paper easily. It
seems that the 'slidy stuff' on most decal paper is not present with the
Zvezda decals and I couldn't slide them off the sheet. I ended up having to
pick up one end with a pair of tweezers and then lift the decal from the
paper backing and onto the model. Fortunately, the decals are not
ultra-thin and could survive this kind of handling with aplomb. Once they
were in place and dry, I gave the sub a coat of matte clear using my usual
formula of Future and Tamiya flat base.
Then I went and sprayed a few areas with RLM 66 dark grey to give a sort of
streaky appearance. When done, it seemed to me to be a bit too much, so I
went back and misted on some more flat black to cut back on the streaks.
The eventual effect seems quite pleasing to me and does break up all that
solid black.
 Well, you'd
think that a model with fewer than 30 parts would be a pretty simple build.
In many cases that would be true, but this one had a few surprises for me.
Naturally, I started with the two main parts; the hull and conning tower.
The fit of the hull was actually pretty good, though with such a long seam,
it was inevitable that filler would be needed. One of the options is to
build it with the full launch doors open, but to me, that takes away from
the sleekness of the boat so I wanted the doors closed. Besides, there
isn't really that much detail to be seen anyway. The lower doors fit
beautifully with no trouble.
Well, you'd
think that a model with fewer than 30 parts would be a pretty simple build.
In many cases that would be true, but this one had a few surprises for me.
Naturally, I started with the two main parts; the hull and conning tower.
The fit of the hull was actually pretty good, though with such a long seam,
it was inevitable that filler would be needed. One of the options is to
build it with the full launch doors open, but to me, that takes away from
the sleekness of the boat so I wanted the doors closed. Besides, there
isn't really that much detail to be seen anyway. The lower doors fit
beautifully with no trouble.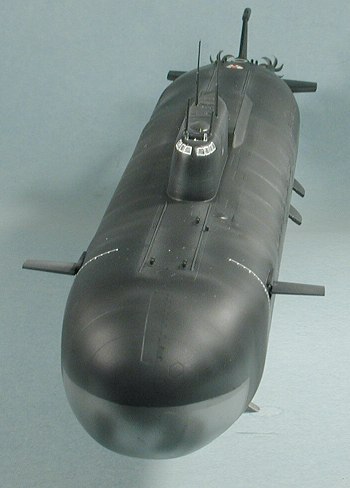 smooth out the rather large
step up from them to the surrounding hull on the fore and aft sections. I
used epoxy putty for this as regular putty would have required multiple
applications to build up enough to meet the hull. As it was, I should have
done this build up along the entire door.
smooth out the rather large
step up from them to the surrounding hull on the fore and aft sections. I
used epoxy putty for this as regular putty would have required multiple
applications to build up enough to meet the hull. As it was, I should have
done this build up along the entire door.
 were
painted in a steel color and the base in magnesium, all using Alclad II.
The black was Testors Model Master thinned with lacquer thinner so it would
dry quickly. When dry, a couple of coats of Future clear acrylic gloss were
applied to give a base for the decals.
were
painted in a steel color and the base in magnesium, all using Alclad II.
The black was Testors Model Master thinned with lacquer thinner so it would
dry quickly. When dry, a couple of coats of Future clear acrylic gloss were
applied to give a base for the decals.
|
FINAL CONSTRUCTION |
Not much to the final bits other than to glue on the props (they are handed so make sure you get the proper ones on the proper side), and the 'windscreen' to the conning tower. The dive planes have a mounting post that is way too long so it was trimmed back and glued in place. The last thing to do was to paint the lettering on the base and this was done with a gold paint pen.
|
CONCLUSIONS |
It is really surprising how large this submarine actually is. It takes up a LOT of space in my display case and dwarfs the 1/400 Alfa sub I built a few months ago. I enjoyed the break from aircraft and find that I have an affinity for submarines, having built several over the last few years. Other than the problem with the missile doors, I found it a pleasant experience.
July 2003
#1273 in a series
Copyright ModelingMadness.com. All rights reserved.
If you would like your product reviewed fairly and fairly quickly, please contact the editor or see other details in the Note to Contributors.