Hasegawa 1/48 Saab J.35F/J Draken
| KIT #: | 07241 |
| PRICE: | 3600 yen |
| DECALS: | Three options |
| REVIEWER: | Scott Van Aken |
| NOTES: | New mold kit |
| HISTORY |
As the jet era started, Sweden foresaw the need for a jet fighter that could intercept bombers at high altitude and also take on fighters. Although other interceptors such as the US Air Force's F-104 Starfighter were being conceived during the same period, Saab's "Draken" would have to undertake a combat role unique to Sweden. Other demanding requirements were the capability to operate from public roads, used as temporary airfields and for refueling/rearming to be carried out in no more than ten minutes, even by conscripts with minimal training. In September 1949, the Swedish Defence Materiel Administration issued a request for a fighter/interceptor aircraft, and work began at Saab the same year.
 Draken's design incorporated a distinctive "double-delta" configuration, with one delta wing within another larger delta. The inner wing has an 80° angle for high speed performance, while the outer 60° wing gives good performance at low speeds. Propulsion was provided by a single Svenska Flygmotor RM 6B/C turbojet (Rolls-Royce Avon 200/300). A ram turbine, under the nose, provided emergency power and the engine had a built-in emergency starter unit. The Draken could deploy a drag chute to reduce its landing distance.
The double-delta shape was so revolutionary that it warranted the only sub-scale test aircraft built in Sweden: the Saab 210, unofficially nicknamed "Lilldraken" (the little kite). The Saab 210 tested the concept of the double delta, first flying on 21 January 1952. The 210's successful testing results led to an order for three full-size Draken prototypes. The first prototype, not fitted with an afterburner, made its maiden flight on 25 October 1955. The second prototype, equipped with an afterburner, on its first flight, unintentionally broke the sound barrier while climbing.
Although not designed to be a dogfighter, the J 35 Draken proved to have good instantaneous turn capability and was a very capable fighter. It entered service in 1960 with the Swedish Air Force; 644 Saab Drakens were built for Sweden as well as other European nations. Sweden's Draken fleet came in six different variants while two Draken models were offered for export. The early models were intended purely for air-defense. The last model built was the J 35F, the final variant to remain in Swedish service. These aircraft have now been retired and replaced by the Saab Gripen.
The J 35 Draken design underwent several upgrades. The last was the J 35J version, in the late 1980s, although by then, the Draken had been almost totally replaced by the Saab Viggen in Swedish service. The J 35J was a service-life extension program since the delivery of the new Saab JAS 39 Gripen was still in the development stage and suffering from delivery delays. The extension program was to keep the Draken flying into the 2000s, but due to cutbacks and high maintenance costs the Draken was eventually phased out. The Swedish Drakens were officially retired in December 1998, although the type remains in limited 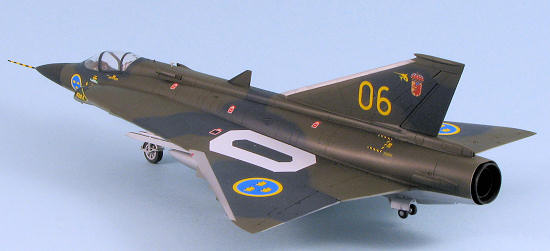 numbers in both military and civilian versions. Export customers included Denmark and Finland. In 1985, the Austrian Air Force purchased 24 J 35D s totally reconditioned by Saab, designnated J 35Ö.
All Drakens are interceptors with limited air-to-ground capability, with the sole exception of the Danish Drakens, which are strike aircraft capable of carrying AGM-12 Bullpup missiles, advanced "jammers", and increased internal and external fuel stores. The Danish Drakens are so far the heaviest of the series to have been in service. Danish F-35 aircraft were retired in 1993.
Finland updated its 35X fleet with new avionics, cockpit displays, navigational/attack systems and electronic countermeasures during the 1990s but finally retired the Draken in 2000.
Austria was the last country to operate the Draken in military service. They bought refurbished J 35D which was the last variant with two internal cannon due to the Austrian restriction of not being allowed to carry air-to-air missiles. These Drakens were retired in 2005, when they were replaced by former Swiss Tiger IIs, while waiting for new Eurofighters.
In the United States, the National Test Pilot School (NTPS) owns six Drakens that were formerly in Danish service; of these, two TF-35XD s and one RF-35XD are operational, based at the Mojave Spaceport.
| THE KIT |
A real surprise to most modelers when announced a while back, the 1/48 kit has much of the look of the much earlier 1/72 variant, a kit that seems to disappear from the shelves with much speed when new boxings are done. There is probably only one good way to mold a Draken kit, and that is with separate upper and lower fuselage halves. The fin and end wing sections are separate and come in two halves.
The cockpit is well done with raised detailing and the option that many of us choose; to install the decals provided over the top of them. Separate rudder pedals and side insets are provided for the cockcpit as well as a nicely done four piece bang seat, which is wisely shown being installed in the last construction step. The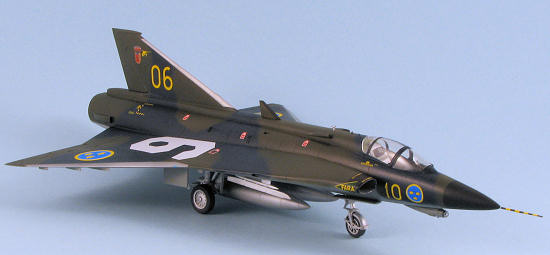 re are holes to open up for the J model behind the intakes for the missile rails and one is provided with an AIM-4D Falcon or two different Sidewinder variants. Also needing opened are holes for the drop tanks if one wants to use them.
The kit provides inserts for the leading edge of the inner wing section to take care of the cannon (which are not used on this boxing) and on the spine for coolant intakes. The engine intakes are a single piece and very well molded. Weight is required and will fit into the two piece nose cone. Drakens had a tail wheel to prevent striking the rear fuselage on takeoff and this was normally down on the ground.
Molding is what one would expect from Hasegawa and is excellent. This also means that you will find ejector pin holes or mini-towers on the landing gear legs, on one side of all the pylons, and on the one-piece nose wheel. Why Hasegawa is unable to eliminate all these markings has always been a puzzle.
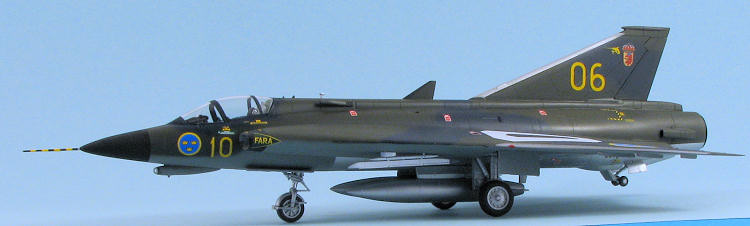
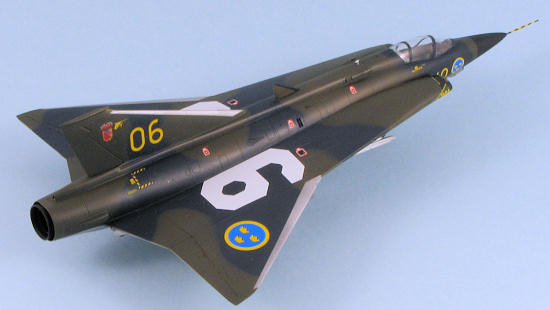
Instructions are superb and provide the now no-longer-imported Gunze paints. FS 595 numbers are provided for some of the exterior finish colors. Markings are for two planes. One is the box art plane from Div 3/F10 in Olive Drab and Midnight Blue over Neutral Grey with bare metal leading edges to the flight surfaces and a major portion of the underside of the fuselage. Two different planes from this unit are provided, one being an F version with large white numbers on the upper wing and the other a J without the big numbers. The third is from Div 2/F10 and is a J model in the greys of 36230 over 36622. This one has the large day-glo upper wing numbers. the decal sheet is excellent and has true whites and reds. Hasegawa has also done a great job on the day-glo lettering as it is quite brilliant.
| CONSTRUCTION |
In a break with tradition, I actually started with the cockpit, along with some other sub-assemblies. The latter consisted of fuel tanks, tank pylons, nose cone, tail cone, wings (where I forgot to open the holes for the wing pylons), main wheels and the seat. This latter item is shown installed at almost the last step. Care is needed when installing the small lower wing fences on the outer wing sections to keep from installing them backwards.
The cockpit is well provisioned with a nice side panel and raised detailing on the instrument sections. A decal that matches these instruments is provided and I applied that over the painted panels.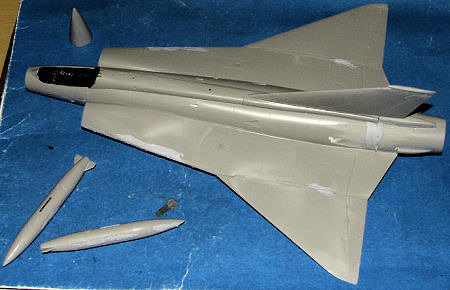 This actually works quite well, though a skilled painter can make the panels look even better. Once the cockpit was built up, it was placed on the lower fuselage half. I also opened the holes for the IRST, fuel tank and missile pylons.
My next step was to cement the fuselage halves together as well as glue on the fin and wings. Then the tips were applied to the latter. Care is needed when attaching these so I recommend a somewhat slow setting cement. I then attached the tail cone (which was a poor fit). In fact, I had to use several sessions of putty application to get this piece smoothed in. Not sure what the problem was. Nose and intakes also needed some filler.
In order to have all the different variants, Hasegawa has several inserts on the leading edge of the wing and in the avionics bay behind the cockpit. The latter fit quite well. The wing inserts were a tad small so one has to take care or use filler to smooth things out. I had the latter. The modeler has the option of cutting out the wing formation lights and inserting clear lenses. I chickened out and did not do this. Then I glued on the nose cone (in which I placed the required weight), engine inlets (which are quite deep and make painting the back of them problematical) and applied the usual filler.
By this time, I pretty well had a complete airframe. So it was time to do some painting.
| COLORS AND MARKINGS |
I masked off the cockpit and sprayed the center of the lower fuselage with Humbrol #11 aluminum. I must have gotten one of those 'bad batches' that some have commented upon as the second time I opened the tinlet a couple of days later on, I found that much of the paint had turned to a jell of some sort. It was a fresh tinlet the first time I opened it so I'm not pleased.
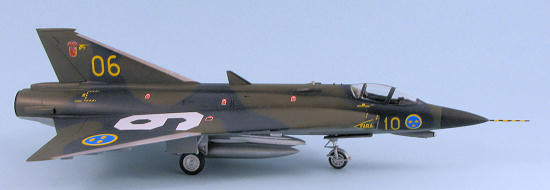 That was masked off and the underside painted in Testors 'Aggressor Grey' enamel. The upper surface was painted with FS 34097, again from the Testors line for the green. Using my Skybow AB 100 detail air brush, I painted the dark sea blue camo pattern. The box side photo shows this as a hard line and I'm sure the Hasegawa model builder masked it, but it seems to me from looking at photos that this was not done in service so I free-handed the scheme. I did the usual back and forth to get things a bit better.
Next the nose and leading edge of the upper antenna were painted black. The leading edges of the wings and fin were masked and painted aluminum. Intakes were Burnt Iron with black leading edges. As you can tell, lots of masking was done, for if one doesn't mask everything, then overspray WILL find the place you missed! Everything was given a coat of Clear/Future and then it was time to put it on its gear.
I find it easier to do decals and fiddly bits if the plane is on the landing gear. In this case, landing gear and fiddly bits are one in the same as each leg consists of multiple bits; the nose gear being particularly fussy. I glued them in place once complete and found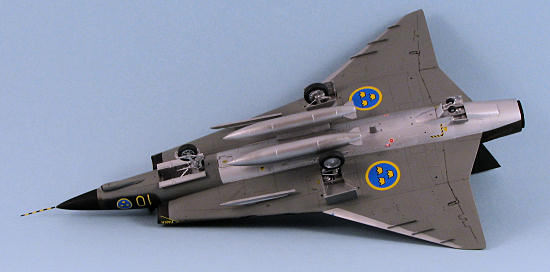 that the retraction link on the nose gear, which tends to hold the gear in place, was a bit too narrow for the slots in the nose well into which it fit. Regardless, I did manage to get the gear glued in place and gave it a full day to cure. Going back a bit, all the gear parts, wheels and inside gear doors were painted aluminum. I used BMF Chrome for the oleos.
Once it was on its gear, I glued on the gun sight and the seat. Then the canopy bits, which had been masked earlier, were attached. As there was some bare areas around the cockpit caused by the earlier mask, I did some touch up painting during that session, followed by a bit more Clear.
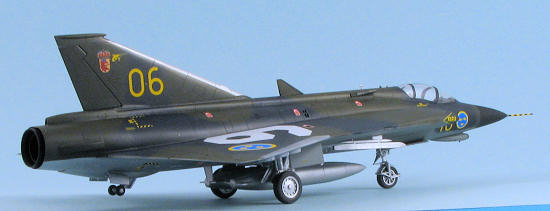
The kit's decals were a delight to use. They reacted well with Microsol and the whites and yellows were nicely opaque. Though there are a lot of data decals, it is nothing like what festoons Phantoms and Eagles. Probably the most difficult decal to apply was the black and yellow banded one that wraps around the nose pitot. You may want to paint that.
| FINAL BITS |
 With the decals in place, the gear doors were attached as was the lower radio antenna. I glued the RAT door closed. This door is too small for the opening so I had to stuff tissue in there to keep it level with the rest of the bottom of the plane. I also managed to snap one of the small main gear actuators while removing it from the sprue. The fuel tank pylons were glued on and the model was then given a coat of matte clear. Actually it is more semi-matte than full matte and looks appropriate.
This left few other pieces. I glued on the wing missile pylons (Hasegawa provides no weapons for this kit) and the fuel tanks. Last pieces to go on were the afterburner section, the clear section for the IRST, and the nose probe, probably the most breakable part n the kit. A bit more detail painting, the masking was taken off the canopy and that was it.
| CONCLUSIONS |
Aside from the poor fit of the aft fuselage section (which could be operator error), this is a superlative kit from Hasegawa. I know that not all will like it, but those of us who are entranced by the shape will be thrilled to have a quality kit of this important Cold War aircraft. Now, if we could only get Hasegawa to provide decent weapons.....
| REFERENCES |
May 2008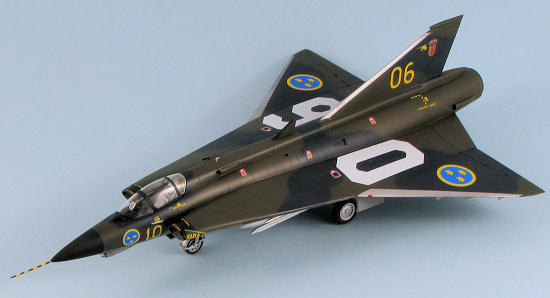 http://en.wikipedia.org
Copyright ModelingMadness.com. All rights reserved. No reproduction in
any form without express permission from the editor.
If you would like your product reviewed fairly and fairly quickly, please contact the editor or see other details in the Note to Contributors.
Back to the Review Index Page
2017