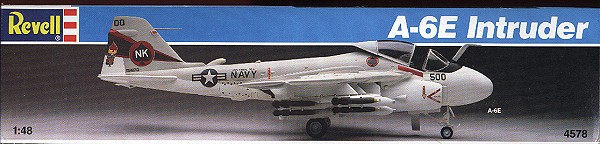
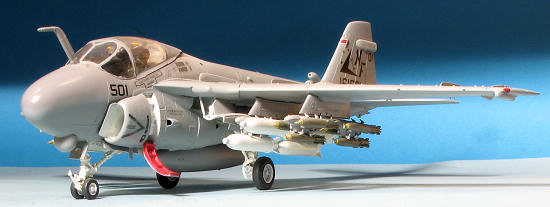
Revell 1/48 A-6E Intruder
Kit Number: 4578
Price: $18.98
Decals: 2 versions, both USN; VA-196 in full color, VA-55 in LV greys
Reviewer: Scott Van Aken
The A-6 Intruder was for years, the US Navy's premier attack aircraft. First seeing duty in Vietnam and finally in Desert Storm, it evolved into a tried and true platform capable of carrying very heavy loads a long distance and being strong enough to bring its crews home despite severe damage. Finally retired in 1996, it was replaced by the less capable, but newer and easier to maintain F-18 Hornet. The A-6 line is still flying as the EA-6B, a capable jammer that is now the nation's only tactical jamming aircraft.
The Revell kit is the most up to date and desirable version of the A-6 in
1/48 scale. The other kit being a very old and much less detailed Fujimi
A-6A. This kit is marked 1988 and is quite typical of Monogram/Revell
kits of that time, consisting of excellent detail, all of it raised. When
first opening the huge box, one is overwhelmed with the sheer amount
of plastic. Unlike certain Japanese kits, Revell chose to offer a large
assortment of weaponry including 12 Snakeye bombs, 8 cluster bombs, and a
pair of Harpoon missiles. It also includ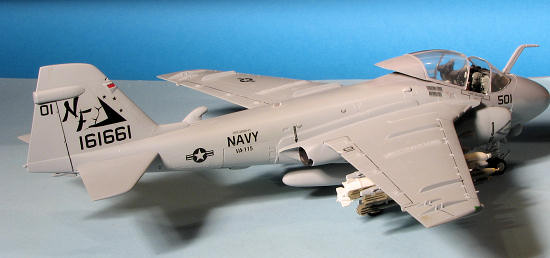 es long range fuel tanks.
There are options to make either an A-6E rebuild (from an A-6A) or
a new build A-6E. I chose the latter for my kit.
es long range fuel tanks.
There are options to make either an A-6E rebuild (from an A-6A) or
a new build A-6E. I chose the latter for my kit.
Once the version and weaponry were decided upon, the unneeded parts were consigned to the spares box. That made the kit less daunting. Naturally I started with the interior, painting it dark grey and detailing the required bits. The cockpit is well detailed with lots of knobs and levers to paint and drybrush. You have a choice of instrument panel depending on which A-6E you are building so be sure to choose the right one.
Rather than go into a long explanation of the building process, check out the step by step sequence at the bottom of the page to get the sordid details. The only areas I had problems with were the underfuselage plug and the alignment of the bomb racks. The rest of the kit went together with little more than the usual (for me) fuss and filling. I also noticed that the canopy and frame do not fit well in the closed position so I would recommend leaving it open. Better to see all the work you put into the interior.
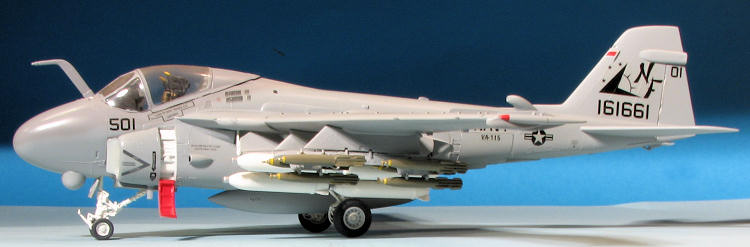
While the kit decals are highly usable, albeit rather glossy, I decided to do a Desert Storm A-6E from VA-115 off the USS Midway. Superscale provided a great sheet of four Desert Storm A-6E's; two Navy and two Marine. This meant spraying lo-vis greys. I used a mixture of Gunze and Testors paints to achieve the correct scheme, oversprayed it with clear and applied the decals. Naturally, I messed up a couple as I always do, but they are not that noticeable (I hope).
Revell's A-6E was not an easy kit to build so not recommended for beginners. It was an excellent value for the money and despite the nitpickers and naysayers, I will be building the EA-6B in the near future. The A-6E is not currently (February '97) available, but seems to be so popular, that it is only a matter of time before it is rereleased. If you can handle the few problems presented by the kit, then I highly recommend it.
1 Dec '96
 This kit was molded in 1992, and is
obviously a Monogram-designed kit as it has great raised surface detail as well as
great detail in the cockpit and wheel wells. It is also a very big kit,
coming in the same size box as the 1/48 DC-3. The first thing I noticed
was the great amount of cleanup that all the parts needed. The mold lines
are quite pronounced and took up a great deal of time. The kit decals
contain two very nice subjects but are very glossy, so I got a set of Desert
Storm decals from Superscale to replace them. I am still not sure which I
will use. Before the hiatus, I had given all the white parts two coats and had
assembled the wings and ordnance. For ordnance I have chosen not to use the HARM
missiles, but to use the bombs instead with a centerline tank. The wing
tanks have been assembled for use on my A-7E. There were a few
problem areas, mostly around the jet pipes that needed joints filled but are
difficult to get to. What we need are rod-shaped sanding sticks that can
have the ends cut off when they become worn.
This kit was molded in 1992, and is
obviously a Monogram-designed kit as it has great raised surface detail as well as
great detail in the cockpit and wheel wells. It is also a very big kit,
coming in the same size box as the 1/48 DC-3. The first thing I noticed
was the great amount of cleanup that all the parts needed. The mold lines
are quite pronounced and took up a great deal of time. The kit decals
contain two very nice subjects but are very glossy, so I got a set of Desert
Storm decals from Superscale to replace them. I am still not sure which I
will use. Before the hiatus, I had given all the white parts two coats and had
assembled the wings and ordnance. For ordnance I have chosen not to use the HARM
missiles, but to use the bombs instead with a centerline tank. The wing
tanks have been assembled for use on my A-7E. There were a few
problem areas, mostly around the jet pipes that needed joints filled but are
difficult to get to. What we need are rod-shaped sanding sticks that can
have the ends cut off when they become worn.
Since returning to building a few days
ago, I have done the following things: Assembled the 4 MERs. This is
quite a chore as they each require 12 bomb shackles and each shackle requires a
lot of clean up. I have also painted the interior parts Dark Gull Grey and
they are now awaiting additional painting and detailing. The seat bottoms
are molded with the interior and the backs are an assembly of four parts. The
fit is not great and they required quite a bit of fiddling to get right. I
have assembled the fuselage halves together and used a great deal of weight to
prevent tail-sitting. The cockpit is easy to get to while in the fuselage
so that will not detract from the detailing. I glued the fuselage in
sections to prevent misalignment. The area between the engines is a
separate part and fitting it properly is also quite time consuming and was glued
in stages. Even so, it has required a bit of putty to fill gaps and
mis alignments. The tail hook housing is separate, but fit reasonably well.
Also fit at this time were the engine intakes. The fuselage is now
puttied and drying awaiting the initial sanding, the biggest area for puttying
is the top of the fuselage where a pronounced step appeared despite my attempts
to prevent it.
alignments. The tail hook housing is separate, but fit reasonably well.
Also fit at this time were the engine intakes. The fuselage is now
puttied and drying awaiting the initial sanding, the biggest area for puttying
is the top of the fuselage where a pronounced step appeared despite my attempts
to prevent it.
7 Dec '96
I have finished puttying the fuselage and rescribing the destroyed detail. It took three applications, but looks very nice. Next to be attached are the wings/horizontal tail. I have added an additional coat of white paint to the gear wells and gear.
14 Dec '96
The wings and horizontal stabilizers have been attached. I needed more putty applications on the bottom rear of the wings, but it is a sturdy join. I have finished the cockpit and am getting ready to attach the transparency. The speed brakes have been attached and are a poor fit; one side seems too big and the other too small for the opening. I considered having them open, but there is no actuating mechanism and most photos show them closed. I have also attached the wing pylons and drilled out some of the numerous intakes. Still to be attached are a myriad of antennas and other accouterments prior to the first primer coat. I also need to paint the weapons and MER's.
21 Dec 96
I have painted the weapons with bombs
being OD and cluster bombs in white. The windscreen was attached
with epoxy and masked with Scotch tape after the interior was complete.
The canopy is attached to the back section. Glad it will be
displayed with it open as it does not fit at all well to the rest o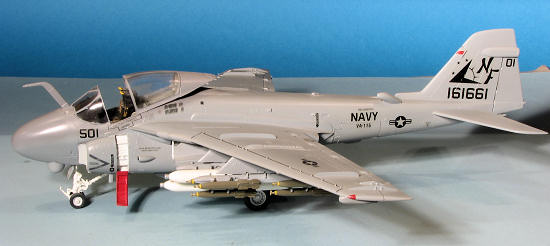 f the
airframe. I have given the gear a second coat of white and that is drying.
All that is left to do is the red for the crew access ladder and then that
will be masked and the real painting will begin. It is a large aircraft
and since it is below freezing outside (where I do my painting), it will be a
while before all the colors are applied. I still have to paint the wheels
and attach the various antennas and the TRAM.
f the
airframe. I have given the gear a second coat of white and that is drying.
All that is left to do is the red for the crew access ladder and then that
will be masked and the real painting will begin. It is a large aircraft
and since it is below freezing outside (where I do my painting), it will be a
while before all the colors are applied. I still have to paint the wheels
and attach the various antennas and the TRAM.
28 Dec '96
All the various bits and pieces have been added to the airframe. The canopy has been masked, the intakes filled with tissue and masked and the airframe painted. I wasn't sure if I should use the two or three grey scheme. The three grey scheme paints the canopy/nose section with 36237, so I used that scheme. Gunze paint was used. When dry it was sprayed with Future floor way. I have also painted the tanks and racks. The struts and wheel have been attached and the kit is awaiting decaling prior to fitting all the doors and ordnance.
4 Jan '97
This puppy has been decaled and yes, I did
screw up some of them like I always do. By the way, the Superscale
decal sheet I used is not only pretty devoid of information, but does not
include the insignia. This requires the purchase of an additional sheet
 (bleeding profiteers). It has been coated again and is now ready to have all the
other stuff (gear doors, bomb racks, and ordnance) hooked up. I still have
to paint all the markings on the ordnance. I'm loading this pig up with 8
cluster bombs and 12 500 lb Mk 82s as well as a centerline tank. More
later
(bleeding profiteers). It has been coated again and is now ready to have all the
other stuff (gear doors, bomb racks, and ordnance) hooked up. I still have
to paint all the markings on the ordnance. I'm loading this pig up with 8
cluster bombs and 12 500 lb Mk 82s as well as a centerline tank. More
later
11 - 26 Jan '97
No additional work although I did take the tape off the canopy!. I kinda like having it take up space.
2 Feb '97
Got slightly motivated and finished up the interior by painting the seats and adding the mirrors to the canopy. Also painted the fuses on the bombs.
9 Feb '97
Have been doing final assembly items.
This week was spent putting all the weapons on the MERS, not an easy job.
I have discovered that most of my bomb braces are crooked and the weapons
are not aligning properly. A real hassle. I should have
 this kit
finished by next week. I'm already clearing space for it in my display
case!
this kit
finished by next week. I'm already clearing space for it in my display
case!
17 Feb '97
Well it is finally done. After much struggle with gluing on the bomb racks, I added the final clear bits, gear doors and actuators. It now rests in my display case next to the Revell F-14D. This kit was a lot more work than I had originally planned, but the result is pleasing. It will be a while before I tackle the EA-6B.
2011 update: I knocked the dust of this one and redid the photos. Missing is the fin pitot tube and over the years I have had to reattach a number of weapons, but really, it looks pretty good for its age and until Kinetic or someone does this one, it is pretty much it in 1/48 for an A-6E (Fujimi does/did an A-6A, but it is pretty crude by comparison).
February 1997
Copyright ModelingMadness.com. All rights reserved.