Monogram 1/48 AH-1S Cobra
Kit Number: 5444
Price: $10.00
Decals : One version; a training unit with large orange panels
Date of Review: 2 April, 1996
Comments: I cannot think of any helo enthusiast who does not have at least one AH-1 kit in their collection. The first AH-1 I built was the 'cute' little 1/72 version in the equally small box about ten years ago. That is the AH-1G version used in Vietnam and had a great shark mouth. Monogram's 1/48 version is the S model (now redesignated AH-1F in an effort to confuse us and because the AH-1 suffixes are now at W) with the flat windscreen and the FLIR or LLLTV in the nose pod. The S version also has a three barreled gatling gun.
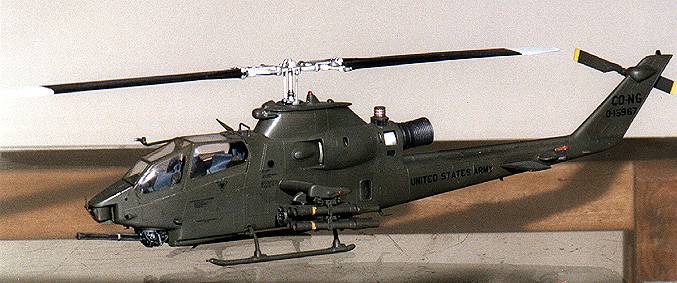
A couple of years ago while on a photo trip, I photographed the AH-1Ss of the Colorado National Guard in Denver. Ever since then, I have had a desire to build one. Monogram's kit comes molded in OD with nicely molded parts and very clear canopy. It also has a nice engine that can be seen through the various vents in the fuselage. While it is a simple assembly, the engine needs several different shades of Metallizer to really look convincing. The Monogram kit has a superb cockpit that begs for Reheat instrument decals and a good drybrushing. The cyclic and collective are nicely molded as is the armour plating around the seats. The rotor head needed a bit of cleaning up and, although a single piece, is a rather intricate molding that deserves your attention. I painted that and the shaft several shades of aluminum with a red rubber boot. You can build the kit so that the blades can be detached for moving/storage. The engine comes as a complete unit and needs a bit of attention to detail as it is visible via many openings in the fuselage. Make sure to fill these holes with tissue prior to painting. The rest of the kit assembled well. The one trouble spot is the attachment of the landing skids. They are molded as one piece along with the bottom section of the forward fuselage. I could not get a real good fit and had to use putty and sanding to get it to look good. I added some weight to the nose section to prevent tail sitting. The gun is supposed to be able to move in the horizontal and the vertical, but I glued it straight ahead as the attachment points on my kit were a bit loose. The nose pod comes complete with a traverse stop and clear lens. I painted the FLIR section a goldish red to match those I saw on the ones in Colorado. I also painted the 'Disco Lights' IR jammers the same goldish red and the effect is very convincing.
The canopy looks like you can display it with the doors open, but close inspection shows that you must cut some small sections off the side piece, and glue them to the stationary part so I epoxied them closed. The large, clear canopy allows all your interior efforts to be seen and appreciated. The kit was then masked and painted an overall faded OD. I used a few of the Monogram decals and wished I hadn't. They hate setting solution and refused to conform to the rivets. The rest of the decals were cut from Superscale lettering sets to make up the serial and the CO-NG on the tail. Finally the sensor probes and antennas were added and the whole kit sprayed a matt clear. Once the masking was removed, the IR jammers were painted with Future and the kit was dirtied up with pastels. It is important to dirty up the area under the engine exhaust as all helos are dirty there from the downwash of the blades.
The finished kit looks great (except for the Monogram decals) and, since it is pretty skinny, can fit just about anywhere on your display shelf. Highly recommended to builders with some experience.
Copyright ModelingMadness.com. All rights reserved. No reproduction in part or in whole without express permission from the editor.