Hobby Boss 1/48 EMB-314 Super Tucano
| KIT #: | 81727 |
| PRICE: | $53.00 SRP |
| DECALS: | Three options |
| REVIEWER: | Scott Van Aken |
| NOTES: | New tool kit |
| HISTORY |
 The Embraer EMB 314 Super Tucano, also named ALX or A-29 is a turboprop aircraft designed for light attack, counter insurgency (COIN), close air support, aerial reconnaissance missions in low threat environments, as well as providing pilot training. Designed to operate in high temperature and humidity conditions in extremely rugged terrain, the Super Tucano is highly maneuverable, has a low heat signature, incorporates 4th generation avionics and weapons system to deliver precision guided munitions. It is currently in service with the air forces of Angola, Brazil, Dominican Republic, Colombia, Ecuador, Chile, Burkina Faso, Mauritania and Indonesia, and has been ordered by Senegal and the United States Air Force. Brazil and Colombia have used the Super Tucano in combat operations.
| THE KIT |
This is the first injection molded kit of the Super Tucano in this scale. It is very typical of Hobby Boss kits in terms of having superb molding with nicely engraved panel line detailing. The cockpit contains a pair of nicely done bang seats, control sticks, and instrument panels. There are decals for the instrument panels and raised detail on the side consoles. The kit offers a photo etch fret and these bits are used for the seat harness and the HUD frame for the front seat.
 The nose gear well is in three parts and this fits into the forward fuselage. Though the instructions do not show it, I would install quite a bit of nose weight in this one as there is a lot of airframe aft of the main gear. Since the nose section which has the prop assembly is separate, one can wait until the kit is near completion before doing this so you are sure to get enough weight installed.
The cockpit is topped with a very clear canopy and windscreen. Both of these have seam lines running down the center of them. Looking at photos in the reference link, this seam is supposed to be there on the canopy and in fact, you may want to accentuate it as it is quite prominent. One does not seem to be on the windscreen so that is one you may wish to remove.
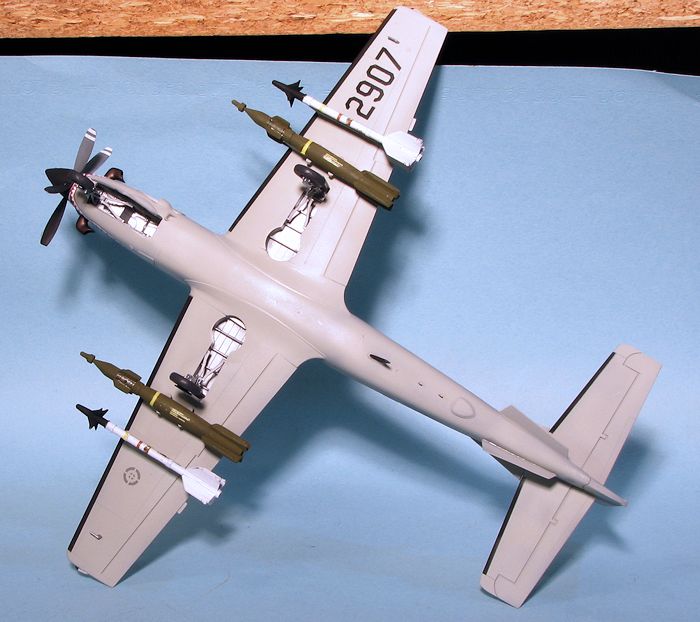
For the wings, there is wheel well detail molded into the upper section. Holes for the weapons pylons are already drilled out so those who want a clean wing will need to fill them. Landing gear is nicely molded with separate wheels both on the nose and main gear. Weapons pylons include anti-sway braces for the inner pylons. There are several under wing ordnance options that include fuel tanks, Mk.82 Snakeyes, AIM-9L/P Sidewinders, standard Mk82 slicks and GBU-12 LGBs. A loadout diagram is provided. One 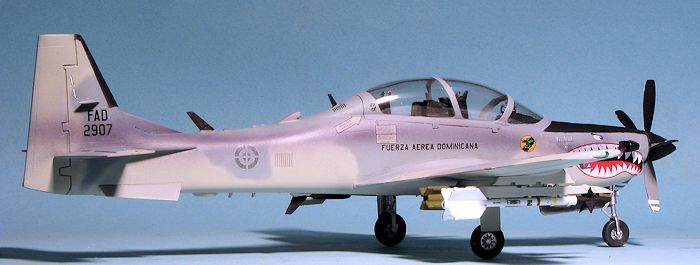 thing that may models (and modelers) miss is that on turboprop aircraft, the blades are feathered when the power is off. Hobby Boss got this right and the nicely done five blade prop is designed to be built feathered.
Instructions are nicely drawn with Gunze paint references. The full color camo and markings guide provide other paint options. Three sets of markings are provided. One is the Brazilian box art plane in a green over grey. In a similar scheme but in greys is a Colombian plane with a huge shark mouth. Finally, a Chilean plane in a wraparound SEA paint scheme. A nicely done decal sheet is included and all the options are quite fetching, making your choice a difficult one. Not shown is an additional sheet for weapons markings. The decals are nicely printed and work as well as any aftermarket.
| CONSTRUCTION |
 This kit was on my 'to build' pile ever since I got it in, but I was awaiting some alternate decals before starting. Thankfully, FCM came through with some that I wanted to use and so construction got underway.
I first painted all the interior bits with dark gull grey, while the seats were assembled along with the wings. The seats were then painted matte black aside from the seat cushion which got a buff shade. This was then set aside until later. The wings were then glued together with a bit of filler on the leading edges. I have to say that the fit of this kit is really very good.
Then, the nose gear well was assembled and installed in the left fuselage side. At this stage, I taped on all the major airframe parts to see how much weight would be needed as the distance between the main and nose gear is quite short. The instructions are mute on this subject and I figured that 14 grams was sufficient. I found out later that I was wrong. I glued that weight onto the top of the nose gear well. Meanwhile the interior was finished, in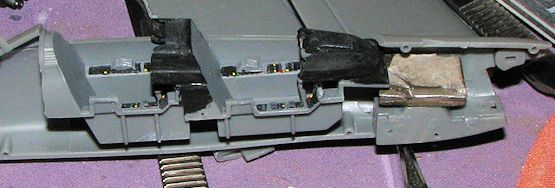 cluding highlighting the consoles with fake 'lights' just to add interest. Those who have worked on real aircraft know that you don't see much color at all on instruments or consoles unless you press the 'lamp test' button. But like equally unrealistic accentuated panel lines, this sort of thing is expected on models. The kit does provide decals for the two instrument panels. Once it was together it was installed and the fuselage halves were cemented together.
Once the fuselage was given its usual treatment to filler, I attached the wings, finding the fit to actually be quite good. Same goes for the tailplanes. I now had a rather complete fuselage and so assembled the forward nose section with the prop. The blades on this are feathered as they should be when the engine is not running. This was then glued on and fit is quite good. The seats were assembled along with the etched belts and those were glued into the interior. I masked the windscreen and canopy without bothering to remove the mold seam. Reason for this was that it was a bit off-set from one side to the 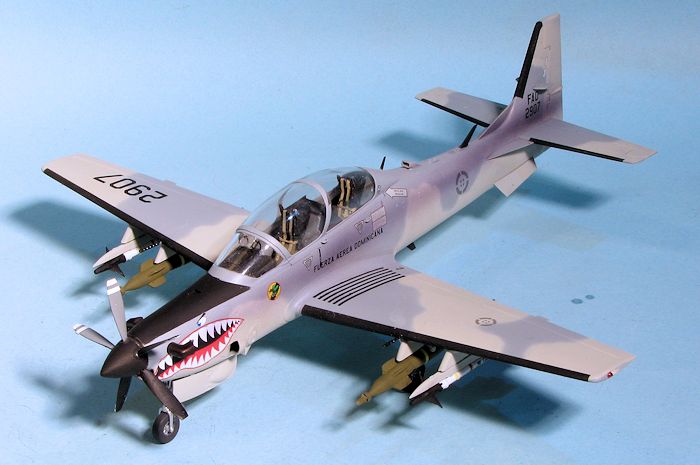 other and any attempt I made at removing that small step it would just make a bigger mess. These items were then attached after I assembled and glued on the photo etch gun sight for the front. The fit of the clear bits is actually quite good.
Returning to the rear of the kit, I cleaned up and attached both the ventral fins and the small stab extensions. There is naught but an engraved area on the fuselage to show where these attach, so one has to be careful when dealing with this part of the build. Some additional airframe bits such as the canopy handles, radio antennas on the fuselage and fin along with a vent on the lower fuselage were attached and it was time to do some painting.
| COLORS & MARKINGS |
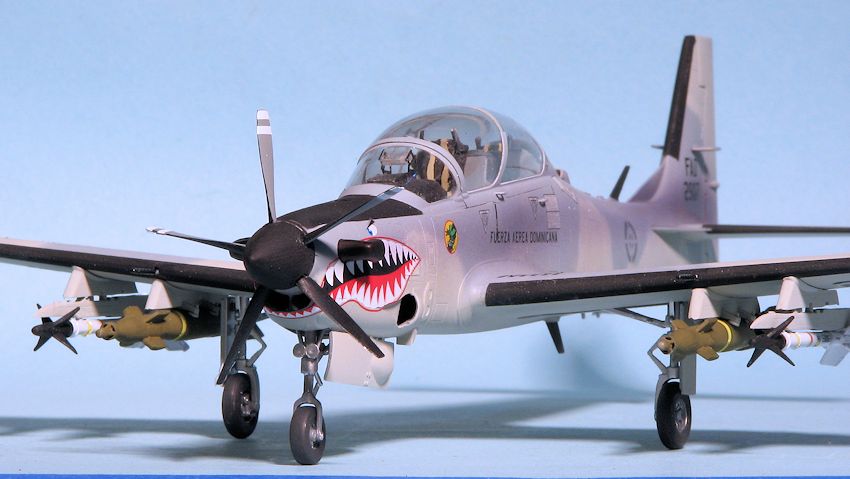
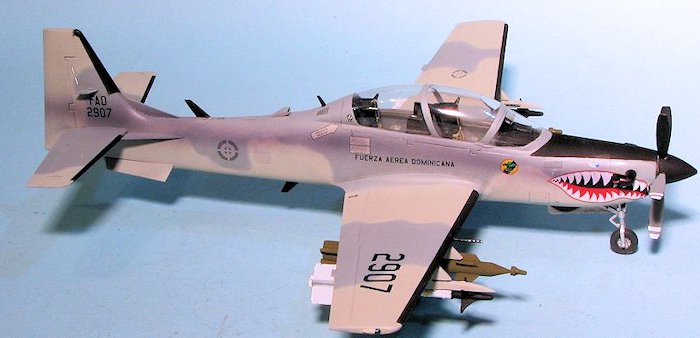
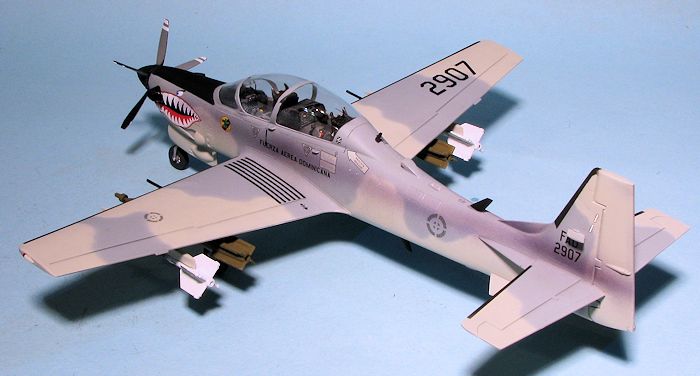
For this build I used FCM's recent sheet on the Super Tucano, FCM 48-047. All of the options are great and deciding which one to do was a real poser. Eventually, I chose the one from the Dominican Republic. This one is in FS 36492 undersides and FS 36375/36492 upper surfaces. I used Testors Model Master enamels for both colors, spraying the underside first. Then the lower surfaces of the tailplanes were masked and the darker grey was sprayed in a rough estimation of the pattern. I then went back over it with the lighter grey to provide the definitive camouflage pattern. when all that was dry, I sprayed on 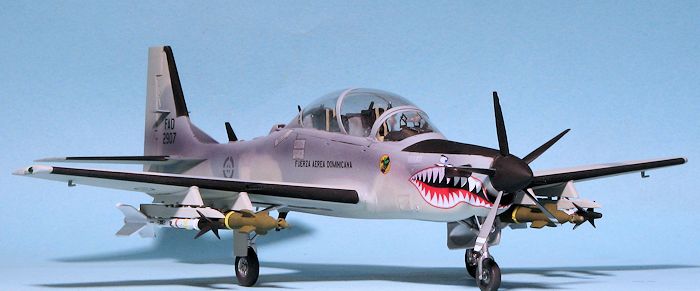 several coats of Pledge/Future gloss clear and then masked the airframe for the black leading edges to the flight control surfaces and the nose anti-glare panel.
With the paint in place, I assembled the landing gear. The wells on this as well as the gear legs and wheel centers were painted Alclad II Aluminum. It was then that I discovered that I had not put in enough weight. Fortunately, there are holes in the front of the airplane and I slid in small slips of lead until it sat on the nose gear. Eventually this took another 14 grams of weight making for a total of 28 grams of nose weight.
Now that everything was on its landing gear, I started applying the decals. The decals are very thin and so need some care when applying. I did not put on all the stencil decals as it would have added a week to the build. Once the decals were in place, I gave the airframe a coat of semi-matte clear.
| FINAL BITS |
For the final bits, I added the wheels and gear doors as well as prop spinner. The blades were brush painted black on one side and neutral grey on the other. I then glued on the weapons pylons. These are handed as you'll see when you get around to putting them in place. Once dry, the small wing pitot tubes were glued in place. For weapons, I decided on an improbable load out with GBU-12s on the inner pylons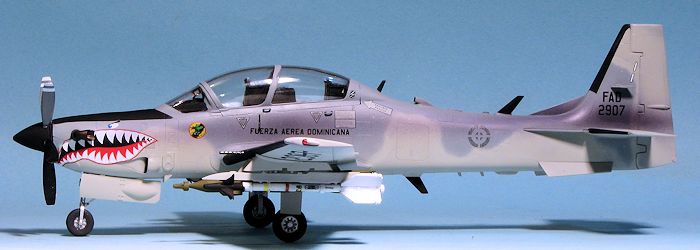 and AIM-9L Sidewinders on the outer pylons. I had to slim down the Sidewinder attachment points on the pylons to get them to fit into the holes in the missile. The anti-sway braces are too wide and as such, do not really hold the bomb in place. They are molded to fit something much bigger around. I did not use the drop tanks as I thought the plane looked dorky with them installed.
I then sprayed on exhaust stains using Alclad II smoke. Pictures of non-airshow Brazilian planes showed a prominent smoke stain all down the fuselage and including the fin. The masks were removed and the last items to install, the wingtip formation lights, needed the holes enlarged in order to fit. They were painted using AK Interactive's clear red and green and that was it.
| CONCLUSIONS |
I know the model has a couple of issues as Brazilian modelers told me about them after I did the preview. However, for most of us, this is the only reasonably priced option as the other kits around are either resin, expensive, or both and are made in Brazil. For those wanting the best accuracy, those would be your best bet, for the rest of us, this very nice looking kit not only goes together well, but looks very much the part when done. Should I ever do another (and it could happen), I'd be sure to really load up the nose with weight!
| REFERENCES |
http://en.wikipedia.org/wiki/Embraer_EMB_314_Super_Tucano
November 2014 Thanks to me for the review kit, FCM for the decals and AK Interactive for the clear paints.
If you would like your product reviewed fairly and fairly quickly, please contactthe editor or see other details in the