| KIT #: | KH80112 |
| PRICE: | Approximately $51.00 |
| DECALS: | Two options |
| REVIEWER: | Scott Van Aken |
| NOTES: | Includes photo etch fret |
| HISTORY |
The Dassault Mirage F-1 is a French air-superiority fighter and attack aircraft designed and built by Dassault Aviation as a successor of the Mirage III family. The Mirage F1 entered service in the French Air Force (Armée de l'Air) in the early seventies. Powered by a single SNECMA Atar turbojet providing about 7 tonnes-force (69 kN; 15,000 lbf) of thrust, the F1 has been used as a light multipurpose fighter and has been exported to about a dozen nations. More than 700 F1s have been produced.
When it became clear that the Mirage F1 was becoming a successful production aircraft, Dassault began investigating the possibility of a dedicated reconnaissance version for its most important client, the French Air Force. However, the esc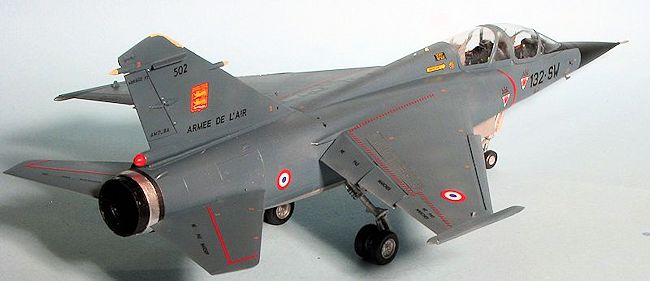 alating cost of fighter aircraft meant that add-on pods for this purpose were a more economical alternative.
Many French Air Force aircraft, as well as those of some export clients (such as Iraq's Mirage F1EQ), did indeed have a variety of reconnaissance pods available, which were attached to the underside of the main fuselage.
A two seat operational trainer, the F.1B was developed to help in the transition to the single seat F.1 variants. The fuselage was stretched to accommodate the instructor, fuel capacity was reduced and the cannon were eliminated. However, the two seat F.1 is capable of carrying the usual variety of underwing ordnance. Most of France's 20 F.1Bs were concentrated into one squadron, previously in EC 5 but when that group transitioned to the Mirage 2000, it was moved into EC 33.
| THE KIT |
When Kitty Hawk released its single seat Mirage F.1C, it was obvious from the parts breakdown that a two seat version was on its way. This meant the incorporation of additional parts to take care of the two seat cockpit and the new forward fuselage section. New clear bits were also part of the mix.
The cockpit is well done though a bit on the basic side. There is sidewall detail in terms of having inserts. The instrument panel and side consoles are flat with detail being supplied by photo etch parts. Two different design bang seats are provided, both with some photo etch detail in terms of the harness. There i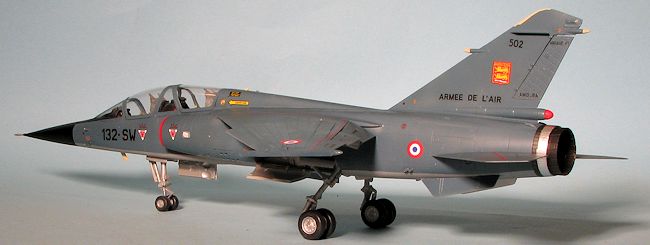 s no indication as to which are used for the plane that is kitted so you'll have to do some research.
The kit includes an engine shape into which the exhaust and intake compressor faces are inserted. I sort of wonder why this is done as there is no intake trunking so you will not see the forward engine bits. Though the instructions do not indicate the need for nose weight, I'd put some in there just to be sure. Main gear wells are separate and the instructions would have you assemble the landing gear prior to installing these gear wells into the aft fuselage section. Personally, I'd check to see if the main gear could be installed later. The gear itself is nicely detailed and looks the part. This same sequence is also done for the nose gear and I'd see if they could be installed after the fuselage is together.
You are provided with separate flaps and slats though the ailerons are molded in withthe wings. A separate rudder is also part of the kit and you have various inserts for the ESM antennas. Since this is a two seater, you get a clear blast shield for the rear cockpit. The canopy bits are separate and can be posed open though there are no visible actuating bits. A nicely done photo etch fret is also included and this is for things like the seat harness, canopy breakers, instrument and console panels, canopy mirrors, and upper wing speed brakes
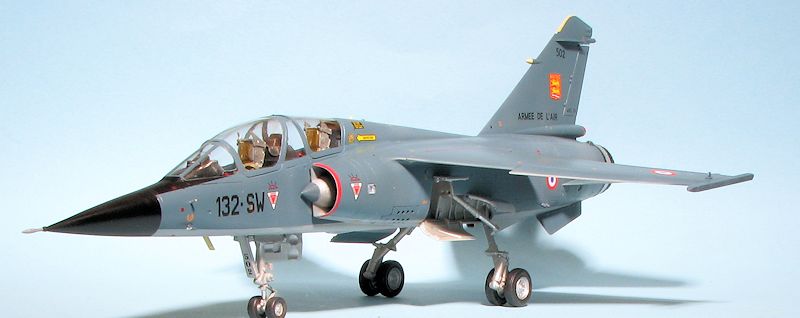
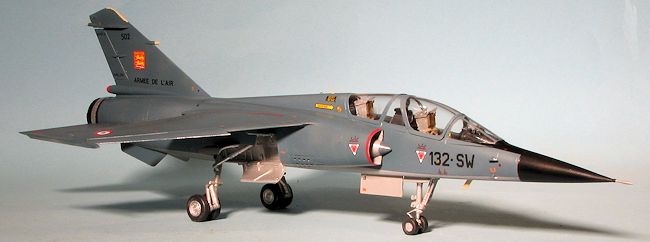
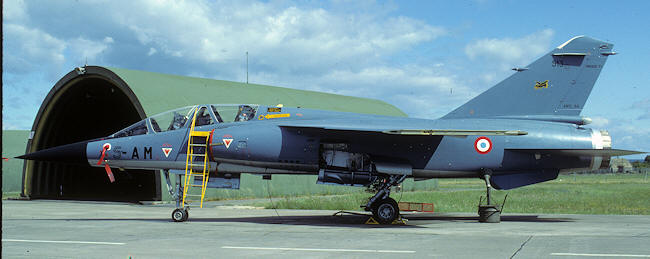 There are a bunch of things to carry under the airframe. Kitty Hawk has already opened the slots in the wings for the four pylons there and while this is nice for some, I wish that model companies would not do this as we might actually want a clean wing model without having to fill holes. In fact, looking through my rather large selection of two seat Mirage F.1 photos, these planes were more often carrying nothing under the wings or fuselage. Here is a photo from the early 1990s time period to illustrate this.
There are far more weapons supplied that what this version will carry. The kit shows it with two long range missiles of some sort on the inner pylon with the outer pylons empty. Two different centerline tanks are provided. One of these has fins with end caps and it is unfortunate that only one is supplied as Mirages often carried two of these (It is even shown as such on the box art); one under each wing on the inner pylon. As you can see from the second image, they also carried wingtip missile rails from time to time. A single boarding ladder is provided that is more appropriate to the single seat aircraft. As you notice, the two seat ladder attaches between the two canopies for the guy in back, whereas the one supplied in the kit only attaches to the front position.
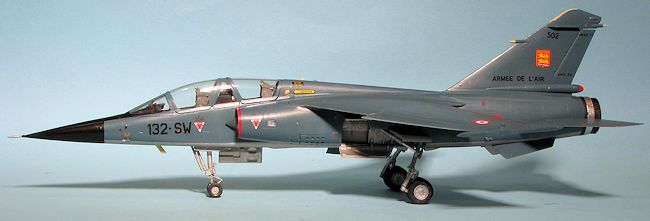
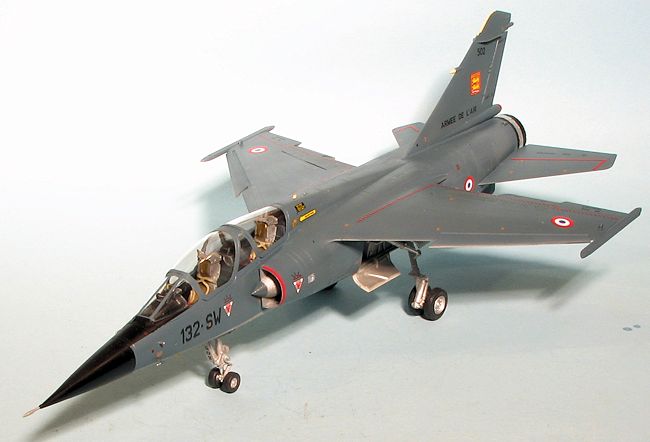 Kit instructions are nicely drawn and provide generic color information for the various bits and pieces. You'll not find any wheel well or inner gear door colors, but as you can see from the above images, they are silver as is the underside of the airframe. The upper surface is Mirage F.1 blue-grey. Markings are provided for a pair of special scheme aircraft when these were with EC 33. The box art image is for the 60thanniversary of D-Day in 2004. The invasion stripes are included as decals and you'll need to attach the fuselage ones prior to attaching the tailplanes. The other has no information but has a large red, white, and blue tail. The decals appear to be quite nicely done so should work well. I would have liked to have seen the addition of some more 'standard' aircraft as two seat F.1 decals in this scale do not seem to exist as of yet. One could, however, cobble something together if they have markings for a single seat version from the unit one wants to do.
| CONSTRUCTION |
First thing I did was to start removing bits from the sprues and looking for sub-assemblies. I was somewhat surprised by the semi-soft plastic so I'll have to be careful not to over sand. I glued the wheels together and the rear bulkhead to the cockpit. The wing inserts were also done. I noticed that the wings and tail planes have little locking mechanisms that will prevent these parts from being removed once installed, so no test fitting here. The lower inserts to the wings fit well and since I'm not going to install the pylons, I'll have some rather large slots to fill in. Back at the interior, I glued in the etched side consoles starting with the front. When I got to the rear, I notice that the instructions have the front ones on the 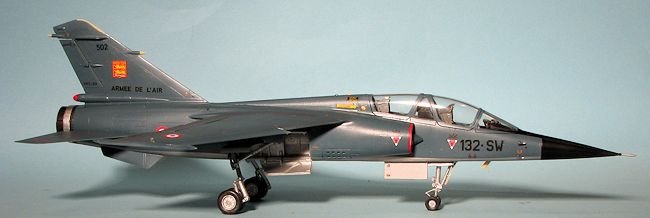 wrong sides. The instruments should be the same for the front and back seat though abbreviated for the back. Keep this in mind on yours. I also attached the instrument panel faces.
I then painted the seats. The French Mirage F.1B used Martin-Baker Mk. 10 seats. The kit also gives Mk.4 seats and has you build them both but doesn't tell you wish ones are the correct ones. The Mk.4s would be used for export planes from what I understand. I painted the framework FS 36231 and the inner sections with buff as the instructions called for grey and 'sail color' for these. However, the Martin Baker web site shows this seat as black with olive green cushions. For this build, I am building the kit as the instructions show. I then did a bunch of painting and rather than use an air brush, I grabbed a 1/4 inch wide paint brush and did the inner gear doors and wells and gear and inside the intakes with Tamiya XF-16 Flat Aluminum. Citadel matte black was used for the cockpit bits, including the instrument panels. I used Vallejo 'tinny tin' for the afterburner bits and bronze green for the flame guard on the inside. Though it will not be seen, the compressor fan was painted using the Tamiya Flat Aluminum. I noticed that the inside of the intakes and the gear wells had what looked like quite a few ejector pin marks, none of which will be easy to remove. Interestingly, thanks to the soft plastic, there were a few deformations on the outside of the fuselage, for instance, where there were ejector pin marks on the inside of the part. You can see one in the photo.
Meanwhile, I assembled the fin. This has several inserts, including a clear one that is trapped between the fin halves. I guess we are expected to mask this tiny fin light prior to painting. Would have made more sense to design it to fit in place from the outside. The rudder is designed to move, though the attachment pins are quite thin. I also decided at this time to toss caution to the wind and installed the main gear wells in the aft fuselage half without first installing the landing gear as the instructions suggest. The instructions also suggest installing all of the nose gear bits before closing the nose section. That also will not happen.
The engine was built up as well at this time, minus the burner petals as it appears those can also be installed after everything is painted. I also decided to assemble the main landing gear legs. Each of these is three pieces and for this build, I used the Scale Aircraft Conversions metal set #48219. These had a couple of benefits over the plastic ones. First of all, they are already the right color. Secondly, SAC has 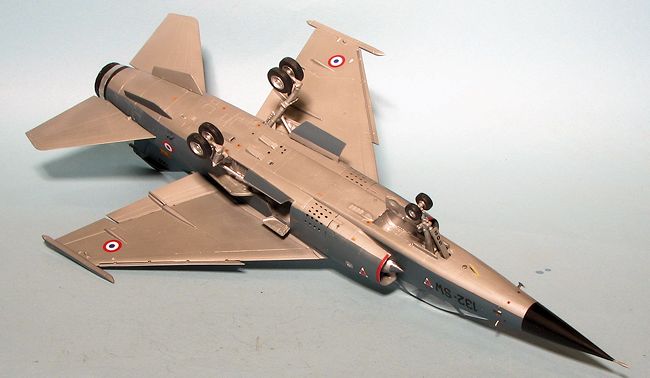 removed all three ejector pin marks from the castings. Thirdly, the large sink areas in the kit gear were not there in the SAC landing gear. In addition to this, when it comes to the nose gear, SAC molded the two pieces as one, eliminating a join. Metal also offers the benefit of being able to be slightly 'tweaked' if need be.
Once the engine was built up and the main gear wells installed, the rear fuselage halves were cemented together. Moving back to the fin, the two sensors were installed just above the rudder and in the center of the forward fin. Both of these are thinner than the area into which they fit.
I decided to finish the build of the cockpit. All of the various interior bits and bulkheads were painted matte black and dry brushed with white. The etched console and instrument panel detail is so shallow as to not respond that well to dry brushing. Personally, I would have rather had good raised plastic detail here or decals. The instructions miss the installation of the rear sheet anti-glare shield. It is not shown in one illustration and mysteriously appears in the next. The instructions also would have you attach the inner wall detail directly to the cockpit tub. Good luck getting it to fit properly. There are small attachment pins on the inner walls to which these pieces securely fit. Glue these to the inside of the fuselage halves first, then install the cockpit tub.
Before joining the nose halves, I stuck a bit of weight in the nose. Probably not required, but just in case. With the nose section together, I joined it with the rest of the fuselage. Fit is fairly good, but required filler to take care of the rather large gap and to get rid of a small step. In fact, it took several applications. I next installed the upper spine section. This needed the use of glue to act as a lubricant to get the aft section to properly fit as it is very tight. I then installed a small pair of cooling scoops in the upper rear. These were drilled out as they offer only blank faces. The fin was then glued in place.
 While that was drying, I finished the rounds of filler on the lower wings and then installed the etched wing spoilers. These are shown going into the wrong side in the instructions. The small rectangular hinges etched in the pieces should be to the front of the piece when installing them. I then moved back to the fuselage to install the intakes.
For these, you will have to disregard the instructions. The inner intake pieces are keyed and the instructions show them in reverse of the way they fit. Also, the part numbers on the intakes are incorrect. Do not use the intakes from the C sprue. Use the other set. The intake on the left side will have a rectangular opening on the side and the right side intake will be without any side openings. You can see this rectangle on the photos shown earlier in the article. The intakes are also keyed with a larger and smaller tab near the lip (which will need to be filled). This will help. The fin was then installed.
I then installed the wings. These have locks on the edges, which means you cannot remove the wing once installed. But are pretty useless as the fit is quite loose. The flaps and ailerons are designed to be installed full down. Putting them in the normal neutral position will require a section of card be installed to take care of the gap in the hinge fairing. The inner flaps are misnumbered in the instructions and should be reversed. There are tabs on the flaps, but they are far too large for the place they are to fit so I sanded them off. Though the ailerons show the tabs in the instructions, the parts do not have them.
 The fuselage has a bunch of intake and exhaust bits as well as the ventral fins that need to be glued in place. I'll leave off the probes until later. There are also antennas or something like that which fit on the wing tips. Adding to the list of things that do not fit as shown in the instructions is the burner petal assembly. There are tabs on the burner ring, but none on the petal parts. In fact, the way the instructions show this assembled is misleading. One will have to attach the three petal parts to the outside of the burner ring, not exactly a solid mounting, but the only way they fit. It left me wishing that Kitty Hawk had molded this as a single part.
Moving back to the interior, I attached the various bits to the forward coambing and then installed the seats after gluing in the etched harness and canopy breakers. The clear pieces were then glued in place. I had to trim the canopy breakers on the seats in order to get the canopy sections to close. Then the metal landing gear pieces were glued in place as were the wing tip missile rails, and it was time to head for the paint shop.
| COLORS & MARKINGS |
Painting modern jets is often anything but simple, even with non-complex schemes thanks to the need to mask various bits. For this reason, it took me quite a while to get through the painting process. For the main colors I used Xtracolor French Mirage Blue-Grey and French Aluminum for the underside. The nose and anti-glare panels were painted Tamiya Black and I used Steel from Alclad II for an exhaust ring along with Bare Metal Foil for the polished area.
| FINAL CONSTRUCTION |
I then decided to attach the rest of the antennas and probes at this time. The gear doors were next. A few things to note. The very small pair of nose gear doors are numbered backwards. I found it quite incongruous that the large nose well door had no attachment hinges as did the rest of the gear doors. Also note that the instructions give you the wrong part number. You need to use the door without the antenna attachment spot. The medium sized main gear doors that fit to the very back of the main well are 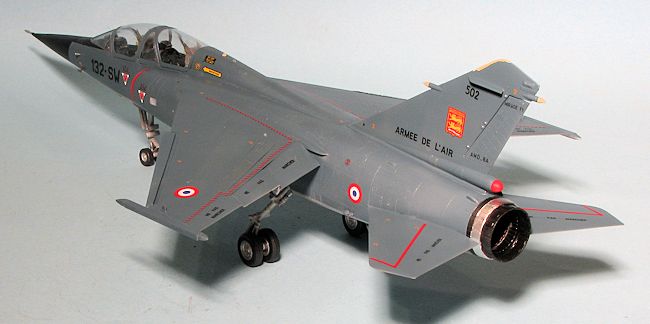 also numbered backwards as to the side to which they fit. Should mention at this time that I found quite a few ejector towers and voids on the door hinges. You may appreciate that you can model the kit with many of the gear doors closed if you so desire. With all the gear doors in place, I then attached the wheels. The really nice thing about metal gear such as those from SAC is when you have dualies, you can slightly tweak the metal to ensure that both wheels touch the ground without resorting to sandpaper.
Perhaps a bit late in the construction sequence, I now went to apply the markings. While the kit markings are nice, I wanted something a bit different. Back in 2011, Berna Decals did a sheet that includes several Mirage F.1B markings. Undoubtedly this was to be used in conjunction with a conversion kit for the Italeri/ESCI kit, but due to the nature of the markings, it should work fine with this kit. I chose the version for EC 2/30 at Colmar in 2009.
The Berna Decals went on without any real issues aside from the walk area markings seeming a bit short, but then they were not designed for this kit. Putting on all the data markings took the better part of a week, always a time consuming process when dealing with modern jets. After putting on all the data 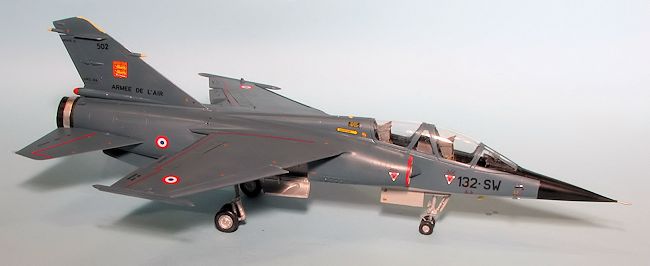 markings, it was time to make a choice of unit markings. I decided on one of the two more modern options so put on the insignia with the dark blue center to the roundels.
Once all the decals were on I attached a few bits I had missed including the tail cone (painted red), fuel dump and nose probe. The horizontal stabilizers are a very tight fit and one needs to be careful not to break or deform the soft plastic on the tabs. The nose probe does not fit well. I then gave the kit a coat of clear matte. It looked too matte so I sprayed some semi-matte over it to gloss it up a bit. The last items to be added were some clear pieces. There is always some last minute touch-up painting to be done and that was taken care of. Then the tape came off the clear bits and that was it.
| CONCLUSIONS |
Overall, I enjoyed building this one. It has its issues and I'd have to say that this one falls into the realm of fiddly builds. The metal landing gear are a must with this one so you can keep all the wheels on the ground, so I highly recommend getting them for this kit and others that are similar. I used none of the kit decals so cannot comment on their effectiveness. The Berna sheet left me with quite a few data markings that were marked on the sheet but not called out in the placement guide. The decals themselves were nicely done. Probably the biggest glitch in the instructions was not having all the parts correctly numbered, ensuring that the builder will have to be cautious during assembly and test fit every part. It does leave one with a ton of bits that can be used on other builds and I will be keeping the 'spares' on this for use on the Italeri/ESCI kit if so need be.
| REFERENCES |
http://en.wikipedia.org/wiki/Mirage_F1#Mirage_F1B
August 2013
Copyright ModelingMadness.com. All rights reserved. No reproduction in part or in whole without express permission from the editor.
If you would like your product reviewed fairly and fairly quickly, please contactthe editor or see other details in the