Revell AG 1/144 Lightning F.6
| KIT # | 4019 |
| PRICE: | $5.75 |
| DECALS: | one aircraft |
| REVIEWER: | |
| NOTES: | 1992 mold, 2001 boxing |
| BACKGROUND |
Please visit the preview for more info on the aircraft and a look in the box.
| CONSTRUCTION |
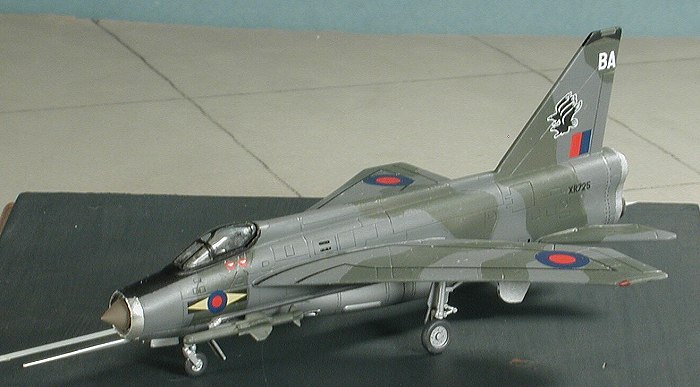
I have waited for a decent decal sheet before starting this and thanks to Mike Grant Decals, I finally was able to give this one a go. First thing I did was glue in the cockpit. This is flat black on the Lightning and though it is nice to have some semblance of detail in terms of a bang seat and control stick, it will remain pretty anonymous under the rather thick canopy. Then the fuselage halves were glued together and the seams were puttied to get rid of any problems. Next step was to attach the ventral strakes and the missile rails. Once on, the seams were filled and sanded smooth. I also filled in the upper wing pylon holes as I think those over wing tanks are just silly looking. Yeah, they did use them and more often than one thinks, but they are still silly looking. It took several applications of filler. Back at the fuselage, I put as much weight as I could into the nose of this thing as every Lightning I've built in other scales is a tail sitter. I then attached the nose and sanded it smooth with the rest of the fuselage. I also filled in the upper guns as the F.6 didn't use them. In fact, it didn't often use the gun pack available for the ventral fuel tank, but it wasn't totally uncommon for this to be in place so I left it in. The kit includes a tail hook but not the little box-like structure at the hinge point. No big deal for most and those who want to include it can do so from scrap. I then glued on the tail planes. Next was the wings. The right one was a super tight fit, but the left was a bit loose, so I had to make sure it didn't droop or do anything silly like that while the glue was drying. When that was done, I sanded the gun area that I'd filled and then removed the canopy from the sprues for a test fit. The sprue attachment points for the canopy had to be sanded down after removal as they left marks on the clear bits. I then found out that the canopy was so thick that it wouldn't fit over the ejection seat. This meant that the seat had to be trimmed on the side until the canopy would fit properly. Once that was done, the canopy was pushed into place, glued on the bottom and held in place with a clamp. With that dry, the masking tape was brought out and the canopy masked. If you don't think that is a difficult thing to do on a 1/144 jet, then try it! Next it was time for some paint!!! CAMOUFLAGE & MARKINGS The camo is a pretty hard edge, so in this scale, that means masking. Gadzooks what a chore! It may have been easier to just hand paint the camo scheme, but I was determined to spray it. I should also point out that in most cases, the upper surface of the ventral stabilizers was also camouflaged. I used RLM 75 for this as it is basically the same color as dark sea grey and I already had a ton of it mixed up for another project. With that all dry, a coat of Future was applied to give the decals a gloss area to stick to. With landing gear in place, it was time for the first decal and I chose the wing walk areas. Most of Mike Grant's sheets are ALPS printed which means it has a single carrier for the entire sheet. Cutting out the markings needed is not a problem for the majority of us. However, you do have to be extremely careful putting these on. They are ultra-thin and, as the instructions warn, they are prone to scratching when moving them around. For a setting solution (and that might not be needed) I used the very benign Microscale system. I altered the markings on my Lightning a bit by using the black eagles vice the brown ones and by using full color roundels (swiped from a Modeldecal insignia sheet) under the wings. This was not unheard of and there are several examples of 11 Sq Lightning F.6s so marked, even after they went from the gloss finish to the matte finish. One thing about the Lightning is that it was seen in just about every standard camo scheme the RAF went through from bare metal until the greys and several that were unique to the type. I also masked the upper nose and cockpit area and painted those black.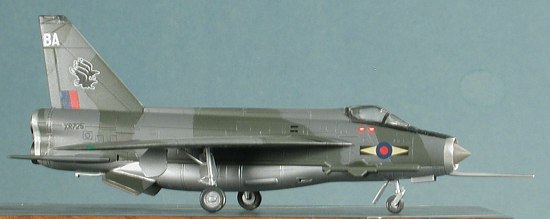 As with most 1/144 kits, there are not a ton of parts, however, what is there is quite well done and despite its small size, Revell decided to do the engraved panel lines for us. In scale these would be 4-6 inches wide and not very aerodynamic, but it is fine for a model.
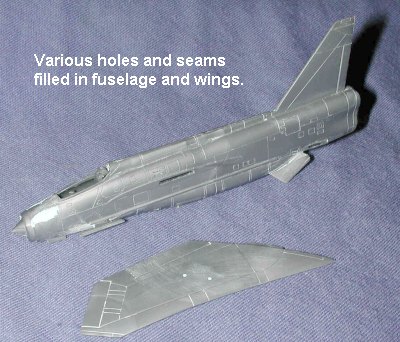
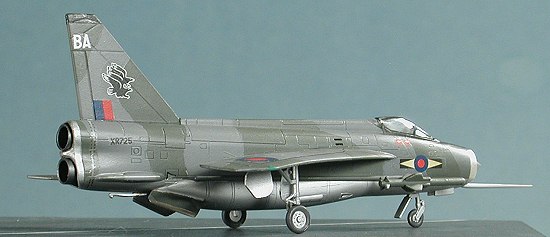
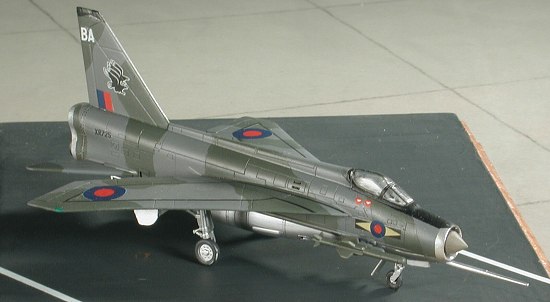 Mike Grant's decal sheet offers three major schemes, but also offers two more that are not shown in the profiles. I wanted to do my Lightning in the old green/grey scheme so grabbed the reference (Warpaint #14) and looked for the 11 Sq bird in the disruptive pattern. It seems that the underside of these planes was bare metal so that meant a nice coat of Alclad II Aluminum on the underside of the model. When dry, I applied the RAF Dark Green using Testors Model Master enamels. Most of you probably know that it is common for the upper wing/tail plane colors to wrap around to the underside of these surfaces. My reading in various books (back issues of Scale Aircraft Modeling, Modeldecal sheets, and Aeroguide), showed that there were three variations of this. One was where there was no wraparound. Another where it only wrapped a short distance, and a final and more common one where it it took up a rather large area, especially on the wing. I chose the middle ground for this one and did the appropriate masking.
 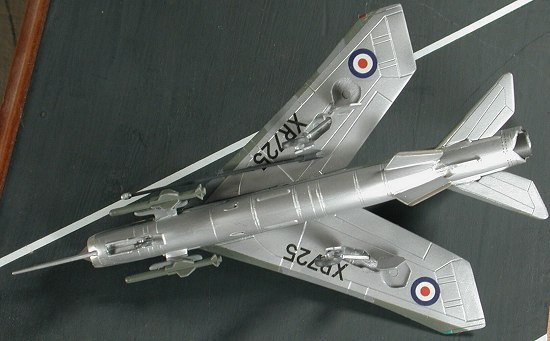 Back at the bench the landing gear were glued in place as were the main wheels and the inner gear doors. I also glued in the exhaust which I'd previously painted Burnt Iron using Testors Metallizer.
| FINAL CONSTRUCTION |
Final construction also included some more painting. But first I glued on the outer gear doors. Like much of the model, these are too thick, but hey, it is 1/144. The nose was treated to a piece of Bare Metal Chrome Foil. The intake area was usually kept quite shiny.
 Next, the refueling probe, which had been painted black with an aluminum tip, was glued in place. If one hadn't applied decals prior to this, it would have been a bit of a chore to get the under wing serials in place. I then mixed up a sort of muddy brown paint to use on the radome and the bottom of the ventral fins. Apparently this is supposed to be some sort of fiberglass.
The fin tip was painted black were appropriate. Missiles were painted Dark Green overall and then glued in place. They seem a bit large for the model to me. Final bit to be glued was the nose probe. Final bits of paint were the wing tip lights and a bit of black in a few vent/intake areas. Then the model was given an overall coat of clear matte, as much to seal in the scratch-prone decals as anything else. It also helped to dull the Alclad a bit as well. The masking was removed from the canopy and the model was done.
| CONCLUSIONS |
Though it does have a few shape problems (the intake and exhaust area, for example), it still looks very much like a Lightning. What's more, it won't break the bank and builds in a relatively short period of time (this one taking me about 9 days from start to finish). I understand that their Hunter (still on the shelf) is just as nice. Now if Mike would be so good as to do a sheet or two for this kit, I'd be very happy!
October 2003
#1288 in a series
Copyright ModelingMadness.com. All rights reserved. No reproduction in part or in whole without express permission from the editor.
If you would like your product reviewed fairly and fairly quickly, please contact the editor or see other details in the