Airfix 1/48 Bae Hawk
| KIT #: | 05111 |
| PRICE: | $16.98 |
| DECALS: | Two options |
| REVIEWER: | Scott Van Aken |
| NOTES: |
| HISTORY |
I'll keep the historical background brief. Needless to say, the Hawk has
been the most successful trainer that Britain has had since World War II.
In fact, it rivals the Hunter as to it's popularity overseas. Despite a
 general post-war history of producing aircraft that did not do well on
the foreign market, the Hawk has been an aircraft that has done very
well.
general post-war history of producing aircraft that did not do well on
the foreign market, the Hawk has been an aircraft that has done very
well.
A very adaptable airframe that can perform both training and light strike missions with equal ease, the Hawk is suitable for those air arms who can handle some sophistication in terms of maintenance as well as those other more established countries that are looking for a capable and efficient trainer/strike aircraft. After at least 25 years in production, the Hawk is still coming off the lines.
| THE KIT |
This was one of the last new tool kits prior to the bankruptcy of Airfix and its purchase by Hornby. If you have built their 1/48 kits of this era like the Spitfire 46/47 or their Jaguar, then this one is quite similar in overall feel. The detailing is good, but not as 'crisp' as one would expect from Tamiya or Hasegawa. It also doesn't cost as much as one would be paying from those Japanese companies. There are also some pretty hefty sprue attachment points that will take some care to remove.
You get a pretty complete cockpit
which includes pilot figures, a pair of reasonably well done bang seats and
instrument panels, the last of which has raised detail on it. No rudder
pedals for those who may be
 wondering. The canopy bits include the blast
shield for the rear occupant. There are no canopy hinge bits though one
could display the canopy open if one wished. The flaps can be separated
from the wing and displayed lowered along with the speed brake.
wondering. The canopy bits include the blast
shield for the rear occupant. There are no canopy hinge bits though one
could display the canopy open if one wished. The flaps can be separated
from the wing and displayed lowered along with the speed brake.
All of the flap hinges are separate and an alternate set is provided for the lowered flap option. For things under wings a set of Sidewinders is provided as well as a centerline gun pod. Those doing the Red Arrows version have the smoke canister, though there is no additional piping for above the exhaust. A pair of drop tanks are also supplied.
Instructions are typical Airfix and done totally pictorially. Paint references are only by Humbrol number so one is up a creek if a translation sheet is not available as Humbrol paints are not available in all parts of the world. Markings are given for two aircraft. One is the Red Arrows Hawk from the 2000 season and there are enough serials provided to do any of the team planes from that season. The white and blue portions of the markings are given as decals and one must apply the lower ones with the gear doors closed to get them to fit properly. I doubt if the white is opaque enough to combat the intensity of the red paint. The other is for a Finnish Hawk in the more current low viz scheme and this is from the Finnish Aerobatic team, the Midnight Hawks. A full stencil suite is also given on the sheet. Generally Airfix decals are fairly good. Mine has the yellows slightly off register.
| CONSTRUCTION |
This one was started by first removing the fuselage and wings from the sprue
so that I could trim back the sprues and provide myself a bit more space in a
jam packed box. I then built up the two seats. The fit of these is only fair as
there are no well done alignment areas on these near butt-join bits. I built up
each seat at one time so that I could adjust things before the cement was fully
dry. One thing I noticed while painting
 the seat is that the instructions show
detail that is not present on the actual part. This would continue during the
build.
the seat is that the instructions show
detail that is not present on the actual part. This would continue during the
build.
A few notes on painting. The interior is supposed to be Admiralty Grey. For those not wanting to add yet another tinlet of paint to the piles, Dark Gull Grey is very close. Same thing regarding Light Aircraft Grey, where, according to the official charts, is the same as 16440, Light Gull Grey.
Once the seats were done, I test fit them into the cockpit. I then glued the rear bulkhead, forward bulkhead and the nose gear parts together. I would have liked to have left the nose gear until later, but it appears this is not an option. The small upper nose gear shelf is not a great fit and no way is anyone going to get 10 grams of weight into the small space above it. While letting these things dry, I taped them into the two fuselage halves so there wouldn't be any alignment issues.
 With that done, I
then
started jamming weight into the nose, using areas under the cockpit as well.
Once done there was some additional painting and then the halves were properly
glued. I found the fit around the nose to be particularly tight and used some
superglue and accelerator on that are to keep the seam down to a minimum. Even
doing this I ended up sanding away much of the detail on the underside. The
intakes were then glued, filled, sanded and fit in place. The one on the right
side was a particularly poor fit while the left one was a lot better. Still
needed work, though.
With that done, I
then
started jamming weight into the nose, using areas under the cockpit as well.
Once done there was some additional painting and then the halves were properly
glued. I found the fit around the nose to be particularly tight and used some
superglue and accelerator on that are to keep the seam down to a minimum. Even
doing this I ended up sanding away much of the detail on the underside. The
intakes were then glued, filled, sanded and fit in place. The one on the right
side was a particularly poor fit while the left one was a lot better. Still
needed work, though.
The wings were then glued together after opening the little notch for the
wing fences. When dry and properly prepped, it was glued in place. The fit is
fair and a lot of filler and smoothing is needed at the front to get everything
to properly contoured around the intakes. After than was done, the air brake
bits were glued in the closed position and the ventral strakes added. One of
mine was short shot a bit and so both had the ends sanded down to the same
length. I then attached the wing fences. As I wasn't doing lowered flaps, the
flap hinges were next. The instructions have the raised and lowered part numbers
 backwards for these, but you'll spot that once you start attaching them. The
inner two hinges on each wing are extremely tight while the outer one is a tad
loose.
backwards for these, but you'll spot that once you start attaching them. The
inner two hinges on each wing are extremely tight while the outer one is a tad
loose.
I then moved to the cockpit and installed the anti-glare shield to the back seat, followed by the gun sights. When dry, the windscreen was glued in place. This part is too narrow for the opening, but if one presses it down and then tapes it place while the glue is drying, it will stay. I also had to use filler on the front of the windscreen as the gap is quite large. The blast shield was glued into the main canopy using clear paint. In order to get the canopy to fit flush, I had to grind down the attachment points of the rear seat anti-glare shield as they jutted up enough to prevent a proper fit.
I then masked the clear bits and glued on the landing gear and retraction struts. It was now time for paint.
| COLORS & MARKINGS |
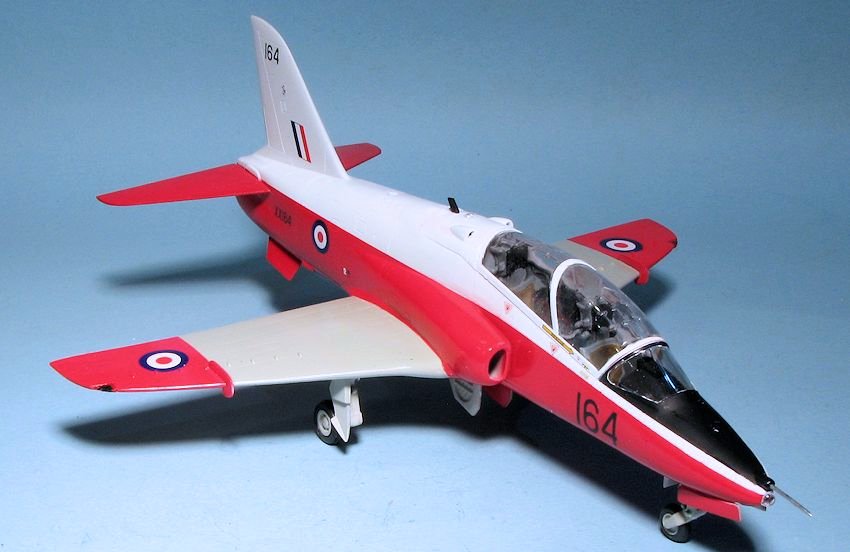
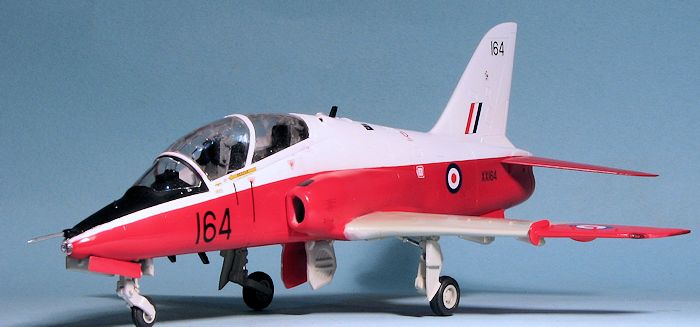
For this kit, I wanted to use the only scheme in which I've not built a Hawk,
and that is the original red, white and grey scheme. For this project I used
Xtradecal
X48047, which has two schemes. I used the Central Flying School
version. First the airframe was sprayed with Tamiya extra fine white primer to
help 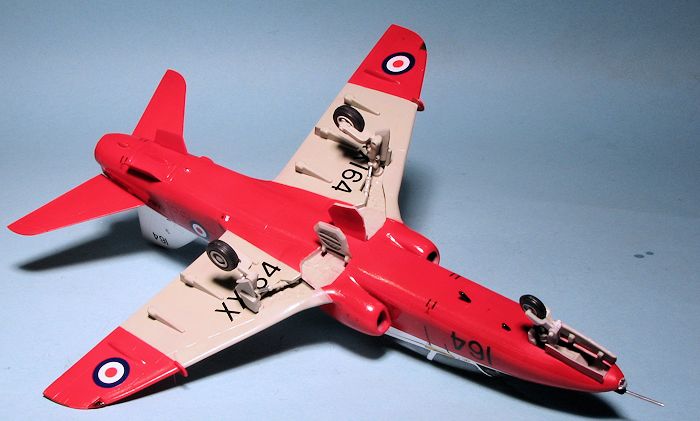 spot any areas that needed more work. This was followed by an overall Tamiya X-1 white coat. I then masked the white and sprayed the red using some
nice Gunze H-3 that I had in the piles. I have to say that I suck at red as I'm
never able to get a uniform coat; there always being patches that are darker
than others. With this dry, the red was masked and the light aircraft grey was
painted using Humbrol 166. I also painted the various gear doors and tailplanes
the appropriate shades. The last major painting was the black anti-glare panel
on the nose.
spot any areas that needed more work. This was followed by an overall Tamiya X-1 white coat. I then masked the white and sprayed the red using some
nice Gunze H-3 that I had in the piles. I have to say that I suck at red as I'm
never able to get a uniform coat; there always being patches that are darker
than others. With this dry, the red was masked and the light aircraft grey was
painted using Humbrol 166. I also painted the various gear doors and tailplanes
the appropriate shades. The last major painting was the black anti-glare panel
on the nose.
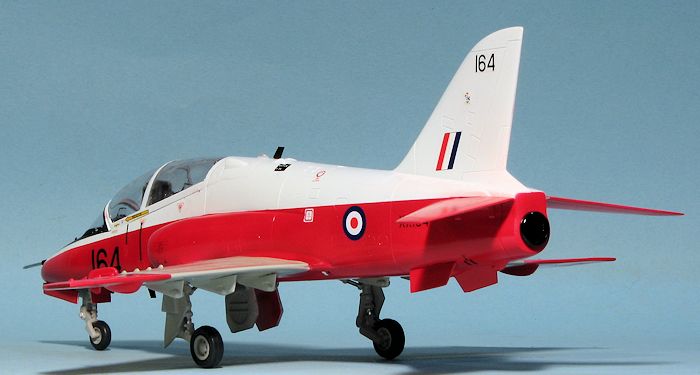
With all that finally done I glued on most of the gear doors and then attached the wheels. Then it was time for the decals. The Xtradecal sheet is pretty complete and the decals themselves are superb, going on well and reacting well to setting solutions. As is usual with me, it took many days to finally get all the markings in place.
| FINAL CONSTRUCTION |
Typical of most jets, there are quite a few bits to
add, even if there are no pylons. In this case it was the rest of the gear
doors, followed by quite a few antennas. For these, holes had to be drilled in
several cases. Note that the VHF antennas used on the early Hawks were not the
 taller and
more pointy ones supplied in the kit. It is a simply matter to simply snip off
the top to make them match ones initially used.
taller and
more pointy ones supplied in the kit. It is a simply matter to simply snip off
the top to make them match ones initially used.
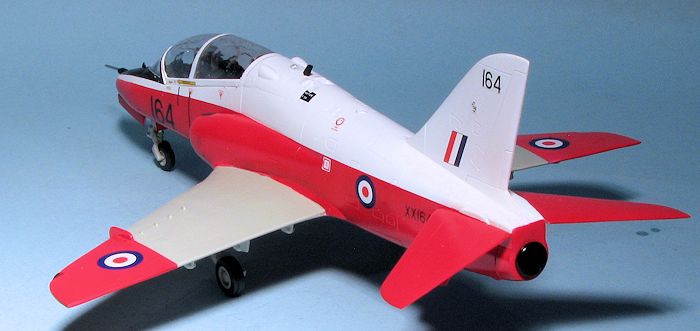
There are also some clear bits to be glued on including the wing tip formation lights. These really should be added and masked prior to painting as getting the proper shade of red on the surrounds was not possible and mine ended up being too dark. Actually, I'd have preferred just the lenses to be clear and the rest of the surround to be part of the wing mold. Hasegawa does this same thing on their Skyhawk kits and personally, I'd rather they did not. The last thing to go on was the nose pitot tube and landing light
| CONCLUSIONS |
This turned into a rather nice model despite some initial misgivings. The fit of the wing around the intakes is the most ill-fitting part of the kit with the rest of it being somewhat of a 'standard' build. It could use some help in the cockpit and I'm sure that there are resin bits for this area. I only used a couple of the kit decals and found them to be rather brittle, though it may be due to age as this is not a brand new kit. The Xtradecals worked like a champ and are highly recommended.
August 2014
Thanks to me
for the review kit, and Hannants (
www.hannants.co.uk ) for the decal sheet.
If you would like your product reviewed fairly and
fairly quickly, please
contact
the editor
or see other details in the
Note to
Contributors.