
Bronco 1/48 JF-17 'Thunder'
| KIT #: | FB-4001 |
| PRICE: | $65.00 SRP |
| DECALS: | One option |
| REVIEWER: | Scott Van Aken |
| NOTES: | New tool kit |
| HISTORY |
The JF-17 Thunder (Urdu: تھنڈر), also designated Chengdu FC-1 Xiaolong (English: Fierce Dragon; Chinese: 枭龙; pinyin: Xiāo Lóng) is a single-engine, light-weight multi-role combat aircraft developed jointly by the Chengdu Aircraft Industries Corporation (CAC) of China, the Pakistan Air Force and the Pakistan Aeronautical Complex (PAC). It is designated as "JF-17" by Pakistan, which is short for "Joint Fighter-17" and as "FC-1" by China, which is short for "Fighter China-1".
The JF-17 was developed primarily to meet the requirements of the Pakistan Air Force for a low-cost, medium-technology, multi-role combat aircraft as a cost-effective replacement for its ageing mixed fleet of Nanchang A-5, Chengdu F-7P/PG and Dassault Mirage III/V fighters and also have export potential to air forces of other developing countries as a cost-effective alternative to hi-tech but expensive Western fighters.[
 Pakistan and China signed the Letter of Intent for the joint
development of the JF-17 (then called "Super-7") in 1998, followed by the
signing of the Contract in 1999. The project got delayed due to the inability to
find an avionics and radar package. In 2001, the Pakistan Air Force recommended
that the airframe design be de-coupled from the avionics and radar systems for
the aircraft to avoid further delay. This resulted in a fresh impetus to the
project and the design was finalized and 'frozen' in 2001. The maiden test
flight of the first prototype took place during 2003 in China, later test
flights with a modified design with Diverterless Supersonic Intakes (DSI), and a
modified tail design took place in 2006. Deliveries to the Pakistan Air Force
for further flight testing and evaluation began in 2007, the aircraft's first
aerial display also taking place that year in Islamabad, Pakistan. The Pakistan
Air Force officially inducted its first JF-17 squadron on 18 February 2010.
Pakistan and China signed the Letter of Intent for the joint
development of the JF-17 (then called "Super-7") in 1998, followed by the
signing of the Contract in 1999. The project got delayed due to the inability to
find an avionics and radar package. In 2001, the Pakistan Air Force recommended
that the airframe design be de-coupled from the avionics and radar systems for
the aircraft to avoid further delay. This resulted in a fresh impetus to the
project and the design was finalized and 'frozen' in 2001. The maiden test
flight of the first prototype took place during 2003 in China, later test
flights with a modified design with Diverterless Supersonic Intakes (DSI), and a
modified tail design took place in 2006. Deliveries to the Pakistan Air Force
for further flight testing and evaluation began in 2007, the aircraft's first
aerial display also taking place that year in Islamabad, Pakistan. The Pakistan
Air Force officially inducted its first JF-17 squadron on 18 February 2010.
The JF-17 is expected to cost approximately US$15 million per unit. The Pakistan Air Force has announced that it has a confirmed order for 150 JF-17s, which may increase to 250 aircraft. The JF-17 will replace Pakistan's MiG-21-derived Chengdu F-7, Nanchang A-5 and Dassault Mirage III/Mirage V aircraft currently in service. Azerbaijan, Zimbabwe and eight other countries have expressed interest in purchasing the JF-17 at a recent military exhibition in Pakistan, according to an official.
| THE KIT |
This is Bronco's first 1/48 kit and it is an aircraft that I believe no one else has done in this scale. If you have seen the more recent kits from Hobby Boss or Trumpeter or Dragon, then you have a pretty good idea at what the molding is like. There are six sprues, five grey and one clear. All of them are individually bagged, including the duplicate sprues for the drop tanks, missiles, wheels and some other items. The main fuselage is split horizontally, with a separate vertically spit nose, undoubtedly to take care of a future two seat variant.
The cockpit is well done and has a nicely molded bang seat
that is in several sections. There is a photo etch sprue that takes care of the
seat harness, instrument anti-glare hood and a few other bits, including the
canopy rear view mirrors. A separate control stick and rudder pedals are
provided. The kit can be built with
 he canopy open or one can use a one-piece
closed canopy so this will determine how the canopy opening mechanism will be
built. Both canopies have a seam running down the middle that is actually present on the canopy but not on the windscreen so will need
to be removed. Interestingly, the box art shows this seam, but I doubt if it is
really there on the actual aircraft. There are also two different radomes in the
kit, though only one will be used. No indication is provided if nose weight will
be needed, so it is nice having the separate radome.
he canopy open or one can use a one-piece
closed canopy so this will determine how the canopy opening mechanism will be
built. Both canopies have a seam running down the middle that is actually present on the canopy but not on the windscreen so will need
to be removed. Interestingly, the box art shows this seam, but I doubt if it is
really there on the actual aircraft. There are also two different radomes in the
kit, though only one will be used. No indication is provided if nose weight will
be needed, so it is nice having the separate radome.
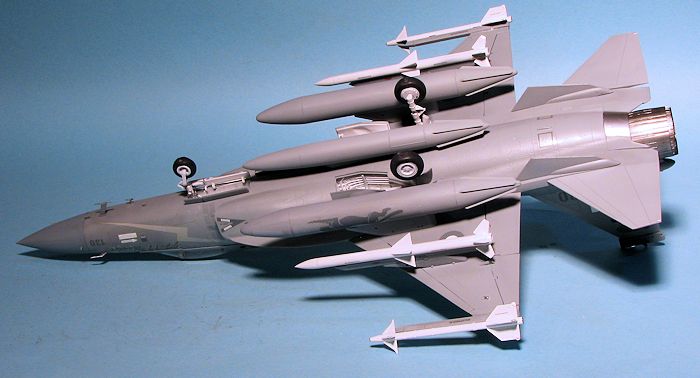
Intake trunking leading to a blanking plate is provided. The gear wells and landing gear are very nicely formed and are multi-piece constructs. The kit provides separate control surfaces, though it appears these are to be assembled in the neutral position. Weapons load is a pair of Sidewinders and a pair of AMRAAMS, or something similar. There is a centerline gun pod as on a MiG-21 and there are three auxiliary fuel tanks; two under the wings and one on the centerline of the fuselage. One does not have to install all these as it is up to the modeler to open the appropriate holes in the underside to mount these. I appreciate this as I don't always want to install everything on a model.
Instructions are well drawn in a slick paper booklet that has 16 construction steps. Color information is provided throughout the build. There are color references for a number of paint companies. The lone markings option is for a plane of the recently operational unit for this aircraft. Colors are pretty much Light and Dark Compass Ghost Grey in a pattern similar the the PAF's F-16 fleet. Decals appear to be well done and provide markings for the box art aircraft. There are the usual mass of stencil decals with the instructions providing a guide for these.
| CONSTRUCTION |
 I started this one as I usually do by looking for
subassemblies. The major ones were the three fuel tanks so those got my
attention first. I then started on the cockpit. This has some photo etch bits
(actually, just about all of them) for the seat harness, anti-glare panel, and
HUD. Not sure I like having p.e. for the anti glare panel as it did not fit all
that great. The photo etch Bronco uses is also rather thing and I bent the HUD a
ton of times during handling.
I started this one as I usually do by looking for
subassemblies. The major ones were the three fuel tanks so those got my
attention first. I then started on the cockpit. This has some photo etch bits
(actually, just about all of them) for the seat harness, anti-glare panel, and
HUD. Not sure I like having p.e. for the anti glare panel as it did not fit all
that great. The photo etch Bronco uses is also rather thing and I bent the HUD a
ton of times during handling.
Eventually I got all the bits in place and after gluing in the nose gear well, glued the interior into the forward fuselage halves. Now would be a good time to mention that I deviated a lot from the kit instructions. The kit would have you build up all of the landing gear before closing up fuselage bits, and to me, that not only makes it more difficult to mask for painting, but is begging for bits to be broken away. Fortunately, it looks very much as if all the gear bits can be installed later in the build.
I glued the main gear wells together and installed them into the lower fuselage. I also opened all the holes for pylons at this time. I also built up the intake assembly. There is no compressor face for the intake, but I doubt if one would be able to see it anyway. This was attached to the back of the cockpit section. I then closed the upper and lower fuselage sections. The fit on the underside of the chines is quite poor and this required several filler sessions to smooth out, all of the detail being lost in the process. However, there isn't much there so you can get away with it. The side areas behind the wing also required filler as did the underside of the speed brake as the join seam is not along a panel line.
 I then attached the slats, flaps and ailerons. These
pieces were all a bit larger than the opening in which they fit and even then
were not a great fit. Since they can only be installed in the neutral position,
I wonder why they are even separate bits. Probably to increase the parts count
as I can see no other reason. The fin halves were also glued and the rudder
installed (again, the rudder is a bit too large).
I then attached the slats, flaps and ailerons. These
pieces were all a bit larger than the opening in which they fit and even then
were not a great fit. Since they can only be installed in the neutral position,
I wonder why they are even separate bits. Probably to increase the parts count
as I can see no other reason. The fin halves were also glued and the rudder
installed (again, the rudder is a bit too large).
Next step was for me to glue the forward section to
the rest of the fuselage. Despite my earlier trepidation, the fi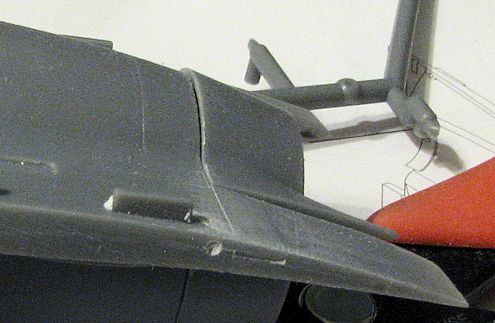 t
of this was actually quite good, requiring only some Mr. Surfacer on the upper
and lower fuselage join. When that done, the exhaust assembly was put together.
I then test fit the housing onto the rear of the fuselage. It is oversize
and does not line up with the speed brake no matter how much one tries. No real
option but to use it so all the bits were painted and the part glued in place.
One has to prepaint the burner can and the surrounding housing before gluing it
in place.
t
of this was actually quite good, requiring only some Mr. Surfacer on the upper
and lower fuselage join. When that done, the exhaust assembly was put together.
I then test fit the housing onto the rear of the fuselage. It is oversize
and does not line up with the speed brake no matter how much one tries. No real
option but to use it so all the bits were painted and the part glued in place.
One has to prepaint the burner can and the surrounding housing before gluing it
in place.
I then attached the completed fin assembly. This was followed by the two piece ventral strakes. I then attached the remaining interior bits, including the two piece glass section on the gun sight. A few small scoops were then glued on. The two behind the main gear wells are pretty much a guess as to location as there are no locators and the instructions are not clear on exact placement. The canopy was masked and glued in place and after stuffing the wheel wells with tissue, I hit the paint shop.
| COLORS & MARKINGS |
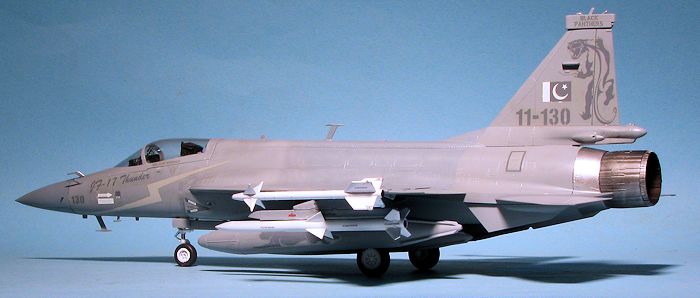
This one is a pretty simple scheme as things go. I first painted it an overall light ghost grey FS 36375 using Testors Model Master enamels. With that done, I decided to add more bits such as the wing tip rails, fuselage pylons and a few antennas. These areas were then resprayed and when dry, I sprayed the upper surface camo area with FS 36320 as recommended in the instructions. This provides very little actual contrast between the two shades. You may want to darken the upper color for greater contrast, though looking at images of the plane, there isn't that much contrast.
With that done, I went to install the gear prior to
prepping the airframe for decals. If you recall, the instructions want you to
build the landing gear completely before installing the wheel wells. The main
gear legs need to be slightly sanded to fit down into the wells. The fit is
extremely tight so trimming the mounting
 pin or widening the hole slightly might
be useful. I also installed the landing gear doors. They are also a bit of tight
fit, but can be installed after the airframe is nearly done. Just be sure to
test fit before gluing as you may have to enlarge a hole or two. You'll
definitely need to open up the holes for the horizontal stabilizers. I used a
#56 drill bit. The airframe was then given a coat of clear gloss in preparation
for decals.
pin or widening the hole slightly might
be useful. I also installed the landing gear doors. They are also a bit of tight
fit, but can be installed after the airframe is nearly done. Just be sure to
test fit before gluing as you may have to enlarge a hole or two. You'll
definitely need to open up the holes for the horizontal stabilizers. I used a
#56 drill bit. The airframe was then given a coat of clear gloss in preparation
for decals.
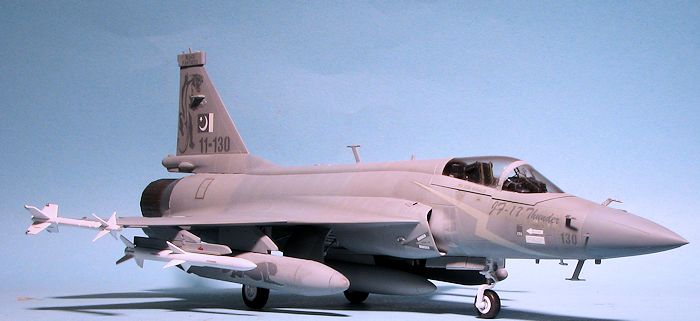
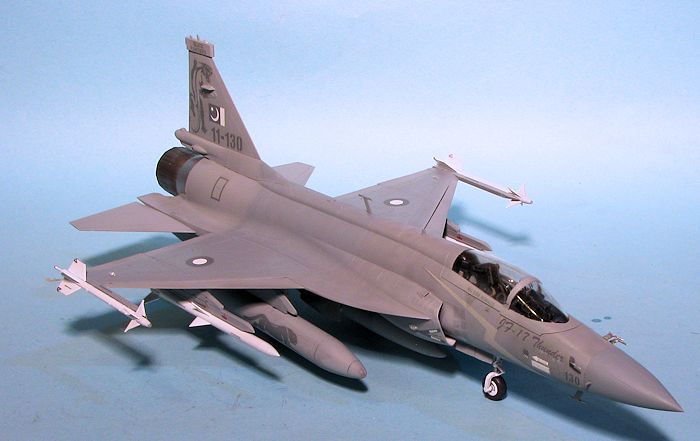
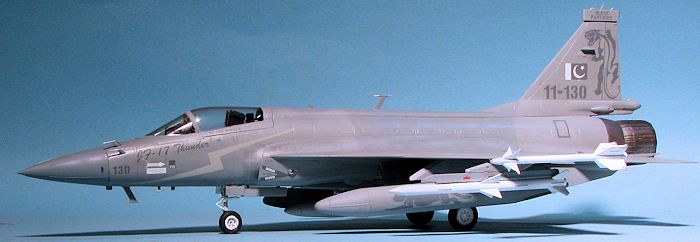
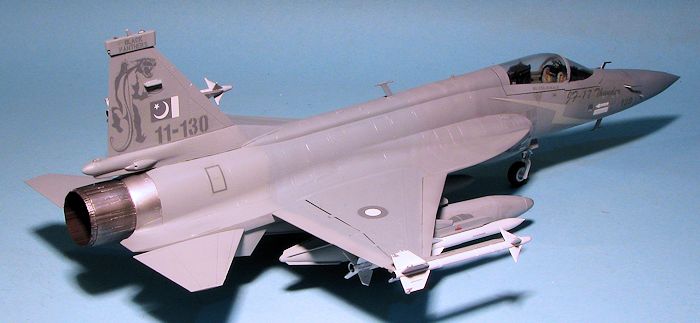
For decals I used Caracal Models sheet CD48014 that has markings for two operational aircraft. Naturally, I chose the one with the most markings. This was the plane based at Peshwar in 2011 with 16 Squadron and appears to be the wing commander's plane as it has his name on it. The decals are printed by Microscale and so I first tried Microsol setting solution on them. This proved to be insufficient so I ended up using Solvaset and even then required several applications and I was still not totally successful in getting rid of all the silvering. Note that the fin Panther needs to be cut to clear the antennas near the top of the fin. I did not apply the zillions of small stencils supplied with the kit decals. The airframe was then given a nice semi-matte clear coat.
| FINAL CONSTRUCTION |
One thing about modern jets is that there is a lot of
stuff sticking out of the airframe and on the pylons. I added the various
antennas to the nose. Then it was time to install the rather large number of
clear lights. Bronco/Trumpeter has these parts attached to the sprues in the
worst way I've seen for lights. They make it nearly impossible to get them
properly cleaned up and the danger of having one go flying is great. Eventually
 I did get them
all installed as well as the clear noses for the Sidewinders, but it took more
time than one might imagine.
I did get them
all installed as well as the clear noses for the Sidewinders, but it took more
time than one might imagine.
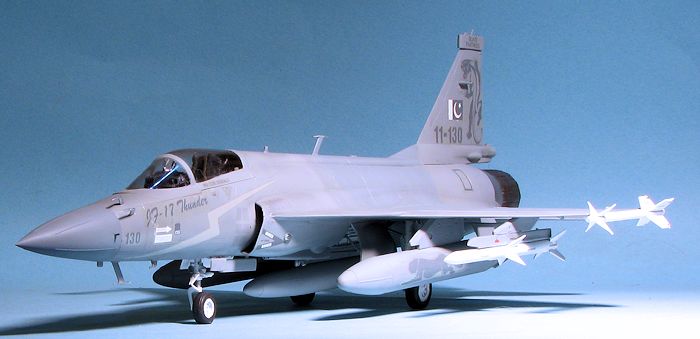
After attaching a few decals to the missiles, these were then glued onto their respective pylons. I then glued on the three drop tanks. These are not the same design as what photos of the real plane show. Instead of basically fat MiG-21 tanks with four small fins, the JF-17 in Pakistan service uses tanks with two large fins at 45 degree angles, much like what is used on the Jaguar. The very last part was to remove the masking from the canopy and afterburner. The afterburner interior was weathered using the AK International exhaust weathering set. I normally don't weather planes, but wanted to see how this set worked. I used the exhaust wash and burnt jet engine pigments and am pleased with the results.
| CONCLUSIONS |
 I've had this
kit for quite a while and just now decided to build it as I seem to be on a jet
kick at the moment. At least it isn't a two seat version! Overall, the kit took
a bit to build. I found the tendency for some parts to be larger than the area
on which they fit to be a bit of an issue and is something that everyone
attempting this kit should watch. No one will mistake this kit for a Tamiya when
they get around to building it, but it is an interesting addition to the
collection and one that I'm glad was kitted.
I've had this
kit for quite a while and just now decided to build it as I seem to be on a jet
kick at the moment. At least it isn't a two seat version! Overall, the kit took
a bit to build. I found the tendency for some parts to be larger than the area
on which they fit to be a bit of an issue and is something that everyone
attempting this kit should watch. No one will mistake this kit for a Tamiya when
they get around to building it, but it is an interesting addition to the
collection and one that I'm glad was kitted.
| REFERENCES |
http://en.wikipedia.org/wiki/JF-17
June 2014
Thanks to me for picking this one up. Thanks also to
Caracal Models for the decals and to
AK Interactive for the weathering
set.
If you would like your product reviewed fairly and fairly quickly, please contact the editor or see other details in the
Note to
Contributors.