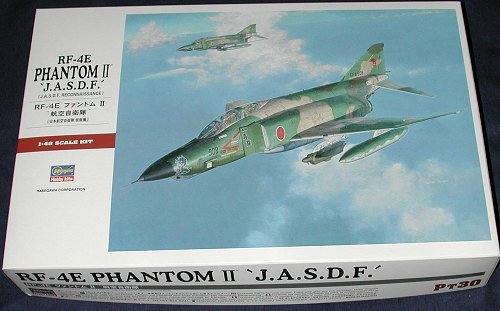
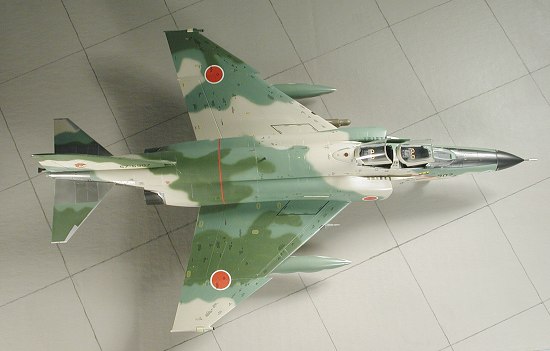
Hasegawa 1/48 RF-4E Phantom II 'JASDF'
| KIT # | 07230 (Pt 30) |
| PRICE: | ¥3200 (about $29) at Hobby Link Japan |
| DECALS: | Five options (all 501 Sq) |
| REVIEWER: | Scott Van Aken |
| NOTES: |
| BACKGROUND |
For a look at the new pieces and a bit of a history lesson, please visit the preview.
| CONSTRUCTION |
I'm almost embarrassed to mention this, but this will only be the second Hasegawa 1/48 F-4 kit I've ever built. While I've built a lot of F-4 models, most have been in 1/72. For those in 1/48, Monogram and ESCI have been the kits that have been done. In my defense, I did build the F-4B/N kit shortly after it was released (back about 25 years or so....). Why I've not done more is a mystery that will never be solved. It isn't like I don't have any of them as I must have a dozen different variants of Hasegawa Phantom in the kit dungeon.
 Well, on to the build. As it has been such a long time, I decided to sorta use the instructions when doing this one and follow their advice during construction. First thing I did was to remove all the bits that were NOT going to be used. That alleviated some of the clutter in the kit box. Next, I looked over the instructions and removed all the bits and pieces that it said I had to. Most of these were on the wings and I overdid it a bit on a few so needed a touch of filler to take care of the error. I still have not sanded off the bracing 'arrow' on the stabilators as of yet, but will get to them before painting.
Then I started gluing a few sub assemblies. First one is the wing. Fit is quite good, though one will have a seam to fill on the lower control surfaces where they join. A good modeler won't have to fill that area, but..... I also glued together the drop tanks and the wheels. There are no alignment pins on the wing tanks, which are from the generic F-4 sprue and are still raised panel lines. Rescribing them will be easy and something I know I'll have to do anyway after sanding the seams.
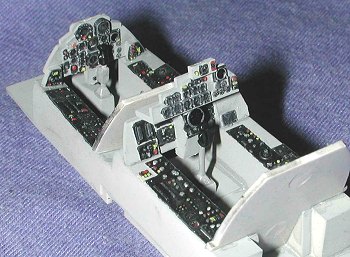 Moving to the cockpit, all the cockpit bits got painted either FS 36231 Dark Gull Grey or Black. The camera bits were painted FS 36118 Gunship Grey. With the cockpit and instrument panels dry, the various bits were painted black and when dry, drybrushed with Dark Gull Grey to bring out details. Then a few bits were picked out with red or yellow and the scope faces were filled in with gloss transparent blue. When that was done, the control sticks, rudder pedals and instrument panels were glued in place. Then the cockpit was glued atop the nose gear well, after removing the mounting and alignment pins indicated in the instructions.
Next, the myriad of ejector pin marks on the inner gear doors and the intakes were filled. I found it interesting that even on the modern, engraved panel line, 2003 mold parts, that there were ejector pin holes that needed filled. Some things just don't change! With the gear door and intake bits filled, those, as well as the wheels, were painted white with Floquil Reefer white and then given a gloss coat when dry.
Installment 2
 Today's building was a bit more mundane than what has gone on before. I assembled the basic intake pieces and glued them to the fuselage. Some careful fitting is needed to eliminate as much need for filler as possible. Once on and dry, the seam area was sanded down and any lost detail restored. I did have to use a tad bit of filler on the upper corner, but that is remarkably little compared to some F-4 kits I've built. I should also point out that the back of the inner intake piece is hollowed out and needs to be filled with some plastic card as the hollowed out part will be visible to the penlight police. I forgot all about that deal until after I'd already glued the intakes in place. There is also a set of panel lines for what appears to be a USN style refueling probe door. I'm not sure if that is supposed to be there or not as the instructions say nothing about filling it in.
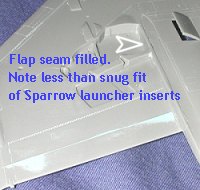 Turning to the wing, the seam along the lower flap took several applications of filler to get properly smoothed out. Now I'm sure that someone will tell me that a panel line is supposed to be there at the seam and if that is true, I'll scribe one in at a later date. I also took this opportunity to install the covers for the aft Sparrow wells. These seem to be a tad too small as they sink below the 'rim' of the well when installed and have gaps on the sides. Any of you ex-RF-4 mechs care to chime in on how these are supposed to be? I'd hate to have to put in a thick layer of filler. With those areas done, I took the wing and painted the wheel wells, speed brake well, lower main intake area, and the lower aux engine intake doors white. Now I know that the inside of the speed brakes themselves are red, but how about the well? The instructions say white. How about the lower aux engine intake doors. Are they red as well?
Returning to the main fuselage, I installed the aft camera bulkhead along with the camera that is fitted to it. I also removed two of the cameras from the sprues and painted the 'lens' area a dark, gloss blue. The three fuel tanks were sanded smooth and rescribed. No filler needed. (I've always wanted to say that..)
Installment 3
Installing the oblique cameras was the next job. These are designed to fit in slots on the inside of the nose. In order to get it to fit properly, I glued one side and then taped the fuselage together so that it would dry straight. It also gave me an opportunity to do some test fitting. During this process, I noticed that I could slide the interior up through the hole in the bottom of the fuselage, so proceeded to glue the fuselage halves together. I also took the opportunity to fill in the USN refueling probe that I missed while doing the initial read-through of the instructions!
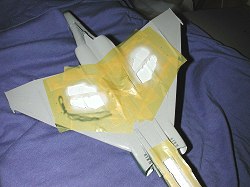
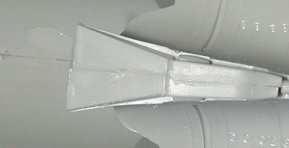 It was during this process that I discovered something rather odd. The farther back on the fuselage one went, the more that the panel lines seemed to diverge from each other. This means that at the nose they matched pretty well from part to part, but near the rear, they got farther from each other. I find this rather odd, especially in a new tool sprue and especially from Hasegawa. The two closeups show parts near the back of the kit. The one on the left shows the tail hook area and you can see that the two halves are not properly aligned, yet the very rear matches as do most of the panel lines in the 'hot section' adjacent to this part.
 The next image shows the wings held in place and the area just aft of the wings is not totally in synch. I've placed black dots where the three panel lines end at the join, and you can clearly see that while the forward one seems lined up, the next two are not. Now it could be that this is how it is on the real aircraft, but I don't think that is the case. Though not shown, on the spine, the lines there are off a bit as well, though not as much as shown here. This means that all those circular access hatches on the spine are a bit more oval than circular.
Anyway, once the fuselage was glued together, I sanded all the seams. Those areas that needed a bit of help were given it with regular filler. Then the wing was glued on. The fit here is pretty good and I only needed a touch of Mr. Surfacer to take care of some of the thin gaps. I also glued the proper fit tip. There are three provided, but only the one with the two ECM antennas (which is standard on the F-4EJkai as well) was used. Fit is great on one side, but a bit of a gap on the other, which was filled with Mr. Surfacer. The assembly was set aside to dry overnight.
Installment 4
Thanks to having many other things to do today, little was accomplished. However, I did manage to sand smooth all the filler that I applied last installment. This gave me a pretty well complete main airframe. I still have to rescribe and replace the lost detail. This is a bit on the time consuming side, but it does add a lot to the finished model when it is done. There are also a couple of spots (mostly under the intakes) where a touch more filler would work out well, but I'll wait to do that after I install the cockpit and glue the lower forward fuselage in place. It is quite possible that this part will cover up some of the areas of concern. I also glued the two radome pieces together and applied filler on the seams. With a weekend coming up, I should be able to make some decent headway by next installment.
Installment 5
As mentioned in the last installment, I had to rescribe and redrill lost detail. By redrill, I mean that the 'rivet' detail that had been either lost or sanded down was replaced by using a small bit (#76) and then lightly drilling into the appropriate area. It seems to work well and with the old spots as a guide, it is relatively quickly done.
 Then I installed the cockpit and lower forward fuselage fairing. The cockpit was pushed into place and when the lower fairing applied, it held the cockpit in so well that no gluing was needed. However, this lower fairing is a very tight fit and one has to be very careful when gluing to make sure that it fits properly. Once it was glued in, I pushed on the nose well to get it to line up with the fairing (which has part of the well molded into it. The molding of the new part is such that I was unable to get all the braces to line up perfectly.
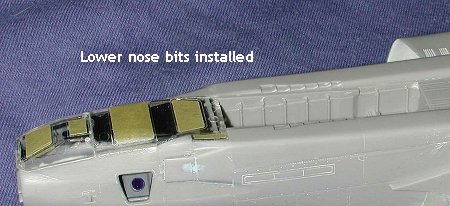
I then started installing all the cameras. They fit very well with no problems. I did have to be careful to let them fully dry to prevent any 'slippage'. Then I masked off the lower camera ports and assembled the very forward camera assembly. Fit is quite good here as well for Hasegawa provides positive locators for the framework in the forward lower 'glass' part. I then glued the lower 'glass bits in place. The aft one is a very tight fit and once the forward one was also installed, it was obvious that either the nose is a bit too narrow or the glass bits a bit too wide as they stuck out past the fuselage. This meant that I had to sand on them to get them closer to being flush. It also meant that the little guide marks for the forward radar warning antennas were sanded off or otherwise obliterated.
 During this time, I also glued on the avionics bay cooling scoops and used some filler to smooth them out. I also removed the reinforcement 'arrows' from the stabilators. Other things done were to assemble the seats after painting the frames black and the center sections a dark grey. It would be nice to at least include decals for the seat harness, but apparently Hasegawa plans on us using the crew figures that are supplied with the kit. Most of you will undoubtedly replace the seats with resin ones of a higher detail level, but the kit supplied ones are not that bad. I also installed the flare doors in the closed position. You may want to back these up with something as they sink in a bit from the surface. These fit snugly as well and once dropped in, are pretty well there for the duration. The last thing I did was smooth out the filler applied on the nose cone.
| COLORS AND MARKINGS |
Installment 6
Though it may be a bit early for this, I decided to start on doing some painting. I really don't like the thought of using acrylics on this kit, but since no one else does the rather odd tan and lighter green that is used on Japanese RF-4s I had little choice (being too lazy to mix). However, I do have light gull grey which goes on the underside so I painted the outside of the gear and 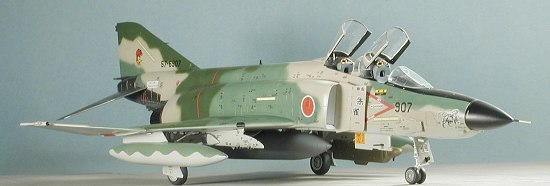 speedbrake doors with this color as well as the underside of the tailplanes. I also painted most of the fuselage undersides, but as I didn't mask off the wheel wells yet, I had to spray around that area. I used Testors ModelMaster enamel for this task. I also painted the gear and various retraction struts white while I had the time.
This painting also extended to the drop tanks and I was able to paint one of the outboard tanks using the light gull grey. I also painted the burner cans 'jet exhaust' from the Alclad II line of paints. The parts were then set aside to dry. The Testors gloss enamel will easily take a day or two before it is cured enough to be able to put up with a lot of handling.
While this was going on, I finished up the two bang seats by painting the little pull handles on the tops of the seats. I find that painting them yellow and then using a drafting pen for the black is the easiest way to do this. The seats were then touched up, dry brushed and installed in the cockpit.
Installment 7
 It has been a few days since the last installment, but that is primarily because little has been done other than painting. With a complicated 4 color scheme as this plane has, it is time consuming as I wait a day between coats to let the paint dry. I also ended up having to mask around the wheel wells and repaint them white, for despite my attempts to mask them with tissue, there was more 'leakage' than I'd have liked.
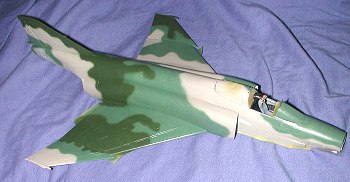 I should mention that two of the upper surface colors, the lighter green and the tan are only available premixed by Gunze in their acrylic line. I really don't like acrylics for these kinds of camouflage as I find I can't get a really fine line using them. These weren't too bad, but still a bit coarser than I can get with enamels.
During this time, I also spent some time painting the drop tanks, though this time, I masked the camo edge. It will look a bit different from the freehanded airframe, but nothing really radical. I did notice that the Hasegawa builder who did the box side plane masked the camo scheme completely. I also finished painting the various gear and speed brake actuators and struts. I then covered the bare oleos with Bare Metal Chrome foil.
With the painting done for the main camo colors, the airframe was given a coat of Future to provide a base for decals. The underside is already gloss so I only had to do the upper surfaces. That was then left to dry. As a bit of a final note for this installment, I found that I'd made a few errors in the canopy area. First, I glued the back piece that goes on the fuselage spine a bit too far aft, resulting in a gap. Then I guess I messed up with either the windscreen or the center piece as I found that I couldn't fit the forward canopy in the closed position for painting. Made me have to do some additional masking that I didn't want to do, but it all turned out OK in the end. Besides, I'm going to pose the canopies open as this kit does not provide the optional single piece canopy that some others do.
Installment 8
With the basic colors in place, I did the metal parts. Using Alclad II paints, I sprayed various areas of the back and horizontal stabilizers with Aluminum, Magnesium and Steel. I did the afterburner cans with Jet Exhaust. I did no underneath prep, either 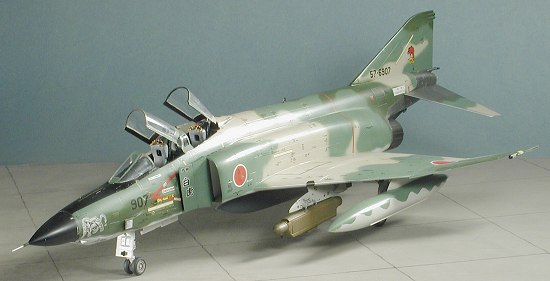 spraying directly on to bare plastic or whatever had been oversprayed. The really nice thing about Alclad is that after just a few hours you can mask over it with no problems at all. As usual with things like this, I used up a lot of masking tape. Now it may well be that painting this area before doing the rest of the camo might be the wisest way of doing things, but I've always done it in this order so decided to continue to do so.
Next step was to get it on its gear so that decal application could be easier. Having already painted the gear, it was just a matter of gluing them in place. I left most of the gear doors off as my experience is that I knock these things off while handling during the decaling process. True to my word, the one inner main gear door I glued in place was promptly knocked off! I also think that I got the main gear a bit too much toed in. They do angle in, but I don't think it should be as much as I have mine.
While that was drying, I did some more painting. In this case it was the splitter plates in their appropriate Gunze colors. Then the centerline tanks was painted FS 36118 as indicated in the instructions. I guess that using and F-15 tank for this meant that none were specially painted the light gull grey for the few Phantoms that would also be using them. I also painted the chaff dispensers that would be later attached to the inner pylons. These are light gull grey on the front and I used steel for the aft sections. I also painted the inside of the speed brakes with Insignia Red using ModelMaster enamels. With the landing gear dry, I glued on the wheels. These had been painted white, masked and then the tire portion painted using Floquil's Weathered Black.
 Now for probably the most challenging part; getting on all those decals. There are over 140 of them and there would be more except that Hasegawa has grouped quite a few of them together under a single carrier. This saves a huge amount of time in application. Purists will want to cut them apart and put on the 400 or so single items, but not this kid! I have to say that I was greatly impressed with the decals. Hasegawa has made a huge change in the decals over the last year or so and these were a delight to use. They are very thin so one has to handle them carefully to keep them from folding, however, they are also relatively tough so that if that does happen, they can be brought back again with a little effort. I used Microset on them and they reacted beautifully to it with no permanent wrinkling as has been my past experience. Some took a second application to get rid of some slight silvering. I started on right side working from back to front. I got near the front and noticed that I'd forgotten to paint the anti-glare panel on the nose. That stopped things at the intakes and I did as much as I could in one day on the upper wings before painting the nose section just prior to going to bed.
Installment 9
The vast majority of my time was spent putting on decals and more decals and even more decals. I also discovered that the decals themselves were just a tad too big in most cases and a little small in some others. This was most noticeable on the 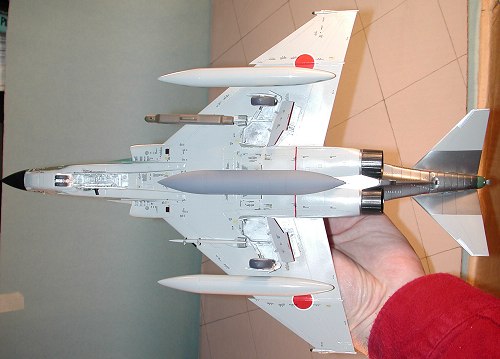 large decals that covered a number of stencils. The one on the belly was the biggest problem as it needs to be cut prior to application because the lower inlet doors are open; something that the decal doesn't take into consideration. There was also some problem lining things up with various buttons, panel lines or holes that are molded on the kit. They came close, but not quite in several cases. Were I not working on a deadline, I'd have done a lot more cutting than what I actually did when applying these. I should also mention that the wing tip slime lights are just not the right shape and don't fit. You can get them to work on the top or the bottom but not both. They are printed as a rectangle, but to fit they need to be chevron shaped.
During breaks from application, I painted the jamming pod in Olive Drab as the instructions suggested and also wrapped the shafts for the speed brake pistons with Bare Metal Foil's Chrome. Once all the common decals were applied (which is about 98% of them) I then applied the specific decals for the plane that I was modeling. These consisted of nose art, crew names and the like. The one on the right side has to be skewered by the temp probe that juts out there if you don't want to cut it off and then try to reattach it over the decal. It would have been really nice if Hasegawa had left a hole in the right side decal as guidance, but they didn't.
Final Installment
Once the decals were all on and I'd checked for silvering, reapplying Microsol when needed, the model was given several coats of Future to seal in the decals and try to smooth out the surface where the 'run lines' went between decals. Naturally, I missed a few decals and there was a touch of silvering, but nothing as bad as it could have been.
| FINAL CONSTRUCTION |
Unlike many kits, final construction consisted of a lot more than usual. It is just the nature of things with lots of antennas, gear doors, pylons and the such. I first glued the anti-sway braces to the bottom of the inner pylons. Then the chaff/flare 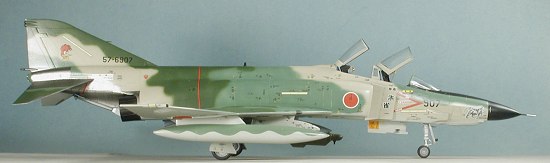 dispensers were glued in place. These have no guide lines at all and the instructions are not the most precise on placement, offering only general guidance. Those were set aside to dry.
I then started gluing on all the stuff in the landing gear area. I first started with the small outer gear doors which were knocked off during decaling. Those were followed by the main gear doors. Finally, the smaller inboard gears and actuating arm were glued on. These doors have no positive location and are just sort of tacked in place. Moving a bit farther back, the speed brake actuators were glued on and the speed brakes then glued to them. Thanks to all the zillions of pressings of the lower wing, the fit of the forward attachments requires a bit of grunt work and trimming of some flash that I missed on the first go-around.
With those in place, I moved forward to the nose gear. Both of these have antennas to glue on and the very forward one has a landing light assembly to glue in. The light portion of this was painted aluminum and then the back of the light assembly painted white. There is a small lower IFF antenna to go on the back of the forward gear door and a sensor to the front. Well, the sensor took a 'zing' into the aether so I replaced it with 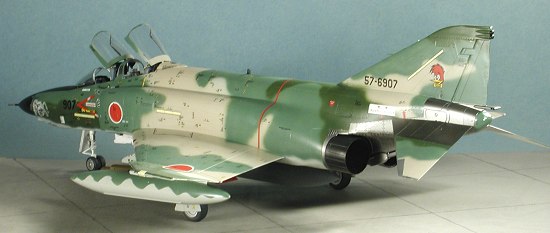 another antenna as there was nothing close to it and I'd already put glue in the receptacle. The main nose gear door had its antenna glued in and then it was glued to the gear well. Fit is great, but again, it took a touch of grunt to get it to fit in place.
Moving to the top of the plane, the upper IFF antenna was glued in place. To the back, the tail hook hold back was glued in as was a little 'thingie' in the hole in the parabrake housing. I think it may be a position light. I then glued the two inner pylons to their respective holes. Next, the centerline tank had the little block glued to the back. This part fits OK, but the small 'L' shaped part it glued onto is not very sturdy and is on the verge of breaking off. I glued the tank to the forward hole and to my dismay, the aft hole (for the old tank pylon) is still quite visible. Then I went and painted the inside of the canopies and the RWR antennas on the wing tip and fin tip black. The other three smaller ones on the parabrake door were painted white and the formation lights were also painted at this time.
I then glued on the forward nose gear door and the wing drop tanks. Next the nose probe was glued in. This has a tendency to disappear in its entirety into the nose cone, so one has to be careful. The final big bits were the stabilators. I have to confess that I've always had trouble getting these at the same angle much less the right one. I do hope that some time in the future someone does these so that they fit better. I also think they are too far out from the side. I've seen a lot of Phantoms with scrape marks on the fuselage from where the front of these hit and while they are not as far away as on the Monogram 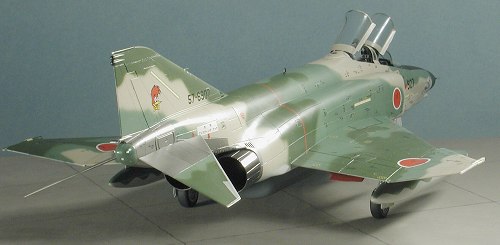 kit, I think they are still too far out. I then glued on the jamming pod. As a note I find it odd that no data or stencil markings are provided for the pod as I'm sure it was just as festooned with them as the rest of the aircraft. I also find it odd that there were none of the outer wing pylons or drop tanks. I've the sneaking suspicion that Hasegawa forgot to put them on the sheet or just ran out of room for them.
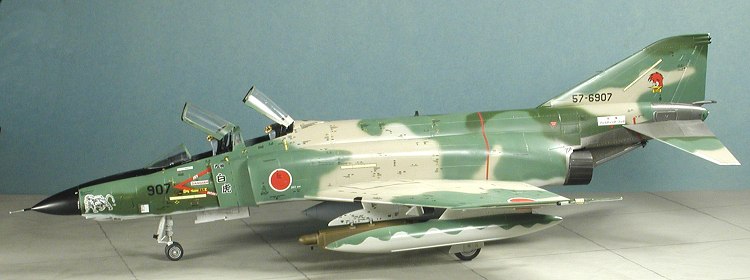
I then gave the airframe an overall coat of semi-matte, leaving the lower surface glossy as that is how it seems to me how things should be according to the colors given. Once that had dried, I removed all the masking from the clear bits and then installed the canopies. I should have added some thin yellow decal around the canopies, but I was running low on time. I'll tell myself that I'll add that on at a later time, but I'm one of those who almost never goes back and does anything to a completed kit. A bit of dirty wash in the wheel wells, and the kit was done. I then scurried off to take pictures before I broke something!
| CONCLUSIONS |
I'm glad to have revisited the Hasegawa F-4 after so long an absence. Will it make me want to build more. Sure, but want and will are two different things. I'll say that it won't be for a little while, but I do have an old C model on the build pile. It is a nice model and for many modelers, an old friend that gets visited again and again. March 2004
Copyright ModelingMadness.com. All rights reserved. No reproduction without
express permission. Thanks to
#1306 in a series for the chance to build this kit.
If you would like your product reviewed fairly and fairly quickly, please
contact the editor or see other details in the