Zvezda 1/72 MiG 1.44
| KIT #: | 7252 |
| PRICE: | $25.98 MSRP |
| DECALS: | Two options |
| REVIEWER: | Scott Van Aken |
| NOTES: |
| BACKGROUND |
Please visit the preview to see what comes in the box and for a short history on the type.
| CONSTRUCTION |
Though the box is large, there really are not that many parts, especially when you'd compare it to a modern Hasegawa kit. Fine with me as I often feel that some companies make things a bit overly complicated.
I always read over the instructions and then see what I can do in the way of sub-assemblies. On this one, the first ones I spotted were the wings. There are three major bits to each wing; a lower insert and a long piece that is part of what I guess is an ECM/ESM appendage to the rear. The insert fit fairly well and the ECM bit didn't. Thanks to using a 'hot' glue like Ambroid Pro-weld, the ECM bit sort of melted its way into position. I used filler on the seams of both parts and on the sink areas to the rear of the wing where the plastic was thick.
 At this time, I also glued in the
wheel wells to the lower fuselage half. Fit here is very good, though the
top of the well has an open area. Supposedly this will be filled with the
wing when it is attached. I also glued in the lower intake ramp and filled
all the seams. Perhaps I didn't need to, but I wanted as clean an intake as
I could get as it looks quite large. At this time I also glued in the
forward engine compressor piece and the rear afterburner section.
At this time, I also glued in the
wheel wells to the lower fuselage half. Fit here is very good, though the
top of the well has an open area. Supposedly this will be filled with the
wing when it is attached. I also glued in the lower intake ramp and filled
all the seams. Perhaps I didn't need to, but I wanted as clean an intake as
I could get as it looks quite large. At this time I also glued in the
forward engine compressor piece and the rear afterburner section.
While the filler was drying, I glued in the control stick (no rudder pedals on this one), and painted the cockpit with the upper surface color as recommended in the instructions. Actually, the instructions are a bit sparse when it comes to interior color information. They just say 'Intermediate Blue' for the interior and 'Black' for the ejection seat. The seat, by the way, is nicely done and comprises four parts that fit quite well. No harness, of course, as you are expected to fill the seat with the pilot figure that is supplied. Once the interior was dry (and I used a bottle of Aeromaster USN Intermediate Blue as I didn't have any of the Testors paint), I applied the decals to the yet unpainted instrument panel and the side consoles. These decals have a lot of clear carrier around them that should be trimmed prior to use. They succumbed quite willingly to Solvaset.
In the meanwhile, I painted the wheels. Again, a ModelMaster color was suggested that I didn't have. Most Russian aircraft wheels seem to be a nice green color so I used Humbrol 101, which looks about right to me. During the painting I noted that one of the main wheels had a rather large sink area in it. However, it will be on the back side so hopefully I can hide it.
 Meanwhile, the wings had dried and I
sanded off the filler and rescribed any lines that got filled in. Took a
second application with some Mr.Surfacer to fill in all the small bits. I
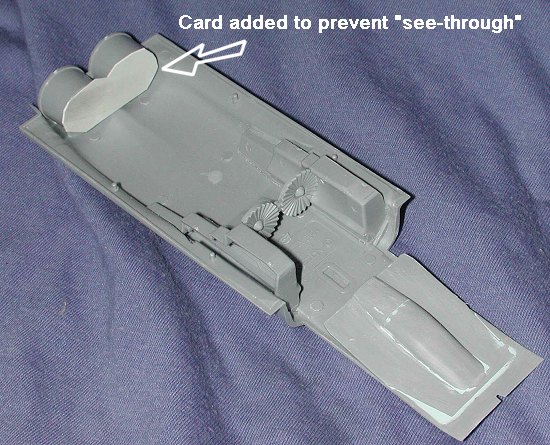
then turned my attention to the lower center section. I noticed that there
could be a 'see through' effect from the exhaust so I cut a piece of
plastic card and glued it to the back of the exhaust. (After the kit was
built, it seems that this wasn't needed.) I then painted the
forward section and the compressor blades with Dark Aluminum. The
exhaust got a coat of Jet Exhaust. Both these colors are from the Alclad II
range.
Meanwhile, the wings had dried and I
sanded off the filler and rescribed any lines that got filled in. Took a
second application with some Mr.Surfacer to fill in all the small bits. I
then turned my attention to the lower center section. I noticed that there
could be a 'see through' effect from the exhaust so I cut a piece of
plastic card and glued it to the back of the exhaust. (After the kit was
built, it seems that this wasn't needed.) I then painted the
forward section and the compressor blades with Dark Aluminum. The
exhaust got a coat of Jet Exhaust. Both these colors are from the Alclad II
range.
Meanwhile the interior and instrument panel was glued in place and I added a nose weight just in case it needed it. I then glued in the interior and closed the forward fuselage halves. Fit is OK, but the interior has darn little to attach itself to. The only guide is that the back of the interior has to fit flush with the rear of the cockpit opening. It was a tight squeeze as the instrument panel didn't seem to want to fit in place and it was difficult to situate the tub with the halves cemented. I needed filler on this join and really, just about every other join on the kit. While that was drying, I glued the upper intake pieces together.
 After sanding the forward fuselage
and rescribing the panel lines, it was time to put some major pieces
together. This basically meant trapping the wings between the upper and
lower rear fuselage sections, joining the nose section, adding the upper
intake assembly and then gluing on the intake side pieces. I did all of
this at one time so that I could adjust things as much
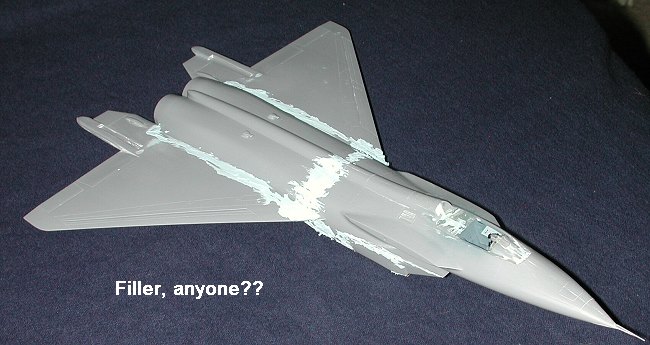
as possible while the cement was still pliable. The end result isn't bad,
but it isn't perfect either. The engineering is good, but the major pieces
(wings, center fuselage and forward fuselage), did not match up perfectly
with each other. On one part there would be a gap; another a step on the
wing side; another a step on the fuselage side and so on. Once all the bits
were dry, I slathered filler on every single join and girded my loins for
having to do several applications to get things smoothed out. I did
not
After sanding the forward fuselage
and rescribing the panel lines, it was time to put some major pieces
together. This basically meant trapping the wings between the upper and
lower rear fuselage sections, joining the nose section, adding the upper
intake assembly and then gluing on the intake side pieces. I did all of
this at one time so that I could adjust things as much
as possible while the cement was still pliable. The end result isn't bad,
but it isn't perfect either. The engineering is good, but the major pieces
(wings, center fuselage and forward fuselage), did not match up perfectly
with each other. On one part there would be a gap; another a step on the
wing side; another a step on the fuselage side and so on. Once all the bits
were dry, I slathered filler on every single join and girded my loins for
having to do several applications to get things smoothed out. I did
not 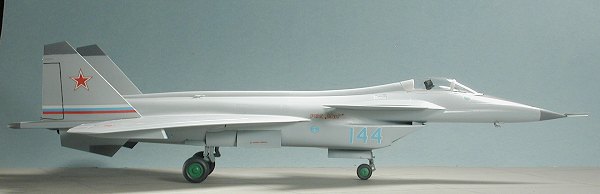 attach any of the tail pieces or strakes as they would only get in the
way of sanding. It took two full applications on some of the worse parts
and a third just to get a few bits I missed. During all this work, I broke
off one of the pitot tubes.
attach any of the tail pieces or strakes as they would only get in the
way of sanding. It took two full applications on some of the worse parts
and a third just to get a few bits I missed. During all this work, I broke
off one of the pitot tubes.
After the third filler run, which was basically some Mr. Surfacer to take care of some pesky holes, I glued on the upper fins and the lower ventral strakes. The right fin needed a touch of trimming to fit the slot as the mounting section was a teeny bit too large. The left side was no problem. I had to use some Mr Surfacer to take care of some gaps. I should mention that my Mr. Surfacer started at 500 but has thickened so much that it is almost like putting on regular filler. I've tried thinning it with lacquer thinner, but it is only good for a very short period of time until it turns back to sludge.
 Meanwhile,
I worked on a few other bits. One was the landing gear. These were removed
from the sprue, and , in the case of the nose gear, assembled. Then I
painted them FS 34092 as recommended by the instructions. Must say that
dark green landing gear are new to me. I also filled the large sink areas
in the wing pylons. Too bad that there are not any weapons to attach to
them or the underside of the fuselage. With the fin and ventral strakes
cleaned up, I then attached the flap actuator housings. Fit here is fair
and the rather large gaps were filled with my usual Mr.Sludge 75.8. While
this was drying, I Googled the aircraft to find out the color of the wheel
wells. I didn't find anything helpful there, but I did see that on all the
photos of the 01 aircraft, the landing gear were a light grey and not that
Dark Green that the kit instructions claimed. A quandary to be sure. Well,
I decided to paint the various dielectric panels using some Aeromaster FS
36118 acrylic that I had in my stash. When dry, this area was masked off
and I returned to the build process.
Meanwhile,
I worked on a few other bits. One was the landing gear. These were removed
from the sprue, and , in the case of the nose gear, assembled. Then I
painted them FS 34092 as recommended by the instructions. Must say that
dark green landing gear are new to me. I also filled the large sink areas
in the wing pylons. Too bad that there are not any weapons to attach to
them or the underside of the fuselage. With the fin and ventral strakes
cleaned up, I then attached the flap actuator housings. Fit here is fair
and the rather large gaps were filled with my usual Mr.Sludge 75.8. While
this was drying, I Googled the aircraft to find out the color of the wheel
wells. I didn't find anything helpful there, but I did see that on all the
photos of the 01 aircraft, the landing gear were a light grey and not that
Dark Green that the kit instructions claimed. A quandary to be sure. Well,
I decided to paint the various dielectric panels using some Aeromaster FS
36118 acrylic that I had in my stash. When dry, this area was masked off
and I returned to the build process.
Next item to glue in place were the outer wing pylons. After they were dry, it was time to do some serious thought about painting.
| COLORS & MARKINGS |
The instructions call for
Intermediate Blue on the upper surfaces and Light Ghost Grey undersides.
Well, every photo I've seen of this plane shows it with a light grey on the
upper surfaces. I had some Aeromaster acrylics in the Light Ghost Grey
 color,
so I masked over the open cockpit and sprayed the majority of the upper
surface of the airframe with this color. It seems to match the photos
pretty well. The blue, however, is another thing altogether. It is way too
dark. I painted the lower surfaces with this shade, using Testors enamels,
thinking it might look better once on the plane. It is too dark. So, I
mixed up a batch that was lightened up with white, doing a 50/50 mix. Much
better, but so close to the upper surface color that it needed to be
darker. I added some more of the Intermediate Blue and that was a much
closer mix.
color,
so I masked over the open cockpit and sprayed the majority of the upper
surface of the airframe with this color. It seems to match the photos
pretty well. The blue, however, is another thing altogether. It is way too
dark. I painted the lower surfaces with this shade, using Testors enamels,
thinking it might look better once on the plane. It is too dark. So, I
mixed up a batch that was lightened up with white, doing a 50/50 mix. Much
better, but so close to the upper surface color that it needed to be
darker. I added some more of the Intermediate Blue and that was a much
closer mix.
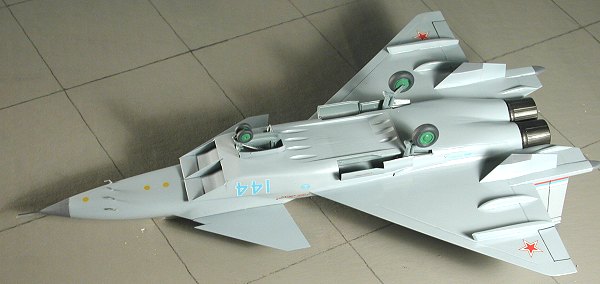
I also knew that dark green wasn't going to cut it for the landing gear, so used a darkish blue grey (FS35237) to do the gear, inside of the gear doors and the gear wells themselves. This was left to dry and in the mean time, I masked off the canopy and windscreen. With the appropriate areas of undersurface color masked off to keep the overspray away, I painted the rest of the upper surface with the Light Ghost Grey.
 Back at the work bench, I glued on
the landing gear. The front one fit superbly with no problems at all.
Wheels went on and fit quite tightly. The main gear wasn't that bad, but it
wasn't as positive a fit as the nose gear. There is a small retraction
strut to glue into place that is a bit fiddly. Wheels were a tight fit here
as well. Next were the gear doors. The nose gear doors have positive
locators and fit very well. Not the same for the main gear doors. There are
small tabs that are to provide the sole support for the doors on the well
lip. The very small one in the back has to have the rear tab removed as the
retraction strut won't allow it to fit in place. The other two I had
problems with the tabs quite easily snapping off. Eventually, I got them on
but am less than thrilled with this attachment method.
Back at the work bench, I glued on
the landing gear. The front one fit superbly with no problems at all.
Wheels went on and fit quite tightly. The main gear wasn't that bad, but it
wasn't as positive a fit as the nose gear. There is a small retraction
strut to glue into place that is a bit fiddly. Wheels were a tight fit here
as well. Next were the gear doors. The nose gear doors have positive
locators and fit very well. Not the same for the main gear doors. There are
small tabs that are to provide the sole support for the doors on the well
lip. The very small one in the back has to have the rear tab removed as the
retraction strut won't allow it to fit in place. The other two I had
problems with the tabs quite easily snapping off. Eventually, I got them on
but am less than thrilled with this attachment method.
Returning to the paint shop, I masked off the nose to paint the anti-glare panel. Then the kit was given a coating of Future in preparation for the decals.
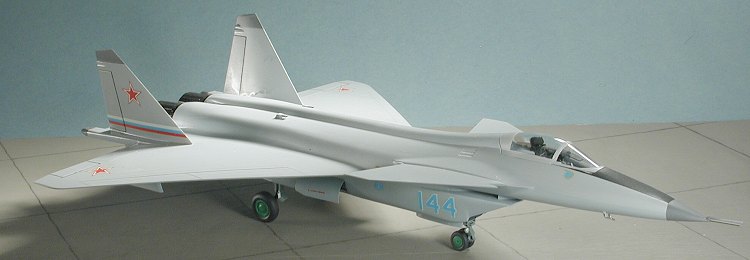
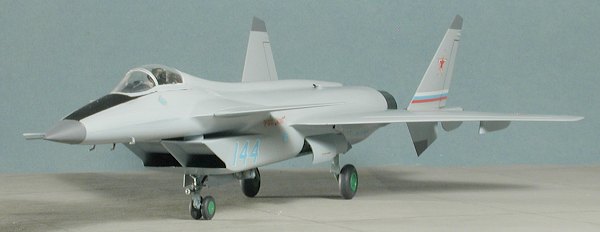
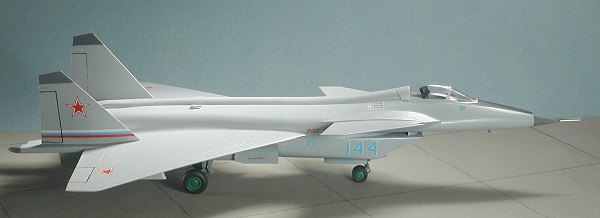
Naturally, I chose the more colorful of the two, Bort 144 with the red white and blue stripe on the fin. The kit decals had already started to yellow a bit, but they went on rather well and succumbed to the Solv-a-set that I applied to them. I suggest trimming these decals prior to application. Most of us are spoiled by the excellent decals that we often get in kits, and many of us generally resort to aftermarket for most of our model. However, that is not an option with this one at this time so we really need to go back to our roots and return to decal trimming!
| FINAL CONSTRUCTION |
 There really isn't much to the final
construction. I glued on the canards at the angle suggested in the
instructions. I also glued in the various landing lights and installed the
small landing light door next to the nose gear. There are four small probes
to be glued to the underside of the nose. I also had to drill out the nose
to replace the pitot that I broke off earlier in the build. I used small
diameter stainless steel tubing for this operation. Finally, the
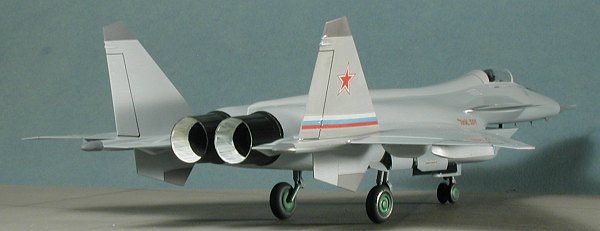
exhaust cones, which I'd partially painted in Ivory to try to duplicate the
ceramic that is used there, were glued in place. These can be glued in
nearly any position as the MiG 1.44 has vectored exhaust, but I chose the
standard neutral position. I did no weathering and kept the paint rather
glossy as this is a prototype and those generally don't look like they've
been left out in the jungle for four years.
There really isn't much to the final
construction. I glued on the canards at the angle suggested in the
instructions. I also glued in the various landing lights and installed the
small landing light door next to the nose gear. There are four small probes
to be glued to the underside of the nose. I also had to drill out the nose
to replace the pitot that I broke off earlier in the build. I used small
diameter stainless steel tubing for this operation. Finally, the
exhaust cones, which I'd partially painted in Ivory to try to duplicate the
ceramic that is used there, were glued in place. These can be glued in
nearly any position as the MiG 1.44 has vectored exhaust, but I chose the
standard neutral position. I did no weathering and kept the paint rather
glossy as this is a prototype and those generally don't look like they've
been left out in the jungle for four years.
| CONCLUSIONS |
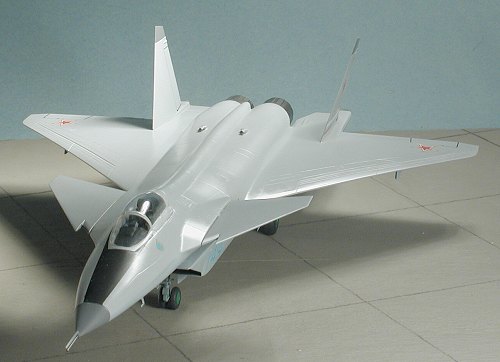 Well, I have to say that I'm pretty pleased with the
results. It is a very large aircraft on the scale of the Su-27 family so
takes up quite a bit of space on your shelf. It is probably the first
modern Russian aircraft I've built in 15-20 years (the last one being a
Fujimi MiG-29 when it was new) and it does make for an interesting addition
to the model collection. Best of all, it is not a difficult build and went
together with minimal fuss.
Well, I have to say that I'm pretty pleased with the
results. It is a very large aircraft on the scale of the Su-27 family so
takes up quite a bit of space on your shelf. It is probably the first
modern Russian aircraft I've built in 15-20 years (the last one being a
Fujimi MiG-29 when it was new) and it does make for an interesting addition
to the model collection. Best of all, it is not a difficult build and went
together with minimal fuss.
September 2004
#1331 in a series
Copyright ModelingMadness.com. All rights reserved. No reproduction in part or in whole without express permission from the editor.
If you would like your product reviewed fairly and fairly quickly, please contact the editor or see other details in the Note to Contributors.