Zvezda 1/72 MiG-27D 'Flogger'
| KIT #: | 7228 |
| PRICE: | $14.35 |
| DECALS: | One option |
| REVIEWER: | Scott Van Aken |
| NOTES: | Not exactly a modern kit |
| HISTORY |
 The Mikoyan MiG-27 (Russian: Микоян МиГ-27) (NATO reporting name "Flogger-D/J") is avariable-geometryground-attack aircraft, originally built by theMikoyan design bureau in theSoviet Union and later license-produced inIndia byHindustan Aeronautics as the Bahadur ("Valiant"). It is based on theMikoyan-Gurevich MiG-23fighter aircraft, but optimized for the air-to-ground role. Unlike the MiG-23, the MiG-27 did not see widespread use outside Russia, as most countries opted for theMiG-23BN andSukhoi Su-25 instead. It currently only remains in service with the Indian, Kazakh and Sri Lankan Air Forces in the ground attack role. All Russian and Ukrainian examples have now been retired.
| THE KIT |
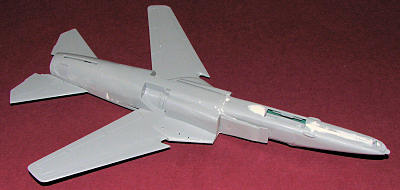
 I found some sunken in areas, a bit of flash, and some large ejector stubs/depressions, though the latter were confined to the intakes and the insides of the fuselage sections. Like every swing-wing kit I have seen, this is made up of two distinct sections. The main fuselage is split horizontally to handle the moving wings (which are one piece molds), while the cockpit section is split vertically.
 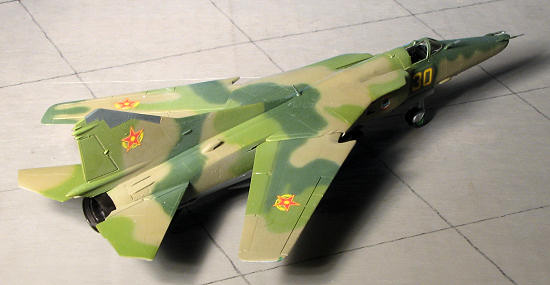 the Hasegawa one which comes with little in this area. A bit of an oddity is that there appears to be a MiG-23 nose cone included on the sprues.
 | CONSTRUCTION |
First thing was to start looking for subassemblies. I glued the main wheels together as well as the rear fuselage, trapping the wings in the fuselage halves. Note that there are thinner, one-piece main wheels, but I think those are for the MiG-23. Naturally, the rear fuselage section needed quite a bit of filler.
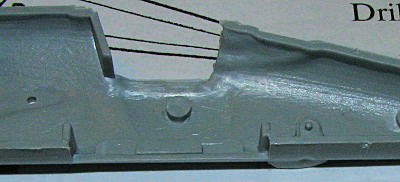 Moving to the cockpit, the cockpit floor was installed after removing the rather large ejector towers in the side panels. No messy detailing here! I also had to cut the instrument panel to fit. It turns out that perhaps that was not needed as I stupidly glued the floor piece up against the fuselage side, only to find out that doing so did not center it. So be careful. There is not any really positive locator for the cockpit floor and it sort of fits where it is placed.
I next sanded down the large ejector pits on the inside of the intakes and glued the inner portions to each nose half. I then inserted some weight in the nose (just in case) and cemented the nose sections together. Actually, this was done in steps as the nose halves were warped. These were taped to try to keep things straight.
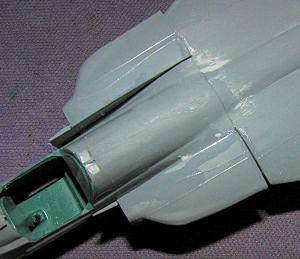
 The next step for me was to cement the nose to the rest of the fuselage. The join is the epitome of poor fit. By the time I got things lined up, the forward fuselage section was taller than the remaining fuselage and there was a gap so large I had thought of using plastic card to fill it. Instead, I filled it with gap filling super glue. As for the rather large step between the fuselage sections, that was tackled with a BAF (big a** file). Thankfully, the plastic in the kit is relatively soft so in almost no time, I had the area smoothed out. The usual round or two of filler got all the joins well taken care of. I also glued on the tail planes at this juncture. Fit is fairly good, but some filler was needed. I also opened up the nose gear hole as thanks to the off center interior, the nose gear would have been well off to the side. I also considered some plastic card to fill the opening that was left between the floor and fuselage.
 Next were the intakes, but this was delayed while I tried to figure out the color of them on the inside. Thanks to the input from a reader, it seems these were painted a darkish green color and the exterior shade was allowed to overspray into it. Having so painted them, the outer sections were glued in place. Um. Not exactly a good fit. Out came more super glue and filler. Eventually, everything was smoothed out, though all the raised surface detail was pretty well wiped out. Meanwhile, I decided to go ahead and install the ventral fin stub and the fin itself. Before that I test fit the burner section. It was a bit too large so that was sanded down to a more acceptable level before installing the fin. The fin does not fit as well as one would hope. Even after much sanding of the mating surfaces, I had to tape it in place while the glue dried and later used filler to take care of the gaps. All the filler and drying and sanding easily doubled the time of the build.
I then attached the bomb pylons and the aft engine scoops. As Zvezda had already drilled the holes for the large glove pylons and I was using the smaller ones, there were additional holes that needed to be filled. I then installed a True Details bang seat. It was far too tall and much had to be removed from the bottom of it to get it to fit. I also had to cut a notch in the back to get it to clear the step that is there. Eventually, I ground it down enough to fit the canopy. This and the windscreen were masked and glued in place. Good a time as any to start painting.
| COLORS & MARKINGS |
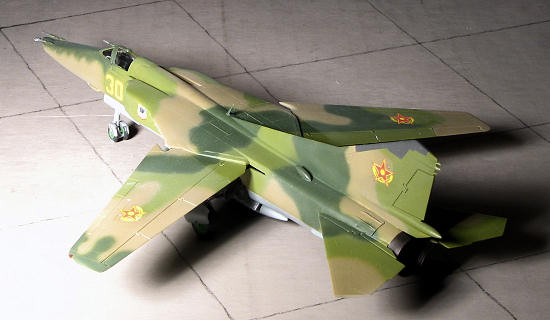
For this project, I ordered what I thought were the proper shades in the AKAN paint range. I have never used these acrylics so was anxious to see how they worked. First, I painted the undersi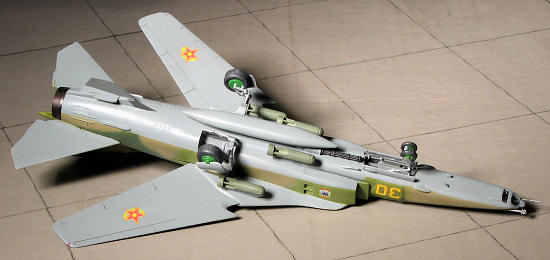 de a blue-grey color. The paint went on quite well and dried rather quickly. Much masking took place before tackling the upper colors. The next color was a tan and it also dried quickly. One has to be careful not to thin this paint too much or it will run, even with low pressure.
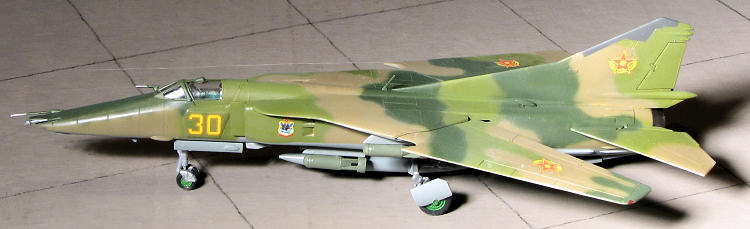
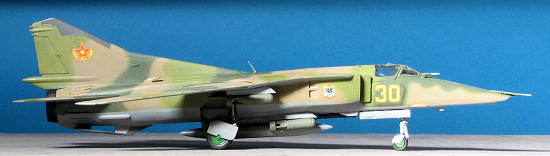
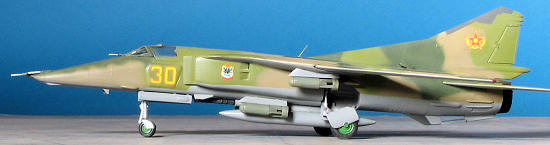
Next were the two upper greens. I started with the lighter green, turning down the pressure to about 8 psi and thinning the paint a bit more. It went on well, but I was constantly clogging the tip so once I got a spray pattern, I kept going. Next was the darker green. Well, this turned out to be very much a greenish grey like SAC bomber tan and not what was called for. Rather than wait, I used Testors French Khaki in their enamel range. This looked pretty close and went on with much less hassle than the acrylic. I did the usual back and forth to fix glitches and the overall scheme was done. It looks very much like a USAF SEA camouflage in terms of colors.
| FINAL CONSTRUCTION |
 was required to figure out how the main gear went together and would fit into the gear wells. After getting things in place, also attached various antennas and a few other fuselage bits. This required a quick repaint of those areas, which I did with a brush. The paint match is perfect.
 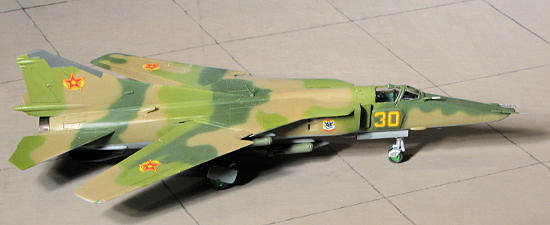 I then attached more stuff like the gear doors, wheels, and the ventral fit before hauling everything to the paint booth for a clear overcoat. Though the real paint is semi-glossy, I decided to do a matte as it photographs better. Then the last bits were attached. The seeker windows in the nose (which were a poor fit, the centerline tank (which will only clear the gun if fit one way), the exhaust section, and the last ones were the bombs. Masking removed, curses filled the air when I noticed that the glue had seeped up onto the quarter windows, and I was done.
| CONCLUSIONS |
 This entire build was perpetrated by a decal sheet. This happens to me quite a bit. I had hoped to use the Hasegawa kit, but it turns out that it is a very early version and not appropriate for the sheet. As the pickings are very slim in this area, the only option was the Zvezda kit. It is not one I would recommend were there something better. The instructions are basic and not very helpful, the parts fit is not the best, and it needs to be treated like a short run kit. Having said that, despite the troubles, the end result is pleasing and I am glad that I took the time and effort to build it.
| REFERENCES |
http://en.wikipedia.org November 2011 Copyright ModelingMadness.com. All rights reserved. No
reproduction in part or in whole without express permission from the editor.
If you would like your product reviewed fairly and fairly quickly, please contact the editor or see other details in the