Fujimi 1/72 Bae Hawk
Kit Number: B3
Price: $5.00
Media: Injected Plastic
Decals: Two versions: Bae demonstrator, RAF 63 Squadron
Reviewer: Scott Van Aken
Date of Review: 10 August 1997
For over 20 years the Hawk has been an RAF pilot's introduction to fast jets. It is also an excellent seller in the world market with over twenty countries choosing it for training and light strike duties. The US Navy has chosen a modified version, the T-45, to replace the TA-4 and T-2 trainers. There has even been a single seat light attack version that has sold to Malaysia and a few other countries. To my eye, the Hawk is a very attractive aircraft and I have built a number of kits of this type.
Fujimi's Hawk is in many ways similar to the kits from Matchbox, Airfix and Italeri. It falls in the middle of the two in terms of complexity with the Italeri kit being the most complex and the Matchbox the simpler. It has finely engraved panel lines and a goodly amount of detail, however the wheel wells are not boxed in, and there are mold pin release marks on the inside of the fuselage (not visible when done) , the landing gear struts, and the gear doors (are visible and need fixed). It is also molded in a relatively hard grey plastic. There are stores options of fuel tanks, rocket pods and a gun pod.
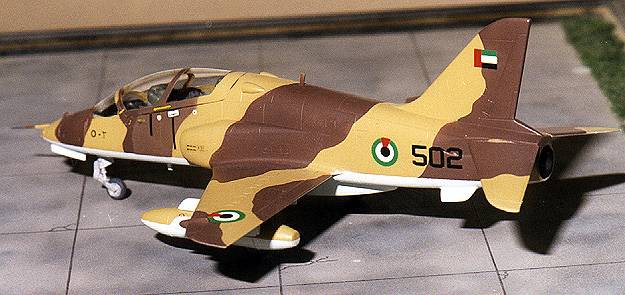
The cockpit is the first area and it comes relatively well equipped although there is no sidewall detail. The instrument panels have decals that provide an adequate representation. There is plenty of room for detail to be added as the interior can be seen through the kit's clear canopy. The bang seats suffer from a huge sink mark on the top of the seat (visible in the photo). This was present on other Fujimi Hawks I have built so I must assume it is due to the thickness of the plastic at this part of the seat. The interior was given on overall coat of medium grey and the seats painted medium green as per the instructions.
Next several subassemblies were made, consisting of intakes, fuel tanks, rocket pods, and wings. Before assembling the wings, the appropriate holes need to be opened for the underwing stores. Once the intakes were dry, they were attached to the fuselage. The fit of these is not perfect and much dryfitting and fussing and putty work needs to be done to get an acceptable fit. Once those are finished, the fuselage has weight added to the nose, the exhaust added, and is then cemented together. Once dry and the seam lines cleaned up taking care not to trash the fuselage mounted antennas, the upper fuselage intakes are added as are the lower strakes. These strakes come as one piece and are smaller than the corresponding slot in the fuselage. Much care needs to be taken to smooth the area out without destroying the surrounding detail.
Next, the wings are added as are the tailplanes. The wing needs attention near the front for a good fit. The canopy was then added and the fit is good in the front, but a bit of a gap at the rear. It is a two piece affair, allowing you to display it open, but you really need to spice up the cockpit before doing that! There is no blast shield between the front and rear cockpit (or if there was, it fit poorly and was not installed). Finally the Gun pod was cemented to the centerline.
Since I was doing a scheme for the Air Forces of United Arab Emirates, I painted it brown and sand upper, with light blue lower. The upper colors were mixed. All paints were Gunze. As you can tell from the photo, I did not get a great mix when I went for some touch-up. This scheme also wraps around the leading edges of the wings and tailplane. I find these schemes difficult to mask and feel that the Brits do this only to frustrate modellers=0). The decals came from Microscale.
Once dry, the rest of the parts were added, including the nose pitot, nose landing light (a much better fit than the Italeri kit), and the landing gear/doors. The nose gear is a one-piece affair that requires careful painting. There are excellent attachment points for the gear and this kit has held up well over several moves. The underwing stores and pylons are not glued in place, but merely press fit. I try to cut underwing holes slightly small so that I can press fit items. This way, when I move, I lessen the number of things that get broken.
Overall, I feel that despite its problems, this is the best 1/72 Hawk on the market. It is not the most detailed or the simplest to build, but gives a good middle between the two. I found the Italeri kit fiddly beyond reason and the Matchbox and Airfix kits way to simplified. I do recommend this kit (when you can find it) to those with some experience.