| KIT #: | 61101 |
| PRICE: | $35.99 which included shipping from Japan |
| DECALS: | Three options |
| REVIEWER: | Scott Van Aken |
| NOTES: | Speed Hunter Graphics 48013 decals |
| HISTORY |
The second generation of F-16 was the F-16C/D. This aircraft differed from the initial variant in having substantially improved avionics, a more powerful F100-PW-220E engine and for a visual clue, a longer fin 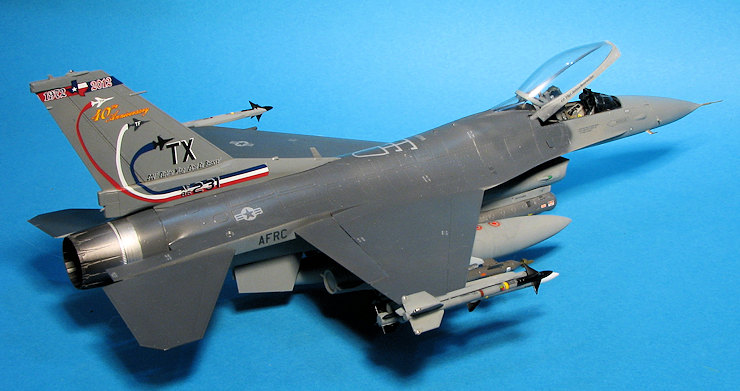 fillet. The block 30/32 was different in the engines used. The block 30 had the General Electric engine while the block 32 continued with the Pratt & Whitney. The type entered service in 1984 and while quite a few of these aircraft have since been relegated to long term storage, a few are still flying the highest time F-16 is an F-16C with over 7,000 hours on the airframe, something of a rather remarkable feat for a tactical jet. As the years went on, the type was upgraded with more modern avionics and the ability to carry a wider range of stores. The aircraft were also reinforced so it is not unusual to see strengthening plates on various parts of the airframe. A second major upgrade was performed on ANG aircraft and this modification can be most easily seen by the inclusion of the 'road warrior' IFF antennas on the upper nose of the aircraft. This upgrade included much of the avionics included in the block 50/52 airframes, making these quite capable aircraft.
| THE KIT |
Tamiya's first F-16 was the F-16CJ that was widely embraced by modelers as being the best so far. True to Tamiya's usual excellence in engineering, it proved to be a very popular kit, despite its rather high price tag. Indeed, this one retails in the $66 dollar range, making it quite pricey unless one does some shopping.
 Not surprisingly, the kit has quite a few inserts. For instance, on the nose are inserts on the side of the forward fuselage for the ESM antennas found on every F-16C/D. Just above them is an insert for the 'road warrior' IFF antennas. If doing an earlier plane, then the smooth plate would be used. There is also an insert on the upper left fuselage for the gun. Other inserts are on the upper rear fuselage and on the underside near the tailplanes for the flare/chaff dispensers. I should also mention that several panels are required to be filled in as it seems that Tamiya is using the same fuselage as for the block 50/52 kit and there are differences.
The vertical fin has a separate rear section to allow for future kits with the extended parabrake housing. This feature seems to be held in place by poly-caps and short rivets so there are additional parts to fit into the lower fin base. The upper fin consists of two parts which slots into the lower section. Not a simple two part fin as provided in the Hasegawa kit and others, but perhaps this is all in preparation for a future F-16A/B series.
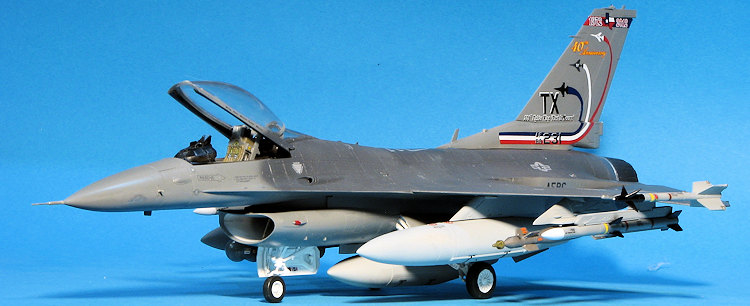
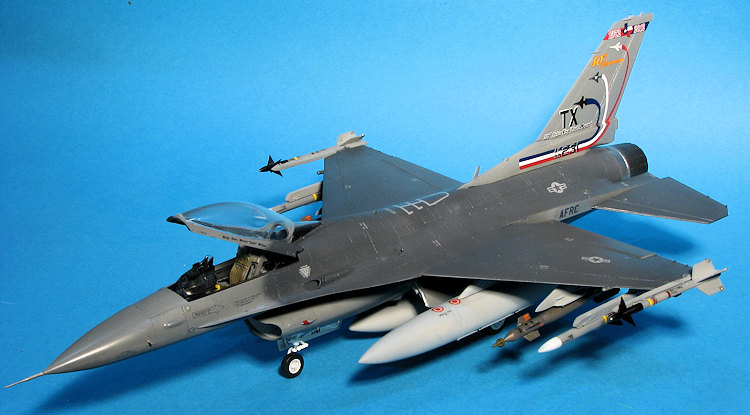
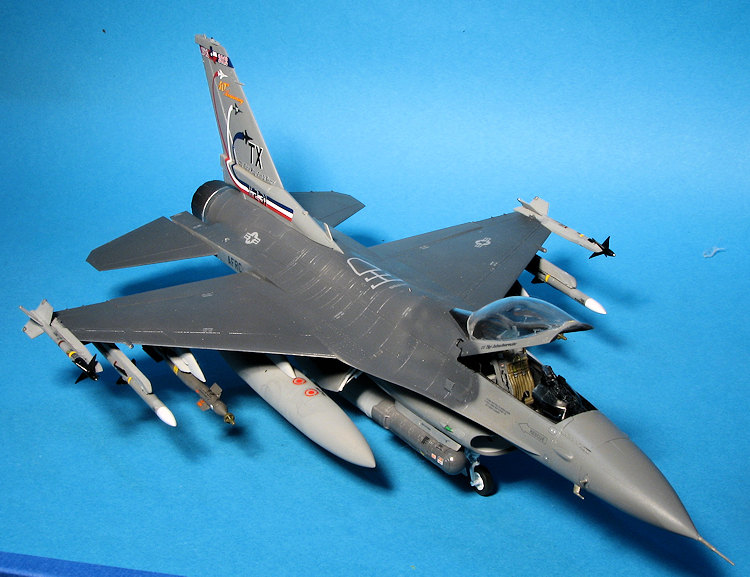
Wings will require the pylon holes opened as will the lower fuselage piece that fits over the main gear wells if you wish to have it loaded up. A very nice selection of stores is included, with the majority of them being in a darker plastic from the rest of the kit. There are two styles of AIM-9, AIM-120s, Targeting Pods, GBU-12 LGBs, ALQ-184 ECM pod as well as centerline and wing tanks.
 The kit provides both a clear and slightly tinted canopy, which like all good F-16 canopies has a seam running down the center of it that will need to be removed. In the cockpit the bang seat has no belts, but the kit does come with a pilot figure.
Instructions are well done with the usual Tamiya-only paint references. These should all be in the simplified two grey scheme, but are shown in the older three-greys version. Take your pick. Two of the planes are from the 194 FS, California ANG from 2006/7. Both are 144 FW boss birds. The 2006 option is a block 25 with a standard color fin and the 2007 version is a block 32 as shown on the box art with a black fin. The third option is from the 188 FW, Arkansas ANG with a red fin. This aircraft is a block 32 from 2006. Decals are nicely done with all the markings you'd need for both the plane and the various stores.
| CONSTRUCTION |
The kit instructions were pretty much followed as is for I have learned that with some kits, departing from them equals issues later in the build. The first step for me was to paint all the cockpit bits in dark gull grey and all the landing gear bits and wheel well bits along with the intake parts and inner gear doors in white. When doing this, one has to realize that this kit is based on the later block 50/52 kits so one has to be careful to only use the pieces specified for this variant. It is also important, if one is not building the kit supplied markings options, to be sure that the plane you are building has the right bits. The F-16 had all sorts of mods and upgrades to it and there are planes in the same block that got different bits or did not get all the upgrades. For that reason, you need photos of the aircraft you are modeling. I found that some 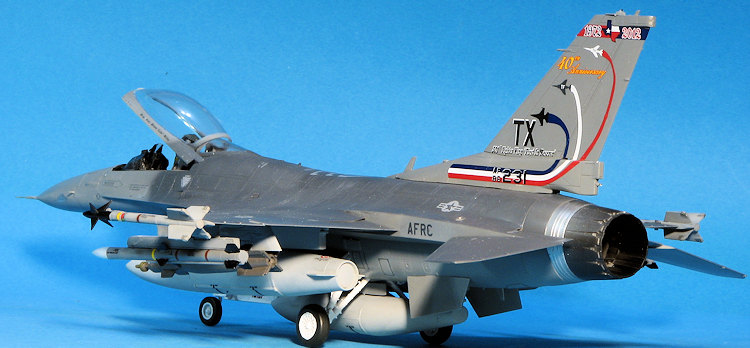 holes needed to be opened for my build and others did not. Same goes for some of the inserts as alternates are provided.
One starts by building up the cockpit minus the seat, and the aft section of the intake that includes the main gear well. These are then installed in the lower fuselage. Various holes in the upper and lower fuselage are then opened to accept later intakes and scoops. The well and cockpit assemblies were then glued in place. The kit uses polycaps for a number of areas including the stabs, fin, and drop tanks. The ones for the stabs were installed along with their housings and the upper rear fuselage section was glued on. I did this in stages, clamping areas that did not fit flush on their own. I also sanded away two small fairings on the upper wing and filled a panel on the aft section.
There are a lot of parts in this and so the build will go more slowly than if doing, say, a similar Hasegawa kit. I also ran into some fit issues. I'm not sure if this was due to pre-painting parts, but many bits were a very tight fit and required additional cement to act as a lubricant to getting the bits in place. This was particularly noticeable when assembling the main gear well. I could not get everything all the way in and as a result, the small central cover piece had a rather large step in it near the back. I did sand and grind this down, but it could have gone better. I also was unable to get the forward upper fuselage section totally flush. This may have been due to clamping the lower and upper rear fuselage while the glue dried. Another part I found did not fit well was the nose cone.
 I will caution you not to install the clear wingtip light sections until after everything is painted or they will not stay clear. In fact, I left off all the clear bits until the end of the build. Some, such as the landing light covers, will be more difficult to install at that point, but not impossible.
One does have to decide what sort of weapons load the aircraft will be carrying, especially if using aftermarket decals. Tamiya gives you a large assortment, some of which will require different pylons. In my case, the outer wing missile rails needed to be the 'old style'. I also decided to only mount one LGB on the inside weapons pylon instead of two. Tamiya does provide a proper insert for the pylon, so though I built up the TERs, I did not use them. I also built all four AMRAAM launch rails, but again, only used two. Sometime during the build, I lost the tail hook and after several weeks of on and off looking, was unable to find it. Hopefully it will show up sometime in the future so I can add it.
In addition to leaving off pylons and weapons until the end, I left off all the small, easily breakable probes on the nose. These were easy to install when all was done and were the near last items glued in. Same goes for the bang seat and the canopy. I very much liked that the fin did not have to be glued in place. This made applying the decals easier.
| COLORS & MARKINGS |
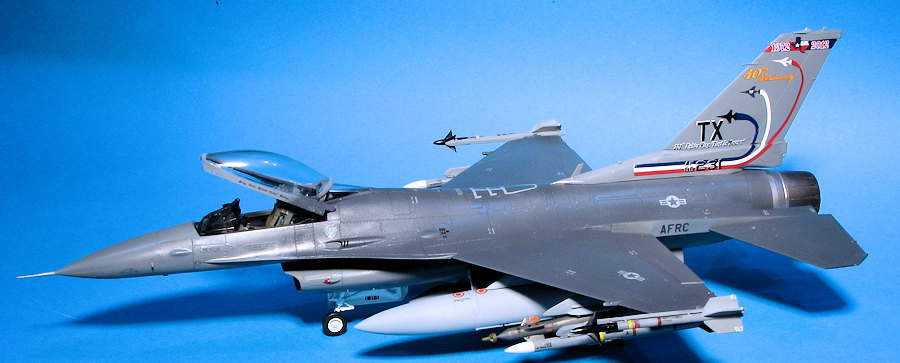
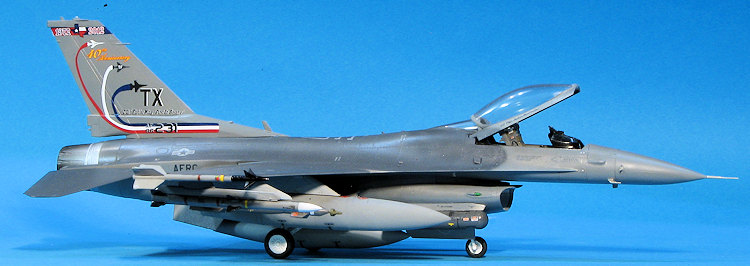
 For this build, I used Speed Hunter Graphics decals set 48013: Heritage Vipers. This set contains a bunch of special scheme ANG and AFRES (AFRC) F-16Cs. It is important to be sure to locate images of these planes as there are bits used on them that are not called out in the Tamiya instructions. Mostly the addition or removal of scoops and vents. I picked the 40th anniversary scheme of the 301st Fighter Wing, based in Texas. I liked that it had all three of the fighters they have flown over the unit's history on the fin. Each plane outline has the tail code used at the time. The 301st has changed codes over the years as they have become available from other units disbanding.
Though the kit instructions show the three grey scheme, this was superceded many years ago by a simpler, and just as effective, two grey camouflage. Basically, it is 36118 gunship grey over 36270 neutral grey. I used Model Master enamels for these two colors. For many of the pylons and fuel tanks, I used a lighter grey as these things were not always repainted. It also adds a bit of interest to an otherwise rather dull camouflage scheme.
 The Speed Hunter Graphics decals were used only for the unique markings. I found that the ones designed for the dark upper grey seemed to be dark compared to the kit markings. So I used the kit insignia and stencils. The most difficult part of the decal placement were the stripes on the fin. Each one is separate to allow more subjects to be placed on the sheet and the red one is particularly difficult to get in place. Use lots of water and don't cut out any other markings when you get to this one. Only a fraction of the stencils were applied as I was running short on time for the build. There are enough on there to make things look busy, but most of them on the underside were omitted completely. This aircraft also does not have the prominent walkway stripes carried on earlier planes before repainting. Photos on the 'net verified this feature as well. I also spent considerable time applying stencils to the weapons.
Once all the probes and lights had been installed, there was touch up painting required. The seat was installed along with the canopy and the various weapons were attached to their pylons. Even loaded down, the kit is almost a tail sitter. I'd put some weight in the nose to keep it firmly on its nose gear. This completed the build.
| CONCLUSIONS |
I had expected this kit to be totally trouble-free and while the fit was generally excellent, it was not without its pitfalls. Due to its overall accuracy, there are a considerable number of smaller bits. Where other kits would mold a piece as one part, Tamiya does the 'Dragon thing', and provides individual pieces. One needs to be aware of this before starting. The end result is quite pleasing and makes for a nice addition to one's collection.
22 July 2016
Copyright ModelingMadness.com
Thanks to me for the review kit. Thanks toSpeed Hunter Graphics for the decals. If you would like your product reviewed fairly and fairly quickly, please contact the editor or see other details in the