Revell 1/144 F-14A Tomcat
| KIT #: | 5555 |
| PRICE: | $9.75 MSRP |
| DECALS: | Two options |
| REVIEWER: | Scott Van Aken |
| NOTES: |
| HISTORY |
 Anyway, when the Tomcat came into fleet service, it was hailed as the perfect fleet defense fighter. The Phoenix missile system around which the Tomcat was designed, was able to engage six different targets, all at the same time and at a huge range. Just what was needed to keep Soviet bombers from reaching the fleet. While never fired in anger by the US Navy, the system did what it was supposed to and that was the important part.
From the start the Tomcat was saddled with a less than optimal engine. It was only with the later F-14B and F-14D that an engine was available to meet the design parameters of the airframe. Unfortunately, in the eyes of many, the money was not there to continue production of the F-14D beyond a few dozen airframes. As in all things to do with military hardware, other programs sucked out the funds needed. While the Tomcat did not have the staying power of the Phantom, it did provide what was needed when it was needed. Thanks to totally unfounded political cowardice and fear that the Iranians would end up with all the ex-USN Tomcats or their parts, we will never see one in the air again. Those of us who have seen these planes fly have seen something we will never forget.
| THE KIT |
This kit from Revell AG is dated 2004 so this is probably the original boxing of the kit. And it makes sense as black aircraft kits seem to sell rather well.
It comes on three major and two minor sprues, all except the canopy being molded in black plastic with nicely done, though obviously over-scale engraved detailing. There is a full interior with control sticks, instrument panels (over which decals are placed), and a pair of nice, but somewhat generic bang seats. Now as you might imagine, this boxing is molded in black plastic. As darn little can be seen, I've substituted the sprue shows of a later boxing in grey. The sprues are identical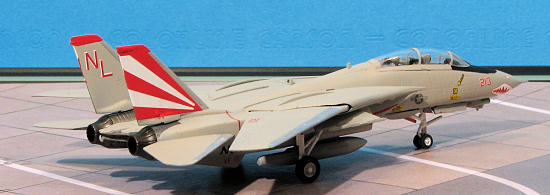 aside from the color of the plastic.
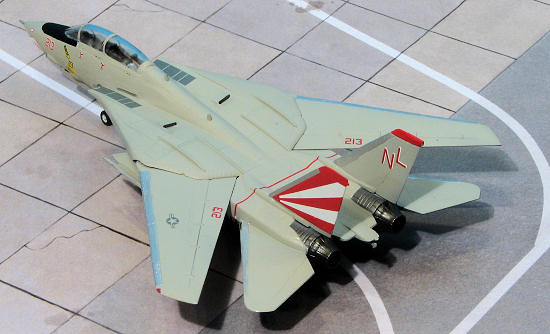
It appears that Tomcat kits can only be designed in one way and that is a horizontally split main fuselage and vertically split nose section. The main intakes are separate and have no compressor facing to install, but in this scale, perhaps it is not needed. The wings are designed to move so that has been taken into consideration. Fins are separate with the stabs molded into a fuselage half. Landing gear are nicely molded and one has the option of building it gear up, though no stand is provided. A nice pair of drop tanks are part of the package as are the forward Phoenix pallets. A pair of Phoenix, Sparrow, and Sidewinder missiles are provided along with the wing pylons for the latter. Exhaust are molded in the constricted position, which is more for an 'in flight cruise mode' display than on the ground. Actually, it was not uncommon to have one exhaust full open and one full closed when on the ground as frequently one engine was shut down before the other.
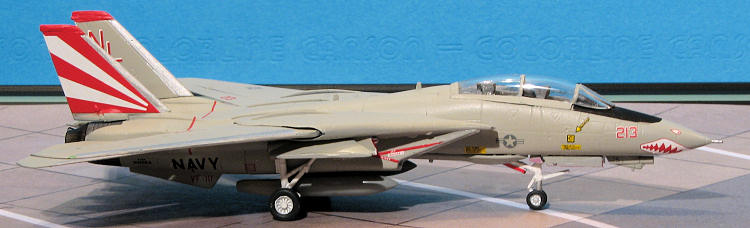
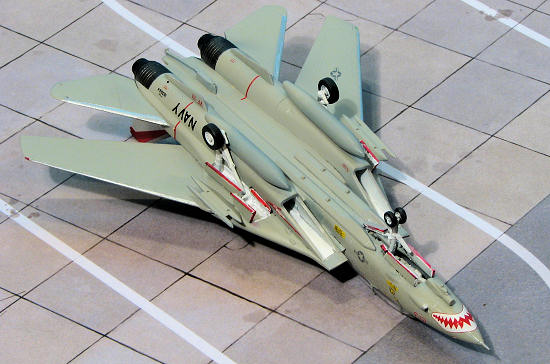
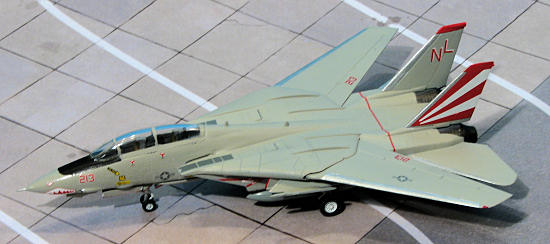
Instructions are the usual Revell AG fare with only Revell paint callouts. Most of us who have built aircraft kits of this era will be well aware of the FS colors needed, so that is no problem. Markings are provided for two aircraft. One is the black VX-4 bird 'Vandy 1' from 1991 when based at NAS Pt Mugu. The other is a very nice initial Tomcat scheme of light gull grey over white with the white and tan radome. It is for a VF-142 "Ghost Riders' plane from 1976 when they did their first cruise on the USS America. The decals are well printed and provide a full suite of data markings for the plane and missiles.
| CONSTRUCTION |
Construction starts with a bit of pre-painting. I did the interior and seats in Dark Gull Grey and painted up the gear and wheel well areas with white. This was also done to the intake interiors. The kit provides quite a lot of detail for the cockpit including separate i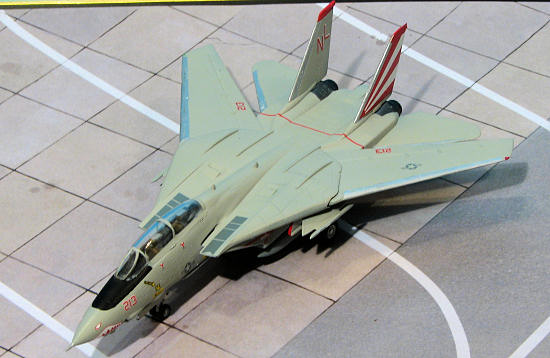 nstrument panels, seats and control sticks. The decals need to have the areas they are to be installed painted in the grey or they will disappear against the black background. I found the instrument panels to be a real pain to get into place. Eventually, the front one disappeared during my many attempts to install it. Basically, when one tries to close up the forward fuselage halves, one finds the fit to be pretty poor and this is due to the instrument panels as much as anything else. I stupidly did not install the lower forward fuselage section until the main two halves were dry. This caused the forward section to be too narrow when it came time to attach it to the rest of the fuselage.
The wings are trapped between the upper and lower aft fuselage halves. These interlock with each other. Despite setting them in many different positions with regard to each other, I could not get the wings to go into oversweep. This meant that the full forward position is too far forward giving it almost a forward sweep. Even with the wings in place, one can easily put a bit of up or down pressure on them to adjust the wing sweep, so I should have been able to get it right, but no.
The seams all need to be filled and when I glued on the nose section, there was a terrible mismatch. Much filing, filler and cursing went on getting this to be even moderately acceptable. The fins glued on with no real trouble and unlike every 1/72 and 1/48 Tomcat I've built, the intake trunk sections were a perfect fit. The kit also has a separate tail cap that needed filler to not have a huge gap. I glued on the Phoenix rails which helped to hide the lower join. The seeker was also glued in place as was the canopy. This latter item was masked and I was ready for paint.
| COLORS & MARKINGS |
 ainting and I've always liked that particular scheme. This has an odd mix of small low viz insignia with very vibrant tail markings. I first painted it and everything else that needed light gull grey (like the outer gear doors and drop tanks and pylons) using Testors enamels. The nose anti-glare panel area was masked off and painted a matte black. A decal would have been nice.
 | FINAL CONSTRUCTION |
 Now for the addition of what are really a lot of little bits and pieces. First things were the wheels. Then I attacked the gear doors. These are molded in one piece and have to be cut. They are grossly overscale, but these are the things one puts up with to model in 1/144. Were I talented and willing to take the time, they could be replicated in sheet brass. They were a real pain to cut thanks to their small size. These were installed and the edges painted with a red Sharpie. The tail hook was glued in as were the burner cans. Lastly, the drop tanks and the pylons were attached. Rarely were planes armed, even with training rounds, so leaving off the missiles does not make it any more or less accurate.
 | CONCLUSIONS |
| REFERENCES |
http://en.wikipedia.org
July 2010
If you would like your product reviewed fairly and fairly quickly, please contact the editor or see other details in the