
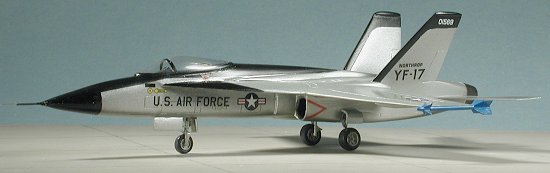
Anigrand Model Works 1/72 YF-17 Cobra
| KIT #: | AA-2023 |
| PRICE: | $58.00 MSRP |
| DECALS: | One option |
| REVIEWER: | Scott Van Aken |
| NOTES: | Resin kit. |
| HISTORY |
Please visit the preview to see what comes in the box and to get a short historical background.
| CONSTRUCTION |
As with all resin kits, the first thing one has to do is to remove all the little resin stubs and clean up the kit. In this case, it wasn't bad at all as the resin is fairly soft so one could do a lot with a hobby knife then sandpaper. I filled a few holes in the intakes and atop the bang seat with superglue. I also cleaned up the intake openings as much as I could with a round file. Mostly smoothing things out. I thought about building intake trunking from plastic tubing, but that is still just a thought for now as I'd have to find some compressor faces to put in there as well. Most will probably just paint the area in there flat black.
 One of the fins has some pitting near
the tip and is warped a bit so it will get the hot water treatment in an
effort to straighten out the warp. During this time I cleaned out the
cockpit area and glued the control stick to the floor. The instrument panel
was glued to the underside of the anti-glare shield. There is a slot in the
floor for it, but the support is too long. By doing it backwards, I should
be able to get the trim length just right. I then glued the fuselage halves
together after painting the area inside the intakes with flat black. Fit is
quite good and reminiscent of the Hasegawa F-18 kit. I guess there are just
so many ways to do a Hornet kit!
One of the fins has some pitting near
the tip and is warped a bit so it will get the hot water treatment in an
effort to straighten out the warp. During this time I cleaned out the
cockpit area and glued the control stick to the floor. The instrument panel
was glued to the underside of the anti-glare shield. There is a slot in the
floor for it, but the support is too long. By doing it backwards, I should
be able to get the trim length just right. I then glued the fuselage halves
together after painting the area inside the intakes with flat black. Fit is
quite good and reminiscent of the Hasegawa F-18 kit. I guess there are just
so many ways to do a Hornet kit!
With the halves together, I applied
filler to the seam and then painted the interior Dark Gull Grey, a standard
for US aircraft. The aft seams took a second application of filler and
while doing this i thought that something just didn't look right about the
fuselage. Wasn't sure what it was, so then moved on to the wings. Unlike
the modern Hornet, the Cobra's wings had the 'bumps' on the wing to the
underside so don't try to install them the other way around. You can tell
by the airfoil section which is the right way to go. I drilled pins in both
wings and roots then dumped a ton of super glue on the joins before putting
 on the wings. I also made the holes on the wing side a bit larger than
needed so that I'd have some fudge room. It turned out that I needed it as
the wings are just a touch longer than the root area. I lined up the back
sections even and will eventually sand the forward sections to match.
on the wings. I also made the holes on the wing side a bit larger than
needed so that I'd have some fudge room. It turned out that I needed it as
the wings are just a touch longer than the root area. I lined up the back
sections even and will eventually sand the forward sections to match.
Then it hit me what looked odd about the nose. Anigrand based this kit on an F-18 and the F-18 fuselage is deeper than the YF-17. The kit also has the flat bottom nearly all the way to the tip as in an F-18 while the YF-17 is more curved. I compared the fuselage to the plans provided with the kit and it was obvious. What was also obvious was that the nose cone strakes should be level with the centerline and not curved down as in the kit. Now the quandary as to what to do about it. I certainly wasn't going to cut the fuselage down the centerline to take out the extra depth, but I could do something about the nose.
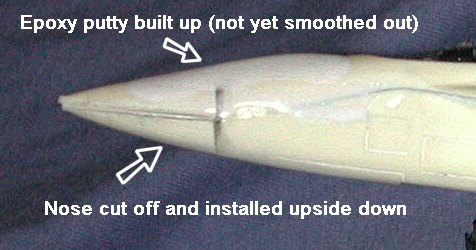 I cut off the kit nose just aft of
the strakes and turned it upside down so that the strakes were level with
the centerline. Then I poured a lot of superglue in the rather huge gaps
and flooded the join with accelerator. I also filled the nose cone with
super glue and if it ever cures, it should provide a strong support. With
some healthy sanding, the lower fuselage section had its longer curve to
it. But the upper side was still a bit flat so I put on some A-poxysculpt
epoxy putty. When it cures, I'll sand it to blend in more. The end result
will be something closer to what the YF-17 nose is like, though the
fuselage is still too tall. The fuselage should be closer to a circular
cross section forward of the intakes instead of as oval as in the F-18.
I cut off the kit nose just aft of
the strakes and turned it upside down so that the strakes were level with
the centerline. Then I poured a lot of superglue in the rather huge gaps
and flooded the join with accelerator. I also filled the nose cone with
super glue and if it ever cures, it should provide a strong support. With
some healthy sanding, the lower fuselage section had its longer curve to
it. But the upper side was still a bit flat so I put on some A-poxysculpt
epoxy putty. When it cures, I'll sand it to blend in more. The end result
will be something closer to what the YF-17 nose is like, though the
fuselage is still too tall. The fuselage should be closer to a circular
cross section forward of the intakes instead of as oval as in the F-18.
 Meanwhile, I put the warped tail fin
under a hair dryer and straightened it out. I then filled the holes with
super glue and sanded things smooth. I am thankful that Anigrand's resin
isn't rife with air bubbles just under the surface of the skin as in some
other resin kits or doing all the sanding I did would be a total disaster.
It is also nice that the panel lines are a deep as they are or they'd have
disappeared during sanding. I then glued on the other wing and sanded it
smooth. While looking over what had so far been accomplished I noted that
I'd succumbed to a rather common problem when doing a lot of sanding and
discovered a rather extensive groove on the left upper wing where I'd
gotten a bit carried away. It was rather obvious so the only fix was to
fill in the groove. This required multiple applications of filler and I
have no one but myself to blame for this glitch!
Meanwhile, I put the warped tail fin
under a hair dryer and straightened it out. I then filled the holes with
super glue and sanded things smooth. I am thankful that Anigrand's resin
isn't rife with air bubbles just under the surface of the skin as in some
other resin kits or doing all the sanding I did would be a total disaster.
It is also nice that the panel lines are a deep as they are or they'd have
disappeared during sanding. I then glued on the other wing and sanded it
smooth. While looking over what had so far been accomplished I noted that
I'd succumbed to a rather common problem when doing a lot of sanding and
discovered a rather extensive groove on the left upper wing where I'd
gotten a bit carried away. It was rather obvious so the only fix was to
fill in the groove. This required multiple applications of filler and I
have no one but myself to blame for this glitch!
With that smoothed out, I glued on
the fins. These were a tad wider than the slots they were to fit into so
more filler was needed for each of them. While those were being filled and
sanded, I saw that the rear main gear doors were normally closed so cut
those off from the smaller forward section and glued them in place. They
are a bit thick so some more sanding was needed to get them flush with the
surrounding fuselage.
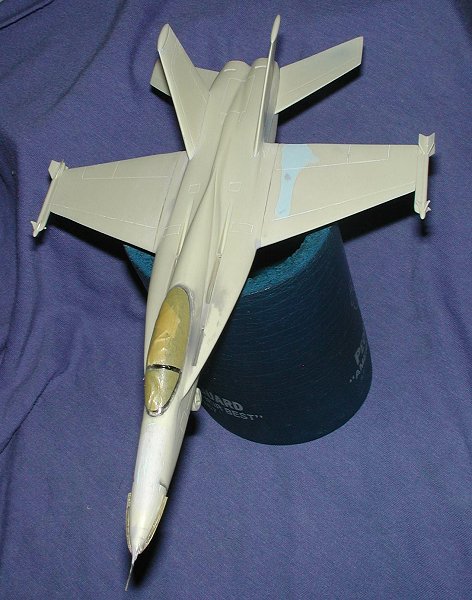
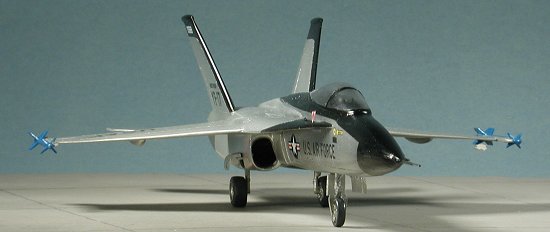
I then returned to the nose of the aircraft. I drilled out the very tip of the nose and inserted a section of tubing to represent the data probe. As I'd sanded off the forward strakes, those were replaced with slivers of brass sheet and sanded to shape. I then masked and attached the canopy using mostly white glue, but the very front and rear were tacked in place from the outside using a touch of super glue. Hopefully this small amount won't fog the canopy, but I won't know until I take off the masking.
Next came the landing gear. The nose gear fit well, but in order to have it sit relatively straight, I had to sand at the main attachment point. The main gear were glued in as best I could. There is no dedicated image of just how these are to fit and the don't look like what is shown on the instructions. This was a case of best guess and while they are in there ok, they look a bit short. I'll know better once the wheels are attached. It was now ready to have paint applied.
| COLORS & MARKINGS |
Now that the plane was on its landing
gear, I decided to do the paint thing and first sprayed on the areas that
get the black trim. This will be masked and then the rest of the plane
painted silver using Testors German Silver, which should look pretty good
once it is on. I used Floquil Engine Black for the black areas as the
lacquer should 'bite' into the resin a bit better than
 enamels. Then the
black areas were masked and the rest of the airframe painted with the
German Silver. The use of this color was a mistake. While I eventually got
it on to my satisfaction, it isn't the easiest to paint and requires many
thin coats to get decent coverage. It is also a bit 'browner' than I'd have
liked so next time I'll just use 'regular' silver paint.
enamels. Then the
black areas were masked and the rest of the airframe painted with the
German Silver. The use of this color was a mistake. While I eventually got
it on to my satisfaction, it isn't the easiest to paint and requires many
thin coats to get decent coverage. It is also a bit 'browner' than I'd have
liked so next time I'll just use 'regular' silver paint.
Since the missiles were not separate and attached to the wing rails, painting them wasn't going to be easy. I decided to brush paint them and started with white. This looked like the devil so I removed the white paint and found some that looked like the color of training rounds in my stash of Vallejo acrylics. This shade was brushed on and it actually looks pretty good. Were I to do this kit again, I might consider cutting off the attached missile and using some out of the spares box. It would make the painting bit a lot easier.
With the paint on to my satisfaction, I sprayed it with clear gloss to get it ready for decals. The kit decals are well printed and went on without any hassles. They are a bit thick and the right side 'rescue' decal was printed backwards, but no real problems. They stuck well and though are totally resistant to solvents, didn't silver.
| FINAL CONSTRUCTION |
 After putting on the decals
and spraying a clear coat over them to seal them in, I returned to the
bench for the final bits. This consisted of attaching the main wheels and
the rest of the gear doors, a quick job. I found out later that the forward
nose gear door should have been glued closed as that is how it was
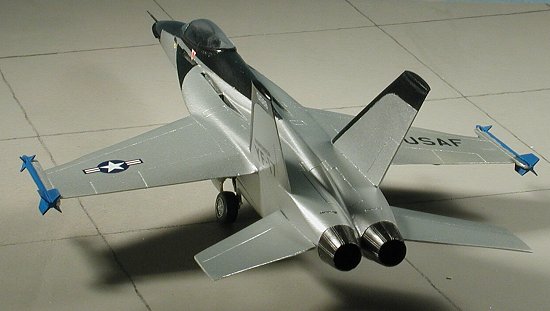
normally. The afterburner cones were glued in and I added one more small
piece of tubing to the pitot to complete the kit. Masking was removed from
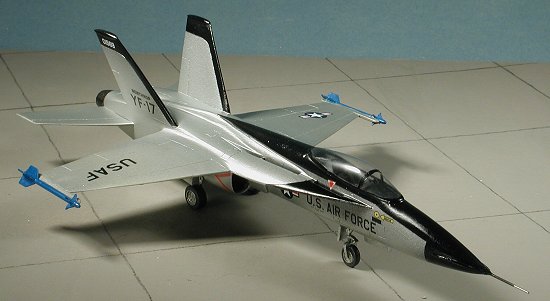
the canopy and it was off to take pictures before I broke something!
After putting on the decals
and spraying a clear coat over them to seal them in, I returned to the
bench for the final bits. This consisted of attaching the main wheels and
the rest of the gear doors, a quick job. I found out later that the forward
nose gear door should have been glued closed as that is how it was
normally. The afterburner cones were glued in and I added one more small
piece of tubing to the pitot to complete the kit. Masking was removed from
the canopy and it was off to take pictures before I broke something!
| CONCLUSIONS |
I now have a pretty good representation of the YF-17 to add to my US fighters collection. Getting there wasn't quite as easy as I'd anticipated, but with short run kits, it rarely is and that is to be expected. Overall, I enjoyed building the kit and figuring out how to do the fixes. It is all part of the fun of doing kits like this and I look forward to the next one.
September 2004
#1332 in a series
Copyright ModelingMadness.com. All rights reserved. No reproduction in part or in whole without express permission.
If you would like your product reviewed fairly and fairly quickly, please contact the editor or see other details in the Note to Contributors.