Williams Bros. 1/72 Martin B-10B
Kit #: ??
Price: $17.95 in 1997 dollars
Media: Injected plastic with rubber tires
Decals: I believe three versions, 2 US and one Dutch
Date of Review: 17 July 97
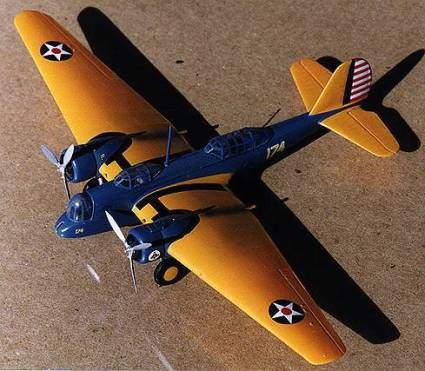
The Martin company's first really successful all-metal monoplane bomber was the B-10. As is typical for the day, the aircraft was ordered in very small numbers by the USAAC, however there were a number of export sales, the most noteworthy that of the Netherlands for use in the Dutch East Indies. It is in this area that they saw action during the opening months of WWII. By then they were woefully obsolete and no match for modern aircraft.
The Williams kit comes molded in blue with clear canopy's and an option for rubber or plastic tires. While I opted for the more natural looking rubber, in the last ten years they have cracked and look awful. Highly recommend the plastic wheel/tire combo.
The instructions state that this kit is for the more advanced modeler and they are right. This is what would now be known as a limited production kit (although this kit has been in production at least 15 years). It is up to the builder to ensure the proper fit of all parts and to make those modifications that are necessary for the version that is being built. Having said that, this kit is no more difficult than the better group of limited production kits. I found it easier to build than any Pegasus or MPM kit. All the parts needed are supplied and the decals are very good.
Corrugated surfaces seemed to be in vogue during this era and the B-10 has its share of these surfaces. Anyway, the first part to build is the interior. It contains the minimum required (seats, stick, instrument panels) and has plenty of room for improvement. Once those are built, it is time to work on the nose turret. Frankly, it was difficult to install, and had to be done when the fuselage halves were mated due to a large lip on the bottom of the turret. The turret has minimal appointments (a gun), however, the plastic is not very clear so you can get by with it. Masking this puppy is a trick and must be carefully done.
Once you have the fuselage together, it is time for the rest of the kit. The tail planes fit well after some careful dry fitting as do the wings. You have a couple of options for the engines , so after that choice is made, these items can be set aside and await the painting process. The undercarriage is, again, minimal and can be left off until after the aircraft is painted.
The most difficult part of construction is the fitting of the canopies. This provides the most trouble as they do not match the openings in the fuselage well at all. Just sand and dry-fit until you are satisfied with them. Since the upper fuselage is visible under the canopy and that area is in fuselage color, you will need to prepaint this area prior to cementing the canopies. Once they are masked, it is time to paint. Naturally, the blue fuselage and yellow wings was the choice for this one. I found it easier to paint the aircraft white, then yellow, and finally mask off the yellow and paint the blue bits. Once that has been completed, the kit was final assembled (engines, landing gear), and the decals applied. The decals fit very well and reacted well to setting solution.
Final result, a nice representation of a B-10B. Not the easiest kit to build, but one that looks good on the shelf. I seriously doubt if anyone else will produce this kit so if you want one, this is the way to go.
Copyright ModelingMadness.com. All rights reserved
Back to Reviews Page 2019