Aeroclub 1/72 Hawker Demon
Price: $10.00
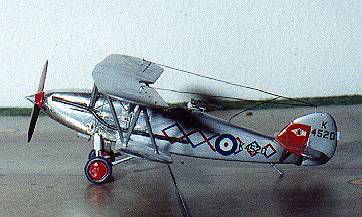
Decals : One version: 41 Sq RAF
Date of Review: 28 March, 1996
Ever since I got the Modeldecal sheets with the huge range of options for Demons, Harts, Ospreys and the like, I have had a hankering to build a kit. The only one that was occasionally available has been the Demon that Airfix molded a number of years ago. I have never built this kit, but friends have told me that it needed a lot of work.
I have often lambasted Aeroclub for their kits, but the truth is that these are short run kits so it is not surprising that they are lacking a few bits and can be painful to build. This is really not the case with their Hawker biplanes. I had very little real problems when it came to building the kit. The fuselage went together fairly well and interior detailing is not much of a chore as there is little to detail. The kit comes complete with seats, control stick, scarff ring and Lewis gun. One only has to make an instrument panel and attach the instrument decal from the Modeldecal sheet to have a good representation of the Hawker interior. By the way, silver is the color of choice for prewar biplanes.
Once the fuselage is complete, then the tailplanes, wings and vertical tail can be attached. It is at this juncture that the aircraft was painted overall silver and the red areas on the tailplane were painted (I had chosen a 64 Sq aircraft from the Modeldecal sheet so it needed some parts painted red). After the paint had dried, I then added bare metal foil to the entire fuselage forward of the cockpit to simulate the metal paneling around the engine. The main gear struts were then attached using superglue and the exhaust pipes were added. After sitting for a day, the cabane and N struts were added as was the upper wing. Superglue was used here as well and made for a very strong assembly. The tailplane struts and white metal tail skid were next to be added.
Then came the fun part. I am convinced that the reason many do not build biplanes is because of the job of rigging. True, it is not difficult, but it is very time consuming. The trick is to do little bits at a time and then put it aside. I used brass wire for the rigging as I found it less of a frustration factor than sprue. One simply cuts a section a bit longer than needed and nibbles away at it until it fits the holes that you drilled to accept it. Then they can be glued with white glue. After about a week of rigging, I then added a couple of short bits from a straight pin to the upper wing as attachment points for the radio antenna. The final decals were put on, the underfuselage radiator and oil cooler attached along with the propeller and windscreen, and with the last bit of rigging for the radio antenna , the kit was finished.
It really makes a great looking model. There is something about 1930's US and British aircraft that makes them fun to build. I think it is the great paint schemes that were applied that makes them so much fun. This Aeroclub kit was a decent build, and I would recommend it for anyone who is not afraid of the rigging required. Highly recommended.
Copyright ModelingMadness.com. All rights reserved.
Back to Reviews Page 2020