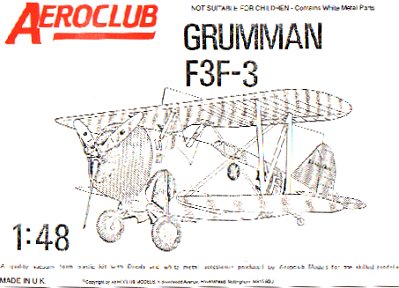
 Kit: Aeroclub 1/48 F3F-3
Kit: Aeroclub 1/48 F3F-3
Price: at the time, about $25.00
Media: Vacuformed plastic and metal
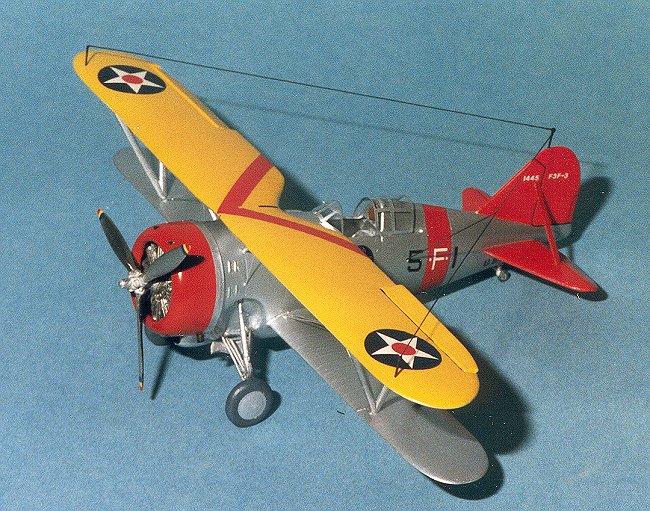
Decals: the only unit to be fully equipped with the F3F-3: VF-5
Date of Review: 14 March 1999
Review and Photos by: Scott Van Aken
Grumman's tubby F3F-3 was the end of a line of successful naval biplane fighters that started with the FF-1. The next Grumman fighter was the monoplane F4F Wildcat and that lead to a succession of cats that lasted until the Grumman name disappeared in the late 1990's. Probably th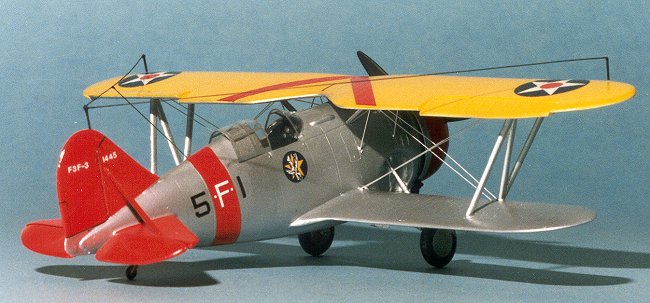 e epitome of US Naval Biplane fighters, the F3F was much loved by those that flew it. It was highly aerobatic and was apparently a ball to fly. It would not have fared well in combat as it only had two .30 machine guns and no armor or self-sealing fuel tanks. However it did train the pilots who fought the Japanese in the early days of the Pacific war.
Aeroclub's kit comes complete with everything needed to make a super model. The engine,propeller, landing gear, wing struts, tail wheel, and some cockpit bits are in white metal. The rest of the kit, including the canopy, are vacuformed plastic. Only one canopy is included and I wish there were two as the one with the kit, once trimmed to the lines on the canopy, is way too small. You have to make the cabine and tail struts out of Contrail Strut material that is provided. The instruction sheet, though very basic with no parts breakdown or even exploded view, included a nice three view of the aircraft and the box art is quite helpful when it comes time for rigging. The decal sheet is quite usable and provides the 1st section leader for VF-5.
OK, now onto the gory details. I really like vacuform kits; honestly. They provide subjects that are not usually available and are not that much more difficult to build than a limited run injected kit once the parts are removed from the backing sheet. In fact, they are often less time consuming! That is the general poop on them and applies to 99% of all builders. However, I am in that lucky 1% that usually has several disasters when building any kit and a vac is no exception. You have already read about the canopy; that is a minor goof.
First thing one does with these beasts is to use a sharp, soft pencil ( I use a #1 testing pencil), and trace the outline of all the parts. This gets lead on the sides of the part you save. That way, when you remove the backing, there will be a white area (as vac plastic is almost always white) that needs sanded off and the part with lead on it will be the 'no sand' zone. A sheet of say 320 or 240 grit sandpaper taped to a flat, smooth surface (like a piece of plexiglas), with doublesided tape works perfectly. This surface is what you use to sand down the parts once they have been removed from the backing sheet.
To back up a bit, one the part has been outlined on the backing sheet, a fresh, sharp scalpel or Xacto blade is then run along the area you just outlined. I hold the knife at a 45 degree angle to lessen the amount of plastic that needs sanded. Once the knife has scribed the parts a couple of times, simply bend the area and the part will snap of the backing sheet. If you are timid, try it on a piece of scrap plastic sheet and you'll see how easy it is. No need to apply a lot of pressure either when scribing or snapping.
Anyway, you will see how much of the plastic needs sanded off once the part is free. Now, applying equal pressure along the part, slowly sand it down using a circular motion. I do all my sanding in the sink with water slowly running on the sandpaper to remove the residue. The really hard part is the equal pressure.Inevitably with longer pieces (like fuselages and wings), pressure will not be even and the edge will not be straight. Not a real disaster as you can always fill in the gaps with filler or scrap plastic sheet.
Once all the bits are removed and sanded, then the kit can be built just like a regular injected kit. Things to look out for; first of all, often there are tiny pips of plastic that need removed. A sharp blade will take care of that. Vac plastic is often rather soft, so be gentle with the gluing. Often the fuselage will need bulkheads and the wings will need spars if they are long. On the edges of the fuselage, use thin strips of plastic under the edges and sticking out a mite to allow for a good mating surface.
As you might guess, I goofed up the fuselage. The front ended up way too small and I had to install a rather large wedge of plastic to fill the gap. Other items; the interior is good, but rather bare and needs some scratchbuilt parts to make it a bit busier. Mine only has a seat, control stick and instrument panel. Aeroclub does provide all the parts you need to make a complete, though rather bare, kit. When I widened the fuselage, I also needed to make a new motor mount out of scrap plastic. The Aeroclub engine is beautiful, but very heavy. I also oversanded the lower wings and they needed help. Conversely the upper wings were undersanded on the trailing edge and are too thick. The lower wings have spars made from plastic rod to help strengthen them. The fuselage has a slot in the rear for the horizontal stabilizers to fit through. This worked rather well.
I cut out and repositioned the elevators and ailerons on my F3F to add a bit of interest. A very easy thing to do as the plastic is soft and is easily scored and cut. Probably the mostcrucial part of biplanes is attaching the upper wings. This was done by first drilling holes as indicated in the lower wings and then installing the lower part of the N struts. Now the holes were made deliberately tight so I wouldn't have to glue them in place while determining the proper positioning of the upper wing. It was then that the holes in the upper wing were drilled (again a bit too small to be a tight fit) and then fit on the top of the N struts. Once I was happy with the position of the upper and lower wing, the lower N struts were glued in place with 5 minute epoxy and the whole assembly carefully taped rigid while the epoxy dried. Once dry, the tape was removed and the cabine strut locations were marked on the underside of the upper wing and on the fuselage.
At this time, the rest of the fuselage was completed and the windscreen installed with epoxy and masked. The only option I had was to have the canopy open as it was obviously too short to fit in the closed position. The rear struts were measured, cut and glued onto the horizontal stabilizers and the white metal tail wheel was installed. At this time the cowling had the front of it filled with epoxy forstrength and it was trimmed. The white metal landing gear was also assembled (minus the wheels and doors), at this time. To ensure a good fit, holes were drilled in the wheel well to take the struts. I also had one of them short shot. Assembly was fiddly, but not impossible. Superglue was used. The cockpit was filled with tissue and the whole airframe and underside of the upper wing were painted Testors Metallizer Aluminum. When done, it was sprayed with Future clear gloss to dull the Metallizer to simulate Aluminum paint. Contrary to common belief, the aircraft was not painted light grey vice aluminum during thier active squadron use. It was only when they were overhauled prior to going to training units that this became standard practice.
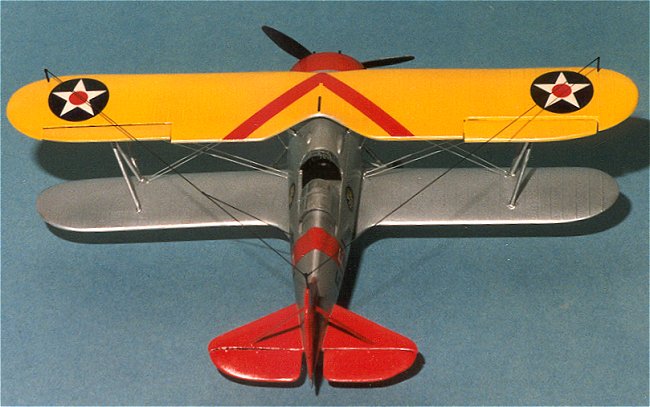
When that was dry, the tail was painted white, then when dry, red. The red was from the Tamiya line. Then the tail was masked off and any overspray covered with Metallizer and Future. The upper wing was painted white and then Yellow using Model Master Chrome Yellow. It was then coated in Future as well when dry.
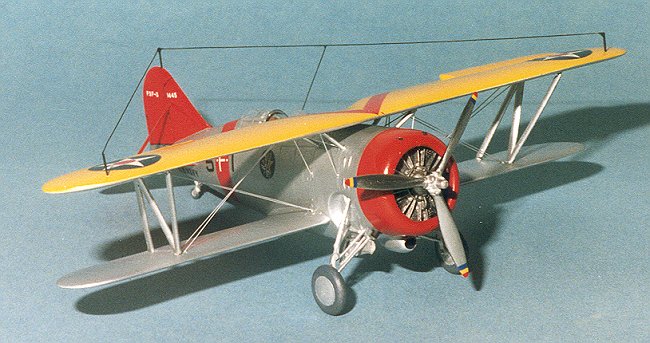
Now the cabine struts were cut to length and glued on to the underside of the upper wing. Then when sure of the proper location, the upper wing and cabine struts were glued into place with superglue. Next the engine was glued onto the engine mount and treated to washes and highlights to make it stand out. Then the cowling was fitted and final trim was done to it. It was then painted red except for a small ring near the rear that was painted aluminum. It was then laid aside until the final steps. The propellor was also cleaned up and the back of the blades painted flat black. The tips were painted blue, yellow, and red. Also done at this time, the wheels were cleaned up and painted black.
Then onto the part for which I have no talent at all; Rigging! (Ominous music inserted here!). After several futile trys at using stretched sprue, I finally went and bought some relatively fine brass rod. After much cursing and swearing and trimming, all the rod was superglued into place. This also included the radio antenna. The final result looks good from a distance. Since I had not decalled the aircraft yet, the rigging was spraypainted aluminum with all the appropriate areas masked off. Next were the decals. As is usual, the yellow of the wings shows through somewhat on the upper insignia, but the rest of the markings fit beautifully. Champ decal setting solution was used to ensure stickiness. The entire model was then sprayed with clear gloss acrylic. Final steps were attaching the cowling and prop, the wheels, removing the mask from the cockpit and transparencies, attaching the sliding hood, making exhaust ports from Contrail tubing, using brass tubing for the guns, and painting the antenna wires black. (Whew!)
The end result is an aircraft that looks very much like an F3F. It is colorful, it fits well into my 1/48 Grumman Fighter collection, and, as is usual for me a vacuforms, it is completed a few months ahead of the release of the Accurate Miniatures injected version!
What is not obvious in this review is that this kit took nearly three years to complete. I would get frustrated and rather than chuck it, would sit it in a box for a few months and then drag it out and play with it some more. Then in a fit of modelling, I would hurry up in a week or two and get it finished just to get the thing off my bench! This is normal for me and vacuforms.
As for recommendations, I can recommend this kit as it does go together quite well, it is complete and can be built by the average modeler without any real problem. I have built other Aeroclub vacs and this one is just as nice. Chances are that no one will build this kit as soon as the Accurate Miniatures version hits the shelves. It is the bane of vacs that if they are not built soon after purchase, the chances are that someone will bring out an injected version of it before yours gets built!
Copyright ModelingMadness.com. All rights reserved. No reproduction in part or in whole without express permssion from the editor.
Back to Reviews Page 2022