Valom 1/72 Fokker F.VIIb/3m "Spanish Civil War"
| KIT #: | 72054 |
| PRICE: | $ |
| DECALS: | Two options |
| REVIEWER: | Scott Van Aken |
| NOTES: | Short run with photo etched and resin parts. |
| HISTORY |
Fokker F.VII was an airliner produced in the 1920s by the Dutch aircraft manufacturer Fokker, Fokker's American subsidiary Atlantic Aircraft Corporation, and other companies under license.
 The original Walter Rethel design of 1924 was a single-engine high-winged monoplane. Anthony Fokker modified the design with two additional engines to enter the inaugural Ford Reliability Tour in 1925, which it won. Consequently, the production versions F.VIIa/3m, F.VIIb/3m and F.10 all had three engines, and the aircraft became popularly known as the Fokker Trimotor.
The F.VIIa/3m was the intitial version with two additional underwing engines, flown on September 4, 1925. The first two aircraft were identical to the F.VIIa. From the third aircraft, the fuselage was 31 in (80 cm) longer and was powered by with 200 hp (149 kW) Wright J-4 Whirlwind radial engines. Probably only 18 were built while many F.VIIas were upgraded to the F.VIIa/3m standard. The F.VIIIb/3m was the main production version with greater span, 154 built including built under license. The Spanish Air Force had seven of these, which operated on both sides of the conflict during the Spanish Civil War.
| THE KIT |
This Valom's long awaited (at least by me) kit of the Fokker F.VIIb/3m. It is only natural that they'd pick a boxing that might have less interest than the others and chose the ones used during the Spanish Civil War. From the looks of the sprues, you could easily do other versions as there are a number of parts not used during this build, including engine cowlings.
 There are two large tan sprues, one clear sprue, a bag of resin and a small etched sprue. Starting with the resin, this is for the engines, wheels, guns and a few other small bits. Photo etch is used for a number of small cockpit details including belts and an instrument panel. There are also a number of p.e. parts for the exterior. The clear sprue includes the windscreen and cabin windows, with an alternate set that is not used. The sprue is well molded.
The two main tan sprues have a number of bits not used including two other sets of props, and the cabin seats, for they are not shown as being used in the instructions. The parts are well molded with crisp engraved panel lines. I found a few bits had sink areas (the cabin seats and outer gear struts), there are ejector towers on the wings and fuselage you'll have to remove, and some of the bits were suffering from mold mismatch, though it was only a few. Some of the parts are quite fragile looking (such as the interior framing) so a razor saw might not be a bad idea. Test fitting some of the larger bits showed that the fit will be quite good once the mating surfaces have been scraped. This is a short run kit and one has to do a few extra steps to ensure proper parts fit.
 Instructions are well done with clear construction steps. The paint chart provides a number of different paint lines. This kit has an upper fuselage machine gun position. Yet, neither on the part or in the instructions does it say anything about opening up a hole in the fuselage for it. In one construction step it is not there and in the next one it magically appears. No indication of the size of hole needed. There is nothing in the way of a gunner's seat for this, just the Scarff ring and gun. I would suggest some research into this to see if the kit can be built without it. Or perhaps paint the area in the cent with black paint.
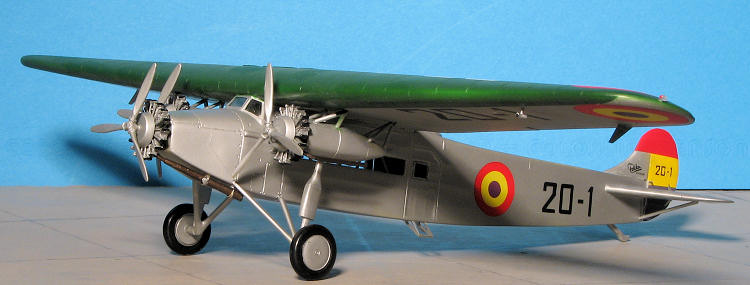
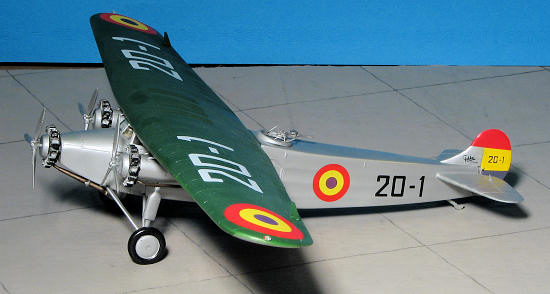
There are markings options for two planes; one for the Nationalist forces in what looks like standard Luftwaffe colors of RLM 62/63/64/65 as shown on the box top. The other is a Republican aircraft with basically an aluminum dope fuselage and green upper wing. The decals are superbly printed and before you wonder if the center of the Republican roundels is black, well it is on the main sheet. Valom realized the goof and a second set of roundels with the dark purple center is in with the kit.
| CONSTRUCTION |
Construction on this one started with gluing the wing halves together. All of the sprue attachment points and mating surfaces need to be sanded down once the part is removed to get the best fit. I found that the separate ailerons fit fairly well though the do seem to be a little thinner than the openings into which they fit. I also glued together the two engine nacelles at this time. The sides are different so be sure not to get the parts confused.
Moving to the interior. I sprayed all the interior bits a medium grey. The cockpit floor and rear bulkhead are, like most of the attachments, butt joins. Though not shown in the instructions, I'm thinking the protrusion on the bulkhead goes to the rear. Moving to the fuselage, I cut off and attached the clear windows. The small one in the door attaches from the outside and is mismarked on the sprues layout. C4 is the more rectangular one that fits on the rear bulkhead. C5 is the one that is more square and this fits in the outer door. The clear parts fit superbly without any problems.
 When it comes to the interior, I did minimal stuff. The photo etch fret comes with separate rudder pedals and all the little engine control levers that stick out of the console along with an instrument panel, console panel and harnesses. No way will you ever see the rudder pedals with out an X-ray so I left those off. I did install the seats, control wheels and the belts. The kit comes with a full harness, but I'm not sure these old planes actually had more than a seat belt. Regardless, I installed the shoulder belts.
The interior section was then glued into one fuselage half (not as easy as you'd think as there are no locating pins). Then the window openings had the flash removed and the windows installed. The small ones for the cabin and cockpit doors are mislabeled in the instructions and should be reversed. The fit is actually quite good once the openings themselves have been trimmed. The framework sections were painted and glued in place. Again, no locating areas so just cement them in as best as you can. I should mention that I sprayed all the interior bits with primer grey before gluing in the windows. I left it that color as it seemed appropriate.
I then glued on the second fuselage section. I cemented this in sections allowing each one to dry before moving on to the next. Not doing may well cause a bunch of extra filler later. The bits don't line up well even after the mating surfaces had been sanded. Once together, it took several sessions of filler to smooth things out. Thankfully, the real airframe on the top and bottom is quite flat. Moving to the back, much trimming had to be done to get the horizontal tailplanes to fit horizontally. Valom marks where the fuselage should go so that is a help. Be sure that the holes for the braces are on the bottom as it is easy to install this upside down. More filler and sanding before the fin/rudder was glued on. I also glued on the windscreen. This will need filler as well. The windscreen on the underside is angular to match the 'glass' panels. The fuselage on which it fits is a smooth curve. Even the 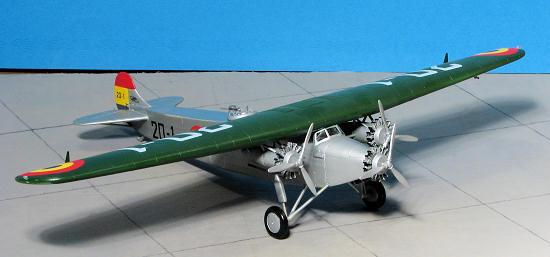 sections under the cockpit side windows is curved so there are rather large gaps that need filled. To keep from having filler ooze into the cockpit, I first applied clear gloss paint to fill the holes. Filler was then applied as normal.
Once that was done, the wing was attached. Fit is actually good, though there is a step in the rear join to the fuselage. I'm not sure it is supposed to be there so several applications of filler were put down to blend this area in.
Next step was attaching the engine nacelles and the landing gear. There are a myriad of struts for this task and while a great deal of fiddling around is necessary to get this all hooked up, the end result is quite sturdy. I should also mention that for whatever reason, it seems most of the struts that attach to the nacelles are too short. Were I to build this kit again (and it could happen), I'd replace all of the engine strut pieces with ones that were long enough. One does have to be careful to ensure that the nacelles are on the proper side and correctly aligned to get all the various attachment points in the right place. One thing I did not do was to glue on the engines. This will be left for a later time. At this time I attached the etched brass control horns on the control surfaces. There are slots on the ailerons to help out, but nothing on the rudder or elevators. I used super glue for these and once they were dry, reinforced them a bit with a bit more super glue.
| COLORS & MARKINGS |
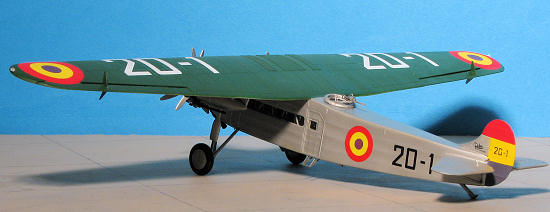
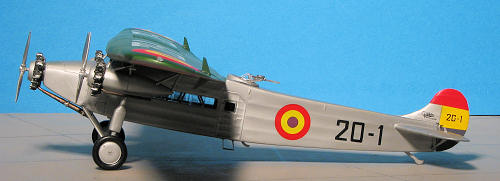
Looking at the two markings options, I decided on the Silver one with the Green wings. These planes were used in Spain's possessions and for the most part, did not directly participate in the war. For the upper wing and leading edge, Valom lists among 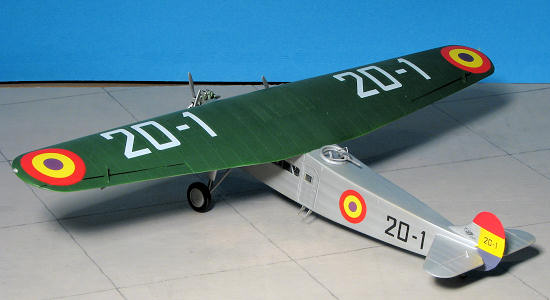 the paint choices, Humbrol #2, which I happen to have. Mixing this with lacquer thinner, I sprayed on a coat or two. Then once it had dried for a couple of days, I masked the wing and painted the rest of the airframe with Xtracolor RLM 01 Silver enamel. This does a good job of replicating the silver paint used on the aircraft.
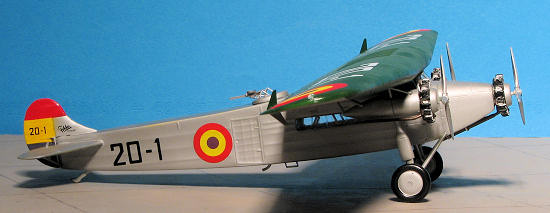
Then I realized that the kit didn't come with rudder stripes. Well Shoooot. Out came the white as I sprayed it on the fin/rudder. Then the upper section was masked and the yellow sprayed on. When dry, the yellow was masked and the red applied. Then the purple was mixed and with the upper colors masked that was sprayed on. When all was dry the markings were masked and the considerable overspray was repainted silver.
| FINAL CONSTRUCTION |
With the major painting out of the way, I painted up the engines and glued those into the nacelles. Trimming of the engine or nacelle interior is needed to get the engines to fit. I also attached the the exhaust. This was an exercise in frustration as there is no clear indication as to where these actually fit. Just glue them somewhere in the engine is about all the instructions showed. The braces for the main exhaust was also frustrating as these photo etch parts were too large and didn't fit worth a hoot.
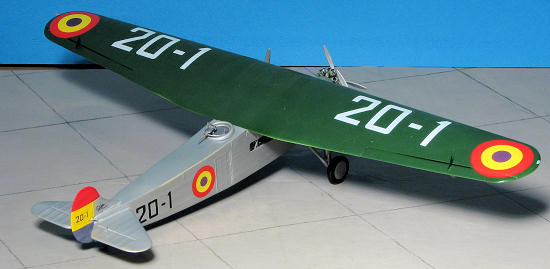
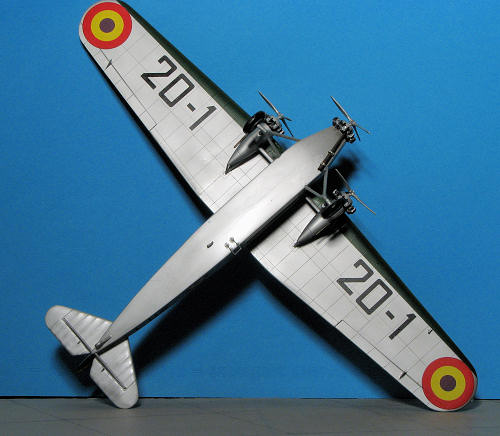 To add to the screw-ups, I realized I used the wrong color of green on the upper wing. It was actually Humbrol #3, a darker shade. Nothing to do but mask things as much as I could and repaint. The installed engines made this quite difficult in this area and I ended up brush painting that section. After drilling out the wheels and trimming the axles, the wheels were glued into place. Now seemed like a good time to apply decals. Generally, they worked well. I doubled up the ones on the upper wing (since I had 'extras' with the wrong color to the center of the roundel) to provide more color saturation. The markings work great on a flat surface, however, they didn't like the compound curves on the upper wing tips. Even much Solvaset wasn't totally successful, but with some pressing down on the markings prior to the Solvaset drying, I was able to get rid of most of the wrinkles.
At this time, I glued on the venturi tube and the wind driven generator (which almost immediately disappeared when I picked up the plane to photograph it). These were touch up painted. For the upper turret, I assembled things as best I could and glued it in place. Then the area in the center of the turret was painted a dark grey to simulate the hole in the upper fuselage. Seemed a better way to go than to drill out a large hole and show nothing but the rough inner fuselage. I also drilled holes in the wing tips for the clear lights. The one that was to go on the fin went zinging off into another dimension. I then removed the masking material and glued on the props. A bit of touch up painting and it was complete.
| CONCLUSIONS |
Now that it is finished, was it worth the work? Sure it was. I never build a model I don't think will be worth it and though some are more of a challenge than others, I'm almost always glad I built it. In this case, though not simple, it provides a good model of an important type and I hope Valom does well with these.
| REFERENCES |
 http://en.wikipedia.org/wiki/Fokker_F.VII
April 2010
Copyright ModelingMadness.com. All rights reserved. No reproduction in part or in whole without express permission from the editor.
If you would like your product reviewed fairly and fairly quickly, please contact the editor or see other details in the