| KIT #: | A041 |
| PRICE: | $17.85 |
| DECALS: | Three options |
| REVIEWER: | Scott Van Aken |
| NOTES: | Short run with resin parts |
| HISTORY |
The
Neiuport-Delage NiD 42 was chosen by the Spanish Air Force as their new fighter
in the late 1920's Before a contract was signed for license production, the NiD
52 was offered and so chosen. The 52 was improved by offering a metal skinned
fuselage 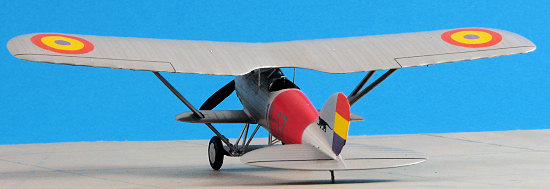 and metal wing framing. Production began at the Hispano-Suiza factory
in Guadalajara in 1929, with the first 34 aircraft constructed of French
provided parts. Another 125 aircraft were built with local materials. When the
civil war broke out, an additional 10 aircraft were provided as attrition
replacements and delivered in 1936.
and metal wing framing. Production began at the Hispano-Suiza factory
in Guadalajara in 1929, with the first 34 aircraft constructed of French
provided parts. Another 125 aircraft were built with local materials. When the
civil war broke out, an additional 10 aircraft were provided as attrition
replacements and delivered in 1936.
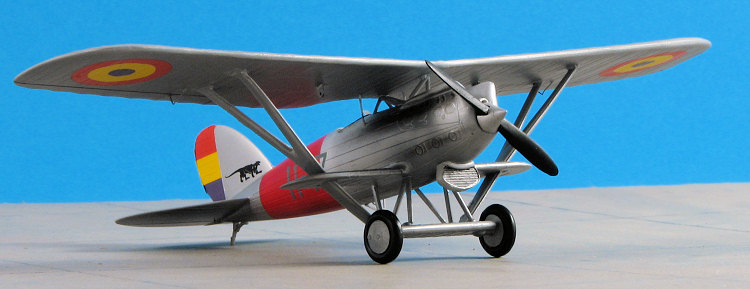
At the start of the civil war, the Republican forces had 48 of these aircraft and the Nationals had 8. At the time, it was the most powerful fighter available to either side until foreign governments started supplying aircraft. For both sides it was the NiD 52 that scored their first aerial victories. Once newer planes were provided, the NiD 52 was relegated to observation duties, the last battle in which the aircraft participated was in the Spring of 1937 at Guadalajara. By that time, most remaining aircraft had been turned over to training duties.
| THE KIT |
Molded
in MPM/Special Hobby/Azur's medium grey, the detail work on this kit is very
nice. You can see that there is some 'hill and valley' work on the fabric
covered bits, but it is not excessive. The kit is quite simple, even more so as
several airframe parts are 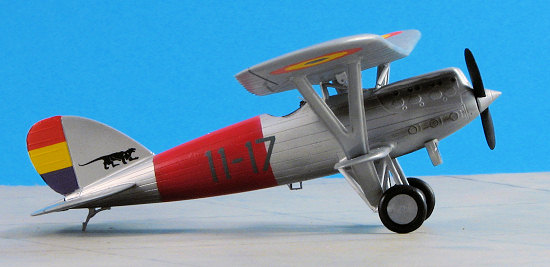 not used, obviously in preparation for another
variant. There were no molding defects at all that I could see, a nice treat.
Resin is used for the cockpit components and some smaller airframe bits like
scoops, guns and the large chin oil cooler. Photo etch (not shown) is for some
hinges, instrument panels and belts. Acetate is provided for the windscreen and
for instruments.
not used, obviously in preparation for another
variant. There were no molding defects at all that I could see, a nice treat.
Resin is used for the cockpit components and some smaller airframe bits like
scoops, guns and the large chin oil cooler. Photo etch (not shown) is for some
hinges, instrument panels and belts. Acetate is provided for the windscreen and
for instruments.
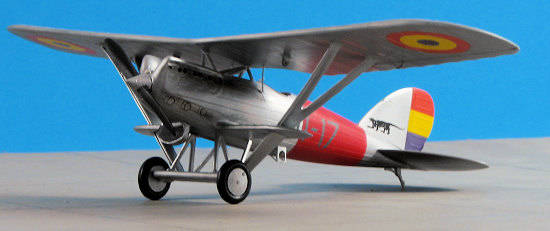
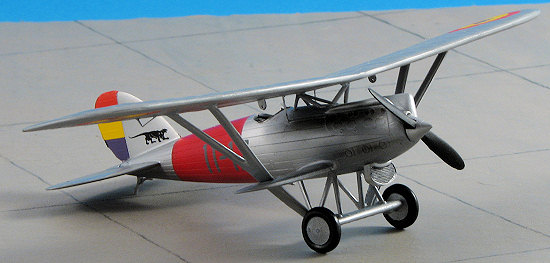
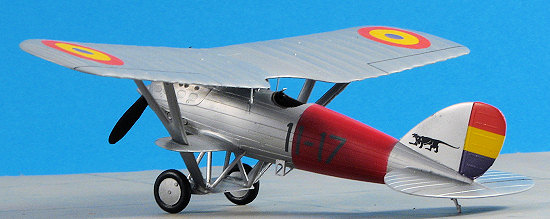
The instructions are well done and give color information in generic, Gunze and another paint that is not identified, but may well be Agama. There are markings options for three aircraft. All of them are Republican aircraft with a base aluminum color and large red bands on the wings and fuselage. These latter items need to be painted by the builder. Option one is the box art plane in 1937 with sand upper surfaces that are mottled in a khaki green. This aircraft has no upper wing roundels. The second option is from 1936 with 13 Squadron near Barcelona. The third is with 11 Gruppo in 1936. The decals are well printed and should provide no problems.
| CONSTRUCTION |
 Beginning
in the pilot's compartment, I started assembling the various bits and pieces.
This was basically a seat with belts rear and front bulkhead and control stick.
The instrument panel is one of those sandwich affairs where one paints the back
of a piece of printed acetate with white, then glues it to the back of an etched
front panel face. This is then glued to a plastic backing and in turn, it gets
placed on the resin bulkhead. In practice it works very well and I use clear
gloss paint to attach the acetate. it leaves the instruments with gloss faces w
Beginning
in the pilot's compartment, I started assembling the various bits and pieces.
This was basically a seat with belts rear and front bulkhead and control stick.
The instrument panel is one of those sandwich affairs where one paints the back
of a piece of printed acetate with white, then glues it to the back of an etched
front panel face. This is then glued to a plastic backing and in turn, it gets
placed on the resin bulkhead. In practice it works very well and I use clear
gloss paint to attach the acetate. it leaves the instruments with gloss faces w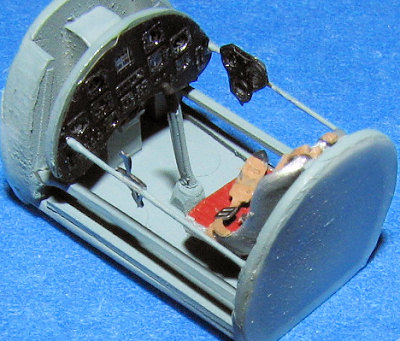 hile
the panel is still matte black. In this cockpit, there are four resin pieces
that are to duplicate the framework and on those are stuck an auxiliary panel
(though how the pilot reads that is beyond me) and a throttle quadrant. Both are
supplied as resin or as etched bits. I used the etched ones. While the lower
frame sections fit fine, the upper ones were too short so I substituted some
brass wire. Works well, as you can see from the image.
hile
the panel is still matte black. In this cockpit, there are four resin pieces
that are to duplicate the framework and on those are stuck an auxiliary panel
(though how the pilot reads that is beyond me) and a throttle quadrant. Both are
supplied as resin or as etched bits. I used the etched ones. While the lower
frame sections fit fine, the upper ones were too short so I substituted some
brass wire. Works well, as you can see from the image.
I then glued the interior into a fuselage half, making sure that it fit properly before gluing it solid. One thing is that the instrument panel fits in fairly far back so it was not possible to attach the gun sight to the panel as shown in the instructions.
The fuselage halves were joined and the usual filler
applied. The horizontal tail plane is a single piece that fit fairly well,
though like the separate fin/rudder, needed filler at the join. During this same
time,
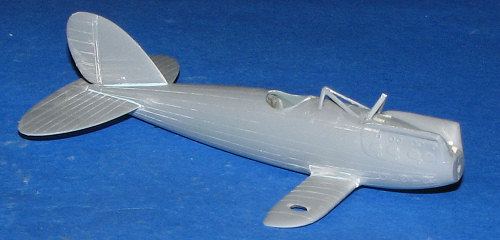 I
attached the piece in between the cylinders. Filler and sanding also needed on
this bit and when done, the resin scoop and guns were glued in place. I also
glued in the central struts. These did not fit the holes in the fuselage and the
instructions didn't show the rake that
I
attached the piece in between the cylinders. Filler and sanding also needed on
this bit and when done, the resin scoop and guns were glued in place. I also
glued in the central struts. These did not fit the holes in the fuselage and the
instructions didn't show the rake that
 the forward one has to be glued at
in order to fit into the dimples in the underside of the wing. I eventually got
things properly positioned and glued on the lower stub wings. While this was
drying, I attached the etched aileron control hinges and some eyelets to
the underside of the wing.
the forward one has to be glued at
in order to fit into the dimples in the underside of the wing. I eventually got
things properly positioned and glued on the lower stub wings. While this was
drying, I attached the etched aileron control hinges and some eyelets to
the underside of the wing.
Now things got interesting. You see, you have to thread the two large 'Y' struts through the lower wing and onto the back of the small landing gear 'wing'. However, you first have to cement on the gear braces to this piece. Instructions help a bit in getting all this aligned and I was able to get most of the pieces to fit into the little dimples. During this, you also have to make sure that the upper wing will fit onto the large braces and the center struts as well. It helps to have four or five hands while doing this, but since I didn't, I just tacked most of the bits in place with super glue until I was sure all would fit. Then they were more permanently affixed.
Feeling quite pleased with myself at not having made a major mess of things, I proceeded to glue on the lower resin radiator and the tail skid. the cockpit was stuffed with tissue and it was time for paint.
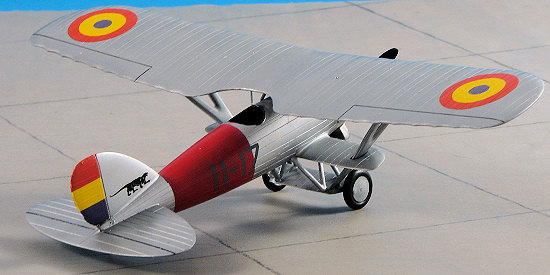
| COLORS & MARKINGS |
The kit offers three very nice schemes, but since I'd
already glued on the wing and its little etched bits, I had pretty well
eliminated 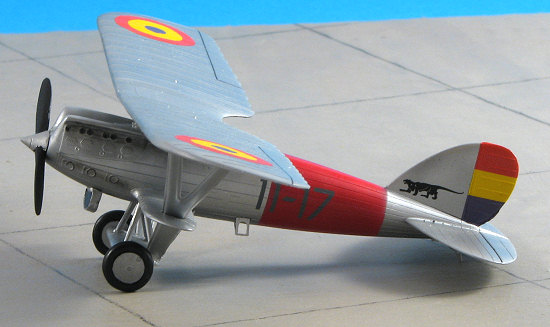 the two with broad wing bands. the broad fuselage band was painted
white than red. When dry it was masked and I sprayed Alclad II aluminum on
everything else. As usual, I got great
results from the Alclad, but this time the paint remained a bit sticky. Most
unusual and I don't know why as I thoroughly shook the bottle. It didn't prevent
me from continuing and I left no fingerprints, it was just a bit tacky until
eventually clear coated.
the two with broad wing bands. the broad fuselage band was painted
white than red. When dry it was masked and I sprayed Alclad II aluminum on
everything else. As usual, I got great
results from the Alclad, but this time the paint remained a bit sticky. Most
unusual and I don't know why as I thoroughly shook the bottle. It didn't prevent
me from continuing and I left no fingerprints, it was just a bit tacky until
eventually clear coated.
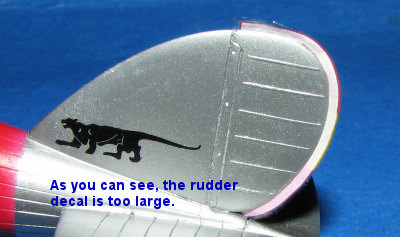
Returning to the bench, I glued on the main wheels and assembled the prop, cutting the prop shaft so I could later glue it in place. The decals were very nicely done and went on without any fuss. I found they were all a tad oversized in regards to the placement guide and the rudder ones were well oversized. This isn't the first time I've run up against this and am not sure what the deal is. The decals themselves are done by AviPrint and are quite crisp and in registration. The yellow is a bit transparent so putting the roundels and fin flash over a camo scheme would show the underlying shades. But that wasn't my problem as I used aluminum instead.
| FINAL CONSTRUCTION |
With the decals in place, I tried to put on one of the acetate windscreens that come with the kit. Actually, I tried to use them both, but one disappeared to who knows where and the other turned into a mess so I left it off. I glued the gun sight to the forward cockpit and glued on the prop. Last were the little resin push/pull rods for the controls, which were painted aluminum. The model was given a coat of gloss clear acrylic to tone down the Alclad II. It was then given a mist of clear matte, and that seems to have provided the proper sheen to things. A bit of final painting and some exhaust stains with pastels and it was done.
| CONCLUSIONS |
 I've grown rather fond of these interwar French
designs. They are interesting in that they are not the norm here in the US and
though the French built some really homely bombers, most of its fighters of the
time were rather neat sesquiplanes or parasol types. The kit isn't horribly
expensive, doesn't have a ton of parts and is such that one who wanted to give
some of the more exotic materials (like resin or etched brass) as shot wouldn't
have a lot to fuss with on this kit. It is one that I can recommend to you as
something a bit different from the usual.
I've grown rather fond of these interwar French
designs. They are interesting in that they are not the norm here in the US and
though the French built some really homely bombers, most of its fighters of the
time were rather neat sesquiplanes or parasol types. The kit isn't horribly
expensive, doesn't have a ton of parts and is such that one who wanted to give
some of the more exotic materials (like resin or etched brass) as shot wouldn't
have a lot to fuss with on this kit. It is one that I can recommend to you as
something a bit different from the usual.
May 2007
#1468 in a series.
Copyright ModelingMadness.com. All rights reserved. No reproduction in part or in whole without express permission from the editor.
If you would like your product reviewed fairly and fairly quickly, please contact the editor or see other details in the Note to Contributors.