Monogram 1/48 OS2U Kingfisher (Hi Tech)
Kit Number: 5488
Price: $10.00
Decals : 2 versions; prewar and mid-war with three colors
Date of Review: 28 Dec, '96
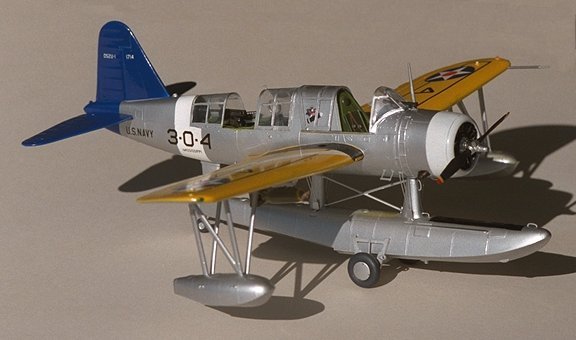
Another photo at bottom of page
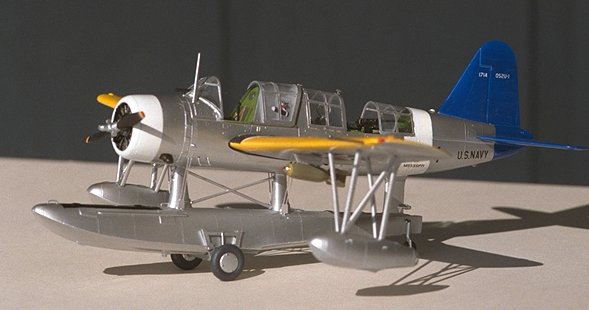
Comments: The OS2U Kingfisher was the US Navy's premier utility/scout floatplane of WWII. It was catapulted of battleships to provide fire direction and used for SAR work to pick up downed pilots. Charles Lindberg can thank an OS2U for picking him up when he was shot down in hostile waters during WWII. The Kingfisher was also operated from land bases by replacing the floats with wheels.
The Monogram kit is the same old kit that has been around since 1967 (according to the mold date). It makes into a fine model, but has several quirks that must be overcome. The Hi Tech part is a sheet of brass that is mostly hand holds, foot steps, seat belts, gun shield, and a wiring harness for the engine plus a few other bits. The brass gun shield prevents the gun and aft center canopy section from being mounted together.
The biggest headaches in building were the 'slip-through' wing (note the lower wing gap in the photo above), and the fact that the main float is attached to the fuselage. If it were separate, it would have made building much easier. For a more detailed look at the building process, visit the "On the Bench" section printed below the review.
I decided to paint this aircraft in a prewar scheme with yellow wings and aluminum fuselage. I was leery of using the Mongram sheet as often I have had problems with it, so I bought Aeromaster's sheet that had the same markings. The decals worked just great, I only wish they had offered a different scheme. I used the Monogram wing walk decals and they worked beautifully, much to my delight.
The finished kit is a joy to behold. The only parts that I did not use were the pathetic bombs. I used a spare set that were from the Pro Modeller A-26 and while they are larger, they look a lot better. I recommend this kit to the intermediate builder that can cope with the problems during construction and the brass parts.
Monogram # 5488 OS2U Kingfisher (High Tech): A blow by blow account.
1 Dec '96
Back in March, this kit was just opened with no construction at all taking place until a few days ago. Since then, I have done the following: I have painted the interior Chromate Green after adding those brass etched parts to it that make this kit 'high tech'. I have also painted the instrument panel and rear gun assembly flat black. To these are added a brass facing which is also flat black. The instrument panel required the instrument decal to be glued behind it so the instrument faces will show through. This I did with superglue and the result is very satisfactory. Other brass bits that had to be added to the interior were rudder pedals, a trim wheel, and buckles for the pilot's and observer's seat. Frankly, I would have preferred to have new console facings and radio boxes, but those were not included. I have also glued together the wings, opened up the under wing holes for the floats and sanded the edges clean. The engine has been painted flat black with a dark gloss grey case and is awaiting dry brushing and the addition of a brass ignition harness.
The floats have been assembled and are drying. I have noticed that the attachment lugs are a bit off and so there is a step on the wing floats. If I were doing this again, I would remove the lugs as now the floats will need putty and sanding. The fuselage halves had several holes opened up for the brass float wires. There are also large holes for the steps already opened for you. These are supposed to be replaced by brass parts, but the size of the holes means that I may use the plastic parts. The wing has been inserted in the fuselage and the halves joined together. Due to possible misalignment problems, I am cementing the fuselage in sections. I have also noted a rather large gap between the wings and the fuselage that will probably require quite a bit of filler.
7 Dec '96
The fuselage appointments have been finished and the fuselage/main float have been cemented together. This required the main wing to be installed prior to the fuselage being glued shut. While the top looks very nice, there was a large step on the bottom of the fuselage. Cleaning this is hampered by the float. I wish the main float was separate as it would make assembly easier. It is undergoing its second coat of putty.
14 Dec '96
Little progress has been made other than smoothing out the putty coats and cleaning up a few of the remaining parts in preparation for completing the airframe.
21 Dec 96
After getting the airframe mostly complete including installation of the wing floats, I have attached the transparencies, pitot tube and antenna. I still have a number of brass bits to fix and will do so soon. Much to my dismay, I discovered that I cannot fit the middle aft transparency with the rear gun in place. The brass shield on the gun makes it too wide to fit the transparency. I removed the gun and tacked the transparency in place. I'll figure out what to do later. All the transparencies have been masked with Scotch tape, a job that took over an hour due to all the frames. I have also painted almost all of the airframe white (except one area to use as a hand hold) as I will be doing a pre-war scheme of silver and yellow with white bands. The white is a perfect background for the silver and yellow paint. It will be quite a chore and require lots of masking, but hopefully the result will be worth it. I have also been assembling the beaching dolly and finishing up some of the other minor bits (bombs, propeller).
28 Dec 96
The beast is finally finished and really looks great. The prewar colors of silver fuselage, yellow wings, blue tail and white stripes is quite an eyeful. First, I attached all the rest of the fuselage and float brass bits (mostly steps and hand holds) and let them dry. Then I masked off the wing, fuselage and nose areas that were to be white, painted the wings Model Master Chrome Yellow (not forgetting to run the color a bit under the front of the wings), painted the tail Model Master French Blue (which is a bit darker than True Blue, but what the heck) and let them dry a couple of days. Once dry, those areas were masked and the rest of the airframe was painted Metallizer Aluminum. Once all that was dry, the entire aircraft was sprayed with Future floor wax. The main reason for this was to dull the Metallizer and make it look like aluminum paint. All the masking was removed and it was time for decals. I used an Aeromaster sheet that has the same marks as in the Monogram kit. I used the Monogram wing walk lines and they worked quite well. If the Monogram decals had been more distinct, I could have used them. It was at this stage that I noted a big goof. I should have waited to attach the wing floats as the insignia decals were supposed to go under them. No way would they fit there now, so I put them just inboard of the floats like they were when the aircraft were repainted in the initial camouflage of two greys. I used a thinned Solvaset to ensure the decals would snuggle down. For the wing and float walkways, I used black stripe decals and full strength Solvaset so they would conform to the many lumps and bumps on those areas. Final attachment was the propeller and the exhaust, the masking was removed, the center aft canopy removed and the gun replaced. It is a great looking kit and nothing like what it looked like a few weeks ago. This kit is currently out of production, but can still be found.
Copyright ModelingMadness.com. All rights reserved. No reproduction in part or in whole without express permission from the editor.
Back to Reviews Page 2024