| KIT #: | A01003 |
| PRICE: | About $8.00 SRP |
| DECALS: | One option |
| REVIEWER: | Scott Van Aken |
| NOTES: |
| HISTORY |
The Curtiss P-40 Warhawk was an American single-engine, single-seat, all-metal fighter and ground attack aircraft that first flew in 1938. The P-40 design was a modification of the previous Curtiss P-36 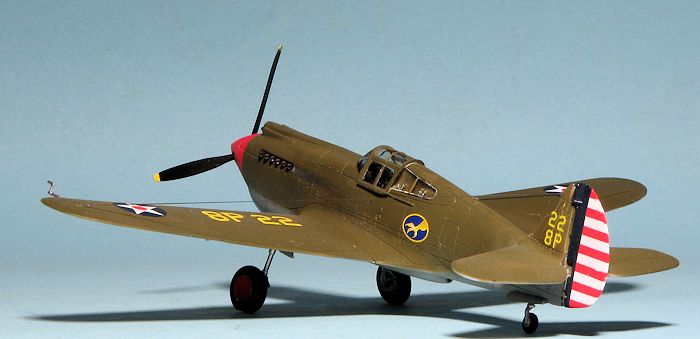 Hawk which reduced development time and enabled a rapid entry into production and operational service. The Warhawk was used by the air forces of 28 nations, including those of most Allied powers during World War II, and remained in front line service until the end of the war. It was the third most-produced American fighter, after the P-51 and P-47; by November 1944, when production of the P-40 ceased, 13,738 had been built, all at Curtiss-Wright Corporation's main production facilities at Buffalo, New York.
The P-40 version in this kit is also the best fighter available to the USAAC at the start of the war, and while not as overly capable as the A6M, if used as a hit and run fighter, it was able to do quite well against Japanese aircraft. This is thanks to its superior diving speed and ability to handle greater battle damage than the lightly built Japanese planes.
| THE KIT |
This is not the first 1/72 P-40B/C. Frog was probably the initial developer of one of these and is the basis for the Academy kit and probably others. Though Jo-han listed one on box sides, they never carried through with developing the kit prior to the company going under. There have also been early P-40s by short run and resin kit manufacturers.
 The kit is well shaped and has engraved panel lines. These panel lines are actually far deeper than they need to be for a 1/72 kit and this has put off several modelers who have seen these kits. Frankly, the majority of modelers will not care one way or the other and while it is said that they will soften out under paint, you will need a lot of paint!
The interior floor slots into the inside of the lower wing, to be followed by a seat, stick and instrument panel. A decal is provided for instruments. There is also detailing on the inside of the fuselage walls. Nothing great, but better than a blank slate. The upper cowling is a separate piece to facilitate the installation of the prop so it can spin. The lower cowling/radiator is also separate. This will eliminate the need to fill seams in these areas. The kit comes with open or closed cowl flap and can be built with gear up, though you will need to fabricate your own stand. There are separate exhaust sections and the kit comes with a pilot. The canopy is clear, but thick and can only be glued in the closed position. I should also mention that there is wheel well detailing and the wheels have flat spots molded on them.
Hard to believe that the instructions for this comprise 16 steps, but they do. You will have to cut off a radio mast molded on one fuselage half, but that is about it. Naturally, all color numbers are Humbrol. The only cross reference is on the back of the box and that is only for external painting information. The lone markings option is for Charles Older's #68 of the 3rd Pursuit Squadron 'Hells Angels' in US equivalent RAF colors. The decal sheet is nicely printed with data markings where appropriate. I think the roundels are a bit too light, but then I have been used to seeing darker blue for these things for decades. There are aftermarket sheets if one wants something different.
| CONSTRUCTION |
This is my third Airfix P-40B/C. I really like this version of the plane and so it will undoubtedly not be my last. I first built up the cockpit (no surprise here) and painted it. This time, I was able to remove the control stick from the sprue without breaking it. I then ass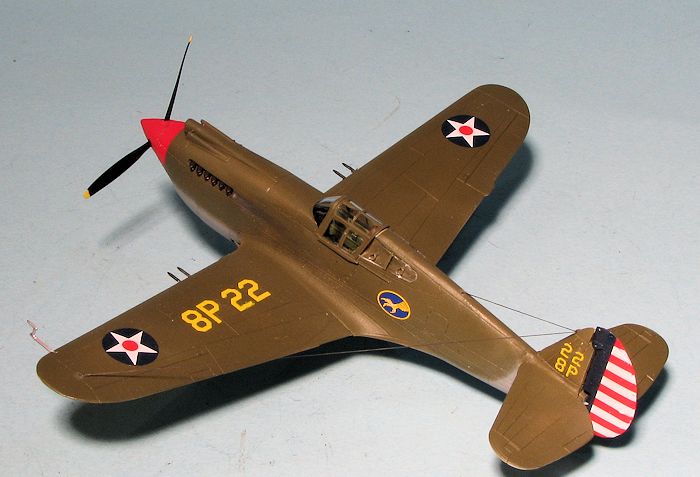 embled the wing pieces and then glued the cockpit atop it. The fuselage halves were also glued together and the radio mast removed as per the instructions.
There are two major inserts for the fuselage, an upper and lower cowling bit. At this time, I paused to fill seams. I don't seem to remember having issues with seams on previous builds, but I'm sure I just forgot it. the biggies are the lower wing near the tips and the two fuselage inserts. One has to be VERY careful sanding this kit as the plastic is softer than on most kits. This is a plus in that it is easy to sand and a minus in that one can easily oversand it, leaving grooves and such.
The wings were then mated to the fuselage. Fit is not that good, with steps between the fuselage and the wing proper. It required several sessions of filler and sanding to cure. Tailplanes were glued on and they have a rather considerable gap as well. I then masked the clear bits. The canopy was then attached and it was off to the paint shop.
| COLORS & MARKINGS |
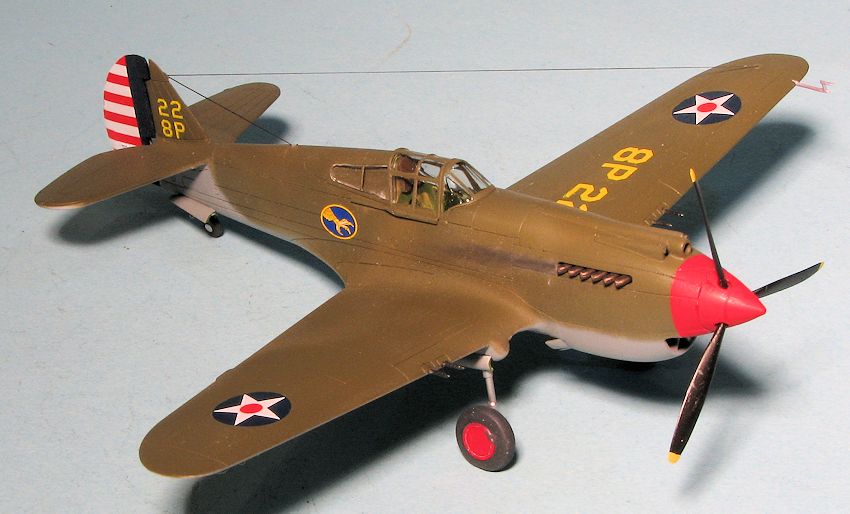
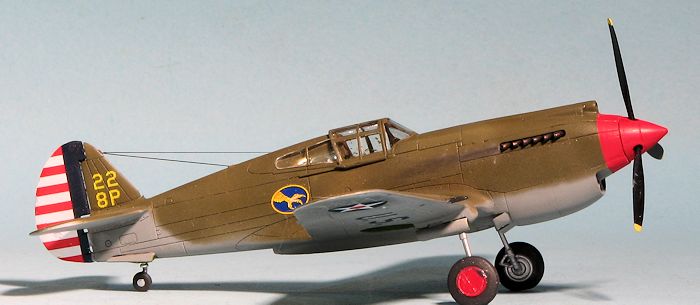
I was going to use another FCM decal sheet for this one and chose FCM 72-022 which had markings for two pre-war P-40s. I picked the one for the 33rd Pursuit Squadron in 1941. This plane has a red forward cowling and wheel covers, so those items were first painted white then red. After masking, I used Testors Model Master enamels for the olive drab and neutral grey scheme.
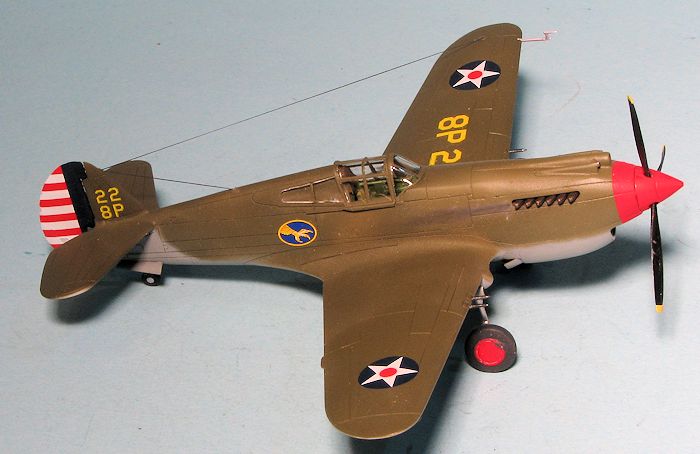 When that was dry, I glued on the landing gear and gave the airframe a coat of clear gloss acrylic in preparation for the markings. I had difficulty getting the gear to hang straight and it ended up splayed. Thanks to the separate rudder, that was decaled apart from the rest of the airframe. These two decals gave me nothing but headaches. For one thing, these are considerably oversize in terms of fore and aft length. They also do not take into account the upper rudder hinge. To be honest, they were designed for the Academy/Zveda kit and not the Airfix offering. I found them to be quite brittle once applied and application of setting solution caused them to fold over on themselves. This was not the case for the other markings, which went on without trauma. I also did not paint the rudder first and probably should have.
| FINAL CONSTRUCTION |
With the markings in place, I continued with the rest of the build. For this one I decided to use some Quickboost bits for the prop/spinner and for the exhaust. I had issues with the prop as the tips of the blades were curved and refused to straighten out. Based on this, I would not recommend this set. The e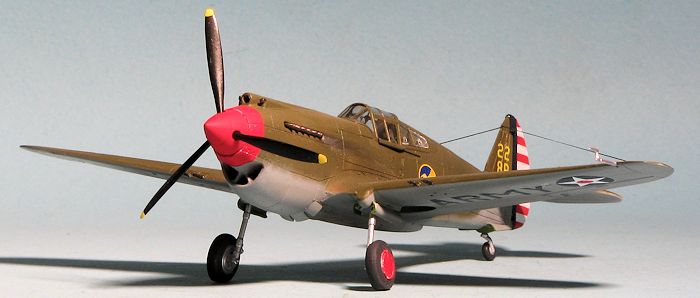 xhaust caused no issues and I was able to paint and install it without any problem. They do look tons better than the kit offering.
Installing the wheels and wheel covers took the use of pliers to get them in place. The kit main gear legs are also very rickety and I would recommend metal gear to add some rigidity to this part of the model. SAC makes them and I'll definitely use them on the next build. I broke the straight pitot tube removing it from the sprues so used the other one. The gear doors were attached as was the prop then I made an antenna wire using EZ line. This was all given a matte coat before I removed the masking from the canopy and installed the rear quarter windows and landing light. I found that the relatively short sprue gates made it difficult to keep from introducing stress cracks in the clear when removing them. A bit of pastel for exhaust and that was it.
| CONCLUSIONS |
This is the third time I have built this kit since it was introduced. I had not planned on it, but it came with a batch of kits I bought and I figured "why not?". It is not the easiest building kit around, requiring some care during construction, but it very much looks the part when it is done. It looks great on my shelves along with the other early P-40s and I doubt it will be the last time I tackle it.
December 2014
If you would like your product reviewed fairly and fairly quickly, please contact the editor or see other details in the