Heller 1/72 C-118 Liftmaster
Kit #: 315
Price: $9.99 (on sale)
Decals: One version for 375 AAW medivac aircraft
Date of review: 16 July 1997
Back in the late 1950's, when we first moved to Scott AFB, there were a number of these aircraft at the base, along with T-29s, T-33s, and the reserves with their C-119s (later to get C-124s before being disbanded. Along came the C-9s in the late 1960's and the 118s were either retired to the boneyard or disbursed elsewhere. Some were distributed to the Navy and in the early 1970's, I made several very long (10 hours+ depending on weather) and very noisy flights from Guam to Japan in these planes.
When Heller brought out this kit in the mid 1980's, I just had to have one. When I finally got it home and opened it, I could see why it came in such a large, sturdy box. This is a big airplane! What you get is medium grey plastic with finely engraved panel lines control surfaces. There is no interior other than the cockpit and there really doesn't need to be one. There are several bulkheads to keep the fuselage nice and rigid. The cockpit is one large piece of clear plastic with lots of room to mold it into the surrounding fuselage.
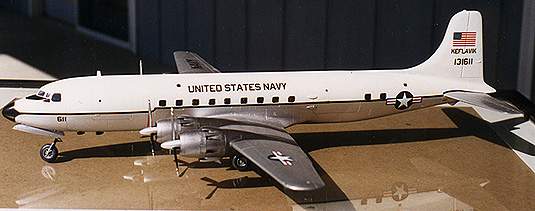
The first thing to decide is what scheme to use. Since very few of us will build more than one of these kits, it is important to do something we will like. The C-118 was used by a lot of countries and services. Having mulled over all the possibilities, I decided to do the station bird from Keflavik, Iceland. Since I had just finished a two year stint there, it just made sense. What helped was a Microscale sheet that depicted this aircraft, so it was set.
Next was to decide how to get it to sit on its nose gear. Fortunately, ATP makes a nose weight that is designed to conform to the nose of the aircraft and it fits beautifully. It is also very heavy. I anticipated problems with the scale nose gear and all that weight, and I got just what I expected.
On to the construction. I basically followed the large and logically designed instruction book with the exception of leaving off all the breakables and the props until the closing stages of construction. All the possible subsections were built up including the four engines, the cockpit, wings and horizontal stabilizers. The engines posed a bit of a problem. Mainly the intakes were not hollow at all, but blanked off. This required a lot of work with a hand drill and needle files to get to look proper. More so as the upper intakes are very thin and had to be done carefully with the tip of an xacto knife (#11 blade, of course). The fuselage air intake needed the same treatment.
Once the cockpit was completed, it was inserted in the fuselage along with the (scale) ten ton lead weight. No way was this EVER going to sit on its tail! Once the fuselage was glued and the required (for me) putty applied and smoothed, it was time for the horizontal stabilizers. A great fit. Now for a big decision. Attach the engines before or after attaching the wings. The kit instructions have you doing engines after the wings. I compromised and attached the outer engines, leaving the inner ones off so that I could get to the wing roots for the inevitable putty session.
Having fussed with the wings and engines (both which required a bit of putty), it was time to get on to the landing gear. This can be assembled after the aircraft is painted and that is just what I did. The paint scheme is quite simple. Overall bare metal with a white fuselage top. Metallizer was used for the aluminum and Testor's gloss white for the fuselage top. An aircraft of this size used a lot of paint! The decals provide the black fuselage cheat line and it is simply a matter of masking. I painted the white first and then masked off all the areas I wanted to stay white before applying the Metallizer. The engines leave a distinct exhaust stain and on these aircraft there is a dark area painted on the upper and lower wing to try to mask this. I used a dark Metallizer color (magnesium, I believe) to achieve this. The engine nacelles were then suitable dirtied up.
Finally, the landing gear and doors were attached. All that weight was bound to break the nose gear, which on a 118 slants forward quite a bit anyway. Once that finally happened (after about a 2 week moratorium), the nose gear was drilled out and a bit of paper clip superglued in to provide strength. No more problems! Last but not least, the props were painted aluminum with white tips and red decal stripe used for the center of the white/red/white prop tips.
The finished kit looks really nice and is one of those models that is on permanent display in my case. This has recently been re-released by Heller at a very fair price. If you have the room, I would highly recommend this kit, in either military or civil markings.
Late entry. Were it not for the fact that the landing gear and doors have departed the airframe since that photo was taken, I'd have more pics. Ed
16 July 1997
Copyright ModelingMadness.com. All rights reserved.
Back to Reviews Page 2020