Classic Airframes 1/48 F-5A 'NATO Allies Pt 1'
|
KIT # |
486 |
|
PRICE: |
$50.00 MSRP |
|
DECALS: |
Three options |
|
REVIEWER: |
Scott Van Aken |
|
NOTES: |
Includes lots of resin parts. Not for the inexperienced. |
|
HISTORY |
Please visit the preview for a look in the box and a short history on the type.
|
CONSTRUCTION |
First thing I had to do was to get all
the resin bits ready to go. Removal of the resin pour stubs was not as
difficult as with other kits as it seemed that the resin on this one is a
tad softer and I quickly had all the proper bits ready for painting. Some
may wish to keep the parts on the stubs while painting to provide a
proper handle, but my e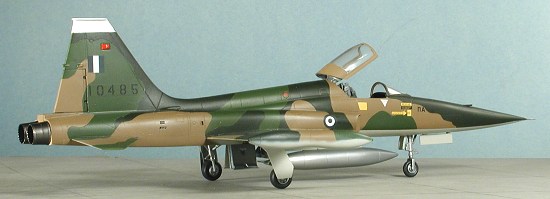 xperience has been that in my attempt to keep a
fully painted resin bit safe from damage that I've either broken the part
or wounded myself with the saw! Only the small sprue with the control
stick, rudder pedals and canopy hinges was painted prior to part removal.
xperience has been that in my attempt to keep a
fully painted resin bit safe from damage that I've either broken the part
or wounded myself with the saw! Only the small sprue with the control
stick, rudder pedals and canopy hinges was painted prior to part removal.
Once any clean-up was done with the resin parts, they were then given their primary paint job. For the interior and instrument panel, that meant FS 36231 Dark Gull Grey, which was also sprayed on the interior of the fuselage. The seat was painted with weathered black, the exhaust shrouds with Alclad II Steel, the afterburner cores with Alclad II Jet Exhaust and the wheel well insert with Aluminum. A number of the other parts were given a preliminary Aluminum paint job a well.
I then went to work removing any ejector towers that could cause some problems. Once removed with clippers, I sanded them down as smooth as I could. I also filled those ejector holes that were there (like the intakes). These were all sanded smooth and then painted Aluminum.
 Meanwhile, back at the
interior, I painted the seat's headrest red and hoses in olive green. The
ejection seat handles were painted white then yellow with black stripes.
This is one of those old fashioned seats with no padding and the pilot
sits on his parachute pack and backing during the flight. The instrument
panel got the instruments painted with flat black and when dry, I started
the rather tedious job of filling in most of them with Reheat
Meanwhile, back at the
interior, I painted the seat's headrest red and hoses in olive green. The
ejection seat handles were painted white then yellow with black stripes.
This is one of those old fashioned seats with no padding and the pilot
sits on his parachute pack and backing during the flight. The instrument
panel got the instruments painted with flat black and when dry, I started
the rather tedious job of filling in most of them with Reheat
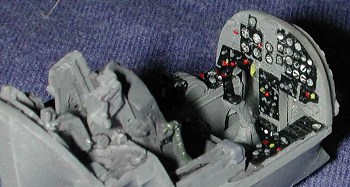 Instrument Decals. Try as I
might, I couldn't find an F-5A panel photo in any of my references so
just put what looked good in the various spots. Frankly, you can't tell
what instrument is what anyway! Various knobs and buttons were painted
with a medium grey or red or yellow or white depending on what seemed
appropriate! I then glued the seat, stick and instrument panel into the
cockpit tub. A bit of a wash and some dry-brushing was done, but not
really that much. It would have been nice to have had a harness molded in
with the seat, but perhaps the seat isn't designed to have one when the
pilot is not in residence.
Instrument Decals. Try as I
might, I couldn't find an F-5A panel photo in any of my references so
just put what looked good in the various spots. Frankly, you can't tell
what instrument is what anyway! Various knobs and buttons were painted
with a medium grey or red or yellow or white depending on what seemed
appropriate! I then glued the seat, stick and instrument panel into the
cockpit tub. A bit of a wash and some dry-brushing was done, but not
really that much. It would have been nice to have had a harness molded in
with the seat, but perhaps the seat isn't designed to have one when the
pilot is not in residence.
 During the 'dry time' of the various
interior bits and decals, I glued the wing tanks and fuselage centerline
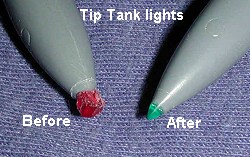
tank. I ended up removing most of the detail from the tip tanks during
sanding and found it difficult to replace the oval access hatches. The
tips of the wing tanks were cut off and small chunks of red and green
acrylic were glued in place to be later sanded smooth. These would
represent the formation lights that were installed there. I also glued
the intake sections together after painting the interiors of them with
Aluminum. The wheels, which had been previously painted aluminum and the
halves glued together, had the tires painted weathered black. It may be
just me, but the main wheels seem a touch on the wide side and perhaps
could be a bit taller as well.
During the 'dry time' of the various
interior bits and decals, I glued the wing tanks and fuselage centerline
tank. I ended up removing most of the detail from the tip tanks during
sanding and found it difficult to replace the oval access hatches. The
tips of the wing tanks were cut off and small chunks of red and green
acrylic were glued in place to be later sanded smooth. These would
represent the formation lights that were installed there. I also glued
the intake sections together after painting the interiors of them with
Aluminum. The wheels, which had been previously painted aluminum and the
halves glued together, had the tires painted weathered black. It may be
just me, but the main wheels seem a touch on the wide side and perhaps
could be a bit taller as well.
 Turning back to the
fuselage, it was time to do some gluing. The interior was installed and
some weight added to the nose, just in case it was needed. Usually long
wheelbase aircraft like this need none, but I wanted to make sure. Then
the fuselage was glued. It was a tad tight around the instrument panel,
you you may want to shave the tub just a bit in that area. Thanks to the
open aft section, it was easy to get sufficient glue to the spine. Once
dry, I looked for seams and they were everywhere. Deciding to do a lot at
once, I then glued in the resin wheel well, the lower aft fuselage
section and the two intakes (which had already been glued together and
sanded smooth. Don't forget to paint the aft intake attachment area flat
black, though it is so far down the intake, I doubt if anyone will see it
anyway.
Turning back to the
fuselage, it was time to do some gluing. The interior was installed and
some weight added to the nose, just in case it was needed. Usually long
wheelbase aircraft like this need none, but I wanted to make sure. Then
the fuselage was glued. It was a tad tight around the instrument panel,
you you may want to shave the tub just a bit in that area. Thanks to the
open aft section, it was easy to get sufficient glue to the spine. Once
dry, I looked for seams and they were everywhere. Deciding to do a lot at
once, I then glued in the resin wheel well, the lower aft fuselage
section and the two intakes (which had already been glued together and
sanded smooth. Don't forget to paint the aft intake attachment area flat
black, though it is so far down the intake, I doubt if anyone will see it
anyway. 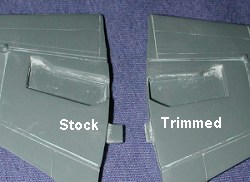
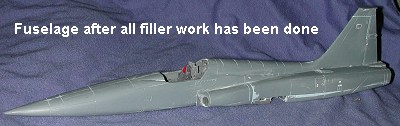
One thing I discovered was that the resin wheel well plug was a bit undersize. This guaranteed several coats of filler. The general fit of all these parts was about what I expected so it was no surprise that I needed filler on all the seams. Once it was done, I re-scribed the lost panel line detail using a very fine finger saw just prior to the final fine sanding. With the fuselage together, I turned to the wings. These had previously had the inserts glued in. These inserts are just a touch too thick for the wing and some sanding needs to be done either before or after you glue them in to bring them to the same level of the rest of the wing. I test fit one to the fuselage and discovered that the small tab that is provided is too long, so it was trimmed down to where it would fit.
Then the wings were glued to the fuselage. The fit is fair and it is obvious that I'll need to use some filler to take care of the join lines. Again, nothing that isn't expected with these kits. While that was drying, I glued together the centerline tank and after taking care if its seams, glued on the two small fins that go with it. Meanwhile, I cleaned up the landing gear pieces and painted them aluminum.
With the wings dry, I applied the
needed filler to the roots and then cleaned up and glued on the tail
planes. It was rather difficult to determine just exactly where they fit.
Judging from the decal and paint drawings, the leading edge of the stabs
 lines up with the fuselage break line on the underside. If this is
correct (and looking at photos of F-5As seems to verify it), then the
tail planes in the drawing are a bit too narrow and the kit ones are the
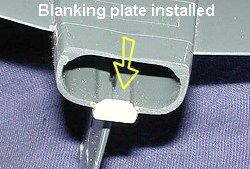
proper width. While at this end of the plane, I decided to test fit the
exhaust. Not a problem, until I noticed that there wasn't a blanking
plate for the very back of the section just under the rudder (which I
guess is a parachute door). I could not find any part that was supposed
to fit there. Thinking that I'd broken off the end plate attached to the
resin burner cans, I looked in the other kit I had and it wasn't there. I
can only assume that there was some missed communications somewhere and
that this piece was left out of the kit. It was easily remedied by a
small section of card stock that was glued in place and then shaped to
fit.
lines up with the fuselage break line on the underside. If this is
correct (and looking at photos of F-5As seems to verify it), then the
tail planes in the drawing are a bit too narrow and the kit ones are the
proper width. While at this end of the plane, I decided to test fit the
exhaust. Not a problem, until I noticed that there wasn't a blanking
plate for the very back of the section just under the rudder (which I
guess is a parachute door). I could not find any part that was supposed
to fit there. Thinking that I'd broken off the end plate attached to the
resin burner cans, I looked in the other kit I had and it wasn't there. I
can only assume that there was some missed communications somewhere and
that this piece was left out of the kit. It was easily remedied by a
small section of card stock that was glued in place and then shaped to
fit.
Meanwhile, I cut the windscreen and
canopy from the sprues. These then had the sprue attachment point sanded
down and polished, then the clear bits masked. I glued the windscreen in
place using non-fogging superglue. The canopy section had the already
painted aft interior section glued in place. This does not fit that well
and has to be somewhat 'squeezed' into
 place. This will cause
difficulty when it comes time to attach the canopy to the mechanism
behind the seat. In addition, its shape does not match the aft section of
the canopy so to keep it from jutting outside the framework, it has to be
glued a bit farther forward that what I think it is meant to be. If one
is to glue the canopy shut, then one will need to sand off some of
the canopy mechanism behind the seat as it will prevent the canopy from
sitting flush.
place. This will cause
difficulty when it comes time to attach the canopy to the mechanism
behind the seat. In addition, its shape does not match the aft section of
the canopy so to keep it from jutting outside the framework, it has to be
glued a bit farther forward that what I think it is meant to be. If one
is to glue the canopy shut, then one will need to sand off some of
the canopy mechanism behind the seat as it will prevent the canopy from
sitting flush.
After sanding the wing roots I then attached the fuselage pylon for the centerline tank. Rarely were F-5As airborne without this tank as the plane had rather short range. The areas on the nose for the 20mm gun barrels was drilled out as I had decided to replace the kit parts with stainless tubing. Same for the nose pitot tube. After cutting the tubing and sliding a smaller section inside a larger piece, this was attached to a hole I'd drilled in the nose. A couple of applications of super glue were used to build up the area a bit and then it was sanded smooth.
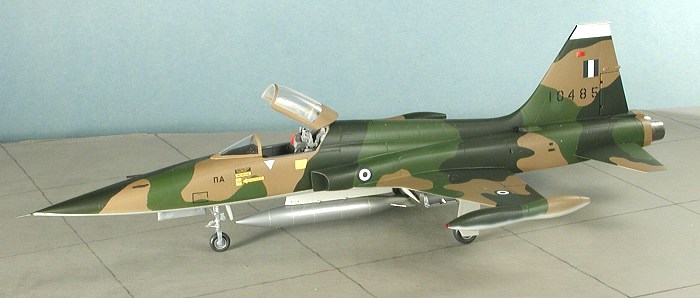
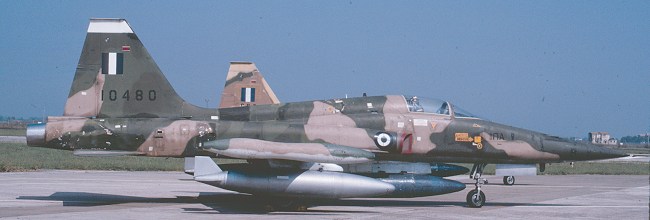
I then attached the tip tanks. These are supposed to have a 'nose down' attitude when in place, as are the Sidewinder rails. You can clearly see this in the image below. This is not taken into account and unless you want to make the tank attachment slots much larger than what they already are, you'll have to accept things as they are. The fit of the tanks is a bit loose, but nowhere near enough to provide the rake needed. Once these were on, the gaps were filled and when dry sanded smooth. The kit then had the various areas that needed masked taken care of and it was time for some paint.
|
COLORS & MARKINGS |
 I'd
decided to use the Greek markings, but wanted something a bit different
from the kit. The Greeks received F-5As from all sorts of places so
just about any non aggressor camouflage scheme would be accurate. The
initial batch were in the same blue-grey over silver that their new
Mirage F.1s and F-4s were painted, but others were in SEA or even desert
camo. Towards the end of their operational career, the F-5s were used as
fighter trainers to give pilots headed towards the bigger jets some
experience in fast jets. The camouflage pattern on these planes is very
tight and almost as if they were masked. In 1/48, it would be exceedingly
difficult to reproduce it freehand. Now as the planes got older, the
touch-up portions were a bit on the ratty side and the aircraft took on a
distinctly disheveled appearance. It was not uncommon for bits and pieces
to be swapped from one aircraft to another. This was especially true of
the wing tip and underside fuel tanks.
I'd
decided to use the Greek markings, but wanted something a bit different
from the kit. The Greeks received F-5As from all sorts of places so
just about any non aggressor camouflage scheme would be accurate. The
initial batch were in the same blue-grey over silver that their new
Mirage F.1s and F-4s were painted, but others were in SEA or even desert
camo. Towards the end of their operational career, the F-5s were used as
fighter trainers to give pilots headed towards the bigger jets some
experience in fast jets. The camouflage pattern on these planes is very
tight and almost as if they were masked. In 1/48, it would be exceedingly
difficult to reproduce it freehand. Now as the planes got older, the
touch-up portions were a bit on the ratty side and the aircraft took on a
distinctly disheveled appearance. It was not uncommon for bits and pieces
to be swapped from one aircraft to another. This was especially true of
the wing tip and underside fuel tanks.
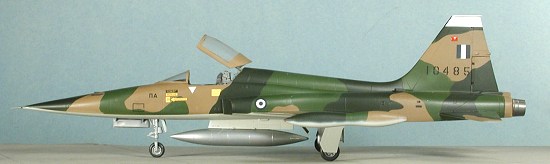 I started with the underside FS 36622 Light Grey.
For all of these colors, I used Testors Model Master Enamels. The fin tip
was painted white at this time. Once the underside was done, much of it
was masked and the upper colors were painted, starting with the tan FS
30219. This color is quite dark compared to the faded shades in the image
above. I figure that since all planes had to be freshly repainted at
least once in their life, this was how mine would be done. I than masked
off the tan that I wanted to keep and did the lighter of the two greens;
FS 34102.
I started with the underside FS 36622 Light Grey.
For all of these colors, I used Testors Model Master Enamels. The fin tip
was painted white at this time. Once the underside was done, much of it
was masked and the upper colors were painted, starting with the tan FS
30219. This color is quite dark compared to the faded shades in the image
above. I figure that since all planes had to be freshly repainted at
least once in their life, this was how mine would be done. I than masked
off the tan that I wanted to keep and did the lighter of the two greens;
FS 34102.
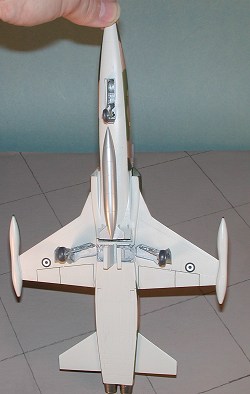
A quick trip was made to the workbench so that I
could put the kit on its landing gear. The nose gear needed to be drilled
out and have a small section of rod glued in place so that it would be
able to mate with the hole in the nose gear well. The main gear are butt
joins and I did have to slightly trim the retraction strut assembly so it
would fit into the well. The wheels were also glued in place. On the main
gear, the axle s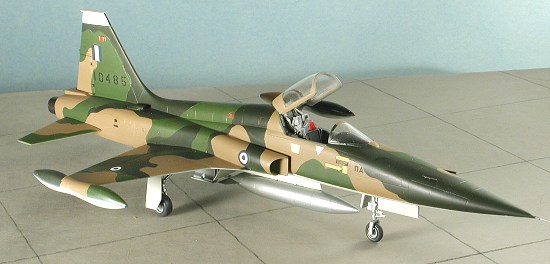 tubs are way too small for the wheels so care has to be
taken when gluing them on. The nose gear has a separate fork to glue on
the other side of the main wheel. Not exactly a great fit.
tubs are way too small for the wheels so care has to be
taken when gluing them on. The nose gear has a separate fork to glue on
the other side of the main wheel. Not exactly a great fit.
With the painting done, the aircraft was given a coating of clear gloss acrylic in preparation for the decals. The decals in the kit are nicely printed by Microscale and went on with no real trouble. However, a couple of the roundels were slightly out of register as a bit of the white backing was showing through. The Greek markings in the kit are also a bit different from what's shown in the image above, but that really isn't much of a problem as there are lots of different variations amongst Greek F-5s.
|
FINAL CONSTRUCTION |
 With the decals on and dry, the kit was given a coating of
matte clear and it was time to add on the bits that were left. First of
these were the nose gear doors. Then I tackled the speed brakes. The small
actuating pistons were a bit fussy to fit into place, but this was done
with a few of the usual modeling contortions. It would perhaps be a good
idea to replace these items on your kit with some fine tubing as they seem
a bit oversize. Then the main gear doors were glued on. The outer doors
have no positive locators so one has to be rather careful when gluing them
in place. Inner ones are oversize in the fore and aft dimension.
With the decals on and dry, the kit was given a coating of
matte clear and it was time to add on the bits that were left. First of
these were the nose gear doors. Then I tackled the speed brakes. The small
actuating pistons were a bit fussy to fit into place, but this was done
with a few of the usual modeling contortions. It would perhaps be a good
idea to replace these items on your kit with some fine tubing as they seem
a bit oversize. Then the main gear doors were glued on. The outer doors
have no positive locators so one has to be rather careful when gluing them
in place. Inner ones are oversize in the fore and aft dimension.
Looks almost complete, but there are a few more things. One are some replacement gun barrels. The kit supplied ones aren't bad, just a bit anemic and tubing does look so much better. It was almost a shame to have to paint them, but they do need to be a dark color. I used Gunmetal. Then the exhaust was glued in place. I had assured a good fit prior to the painting evolution.
I then moved to the cockpit area and glued in the canopy. Not exactly an easy job as the instructions are quite vague about how everything fits, but after a bit of trimming and fudging and verbal encouragement, I managed to get it on to where it looks decent; not perfect or even good, but decent. I didn't use the actuating arms as they seemed to leave the canopy too high when I compared what I did with photos. I did a bit more detail painting and touch-up. I know I missed some things, such as the red warning areas around the intake and the canopy seals that are always on modern jets. However, there are occasions when finishing in time is more important than getting it all, so I removed the masking and considered things done.
|
CONCLUSIONS |
Finally, 1/48 modelers can have a complete early F-5A to add to their collection without having to resort to a lot of work and the Hawk kit. Though it does have a few areas that need a bit of work and some care in construction, overall it is a pretty straight-forward kit. I anticipate a lot of really great aftermarket sheets for this one and perhaps a few resin bits as well (like main wheels). I'm pleased with the result and even more so as it didn't take me anywhere near the amount of time to finish as I'd originally anticipated. I'm very much looking forward to the two-seat versions.
April 2004
#1313 in a series
Copyright ModelingMadness.com. All rights reserved. No reproduction without express permission.
If you would like your product reviewed fairly and fairly quickly, please contact the editor or see other details in the Note to Contributors.