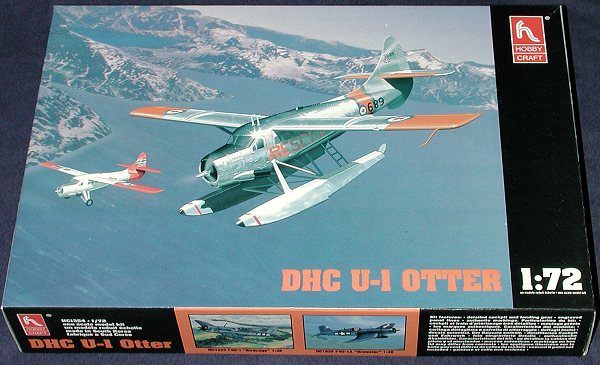
Hobbycraft 1/72 DHC-3 Otter
| KIT # | 1354 |
| PRICE: | $12.98 |
| DECALS: | Two aircraft |
| REVIEW : | |
| NOTES: | Can be built with wheels or floats |
| BACKGROUND |
Please see an earlier preview of this kit for history and look at what's in the box.

| CONSTRUCTION |
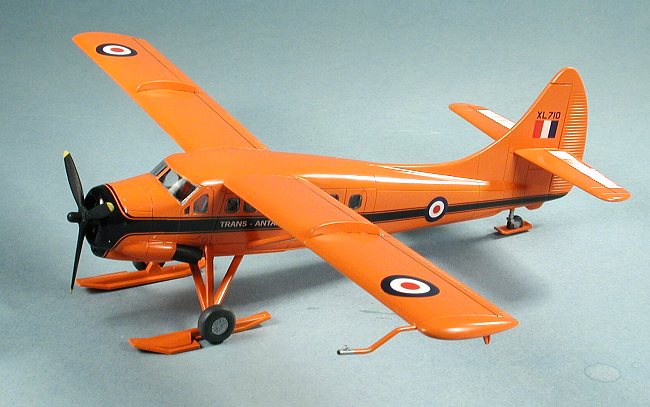
This particular Otter kit isn't exactly the same as the one previewed. Basically, it has a different box art (see above) and a much better set of decals. The plastic is identical and offers a choice of wheels, skis and floats.
Not a whole lot of subassemblies on this one, but I did glue together the wings and the interior pieces. There is a bulkhead behind the cockpit that I glued the door into and then glued into the fuselage prior to installing the floor. The interior parts were all sprayed a dark grey (RLM 66, actually). The main reason is because there is nothing for the cabin area and you can't see anything through the thick, distorted clear bits anyway. I did paint the seat inserts red just to show that there is something there as you can see them, but not the control stick nor the instrument panel once the interior is installed.
 The glass pieces fit snugly into the holes in the fuselage. In fact, I had some trouble with the right door clear bit. The doors are separate, but they were glued in place. I found that the bulkhead is a trifle too tall and won't allow the floor section to properly fit on the alignment stubs . You can either trim the bulkhead bottom or just not worry about it. As I said, there is nothing to be seen through the clear bits. The fuselage halves were glued together with no trauma. There are some sink marks where there are alignment pins. Easily filled on the top, not so on the lower sections where there are fuselage stiffeners. I left the lower ones alone as I could see no simple way of getting to them without sanding off and replacing the stiffeners. The windows were then masked.
With the fuselage sanded, the wings were attached. Fit was excellent and the struts fit equally well. The flap hinges were NOT glued in at this time as they'll be easier to attach later. The landing gear struts were then glued on. These also fit very well, though there is no positive attachment point for the upper strut. One thing I did see was that there were holes drilled for the aft attachment point of the floats. If you aren't using the floats, you'll have to fill those in. I'd rather have them filled and then be required to drill them out.
 The upper wing fences were then glued in place. The holes for these are larger than the width of the fences so you'll see some holes there that need filled. Horizontal stabilizers fit just as well as the wings. Now with the airframe looking like a plane, the exhaust shrouds were glued on. One of mine was barely short shot. Then the engine piece was glued on the front along with the push rod section and painted flat black. This was followed by the cowling, which didn't fit that well. It was too late to remove the engine and trim it, so I sanded away at it in situ until the cowling fit. I'd suggest test fitting the cowling prior to gluing in the engine!
With the cowling glued and 'fillered', the pitot tube and the windscreen were glued in place. The windscreen should have a brace running down the middle of it. This is not given on the kit part, but is easy enough to add when you mask the windscreen. The engine opening was filled with tissue and the kit was ready for the first paint application.
| PAINT & DECALS |
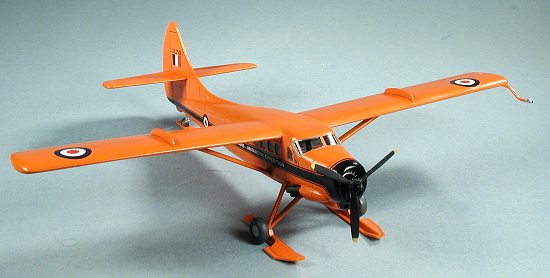
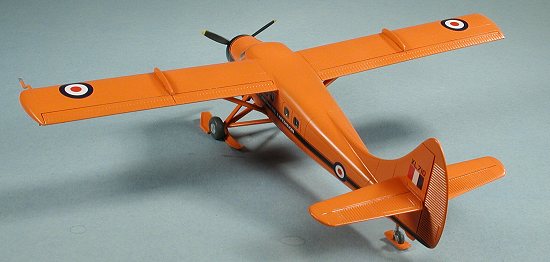
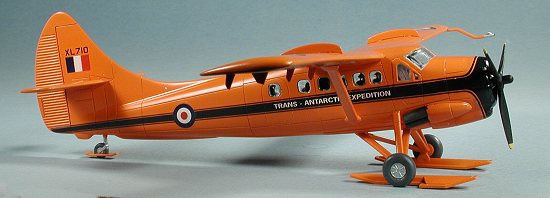
Making up my mind what scheme to do was a real problem. I just got the latest from Max Decals and it was for Antarctic Otters. There are so many on the sheet that are cool that I didn't know which to do. Finally settled on the British Transantarctic scheme of overall orange. This would be a challenge for the decals as it is very tough for the white to be properly opaque when put over these intense colors. I have had kits where I stacked three decals on each other and the background color still bled through!
 Having totally wimped out and picked an overall orange scheme (have you noticed that kit builds are quicker if you don't have to mask paint?), I chose Humbrol 18 as the color of choice. It is a nice color, goes on beautifully and is gloss. Of course, the kit was undercoated with flat white using Floquil Reefer White as orange can be sort of transparent so a solid white undercoat is the best way to eliminate that trait.
With the paint dry, the Max Decals were applied, starting with the fuselage and engine stripes. Good news is that they went on with no real trouble. Bad news is that they are a touch small, leaving a bit of a gap at the top and bottom of the engine cowling and also at the rear, though that can be adjusted to fit. Since you have to paint the forward part of the cowling anyway, this isn't a major problem. I used my Rapidograph pen to fill in the blanks on the upper and lower cowling and used gloss black enamel for the forward portion.
The rest of the decals went on without a hitch. These are remarkably resilient to the Microscale setting solutions, so I used Solvaset. Even with Solvaset, the decals didn't immediately shrivel up as do many other brands and could be moved around. They did eventually succumb.
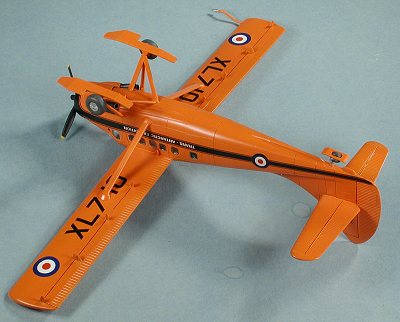 As was feared, the white wasn't able to hold back the underlying orange color. The only way around it was to double up on the roundels. In one respect, I was rather fortunate. You see, there are six large roundels on the sheet. Two of them are for another scheme, and are slightly smaller than the other four. I didn't realize this and so blithely cut two of each size. It was when I applied them that I noticed their slightly different size. The smaller ones were transferred to the underside.
Now that I had to put additional roundels on the plane, this was actually a good thing that I messed up on the sizes. I broke out my Modeldecal sheets with post WWII RAF roundels. The fuselage side ones appeared to be 24" size so those were applied over the kit decal. A LOT better. The upper wing ones were an odd size not provided by Modeldecal, so I used the other two Max roundels that I mistakenly didn't use. The lower wing ones are 36" a very common size. Interestingly, a brand new Modeldecal sheet I bought last year has the colors much brighter than on the older sheets and it doesn't match the darker shades used on the older sheets or the Max sheet. Though it isn't apparent in the image, it is almost as brilliant as those colors used on WW I roundels and not the darker shades it should be. I used an older sheet on the fuselage side roundel, but didn't have any 36" ones left so had to use the new sheet. Fortunately, it won't been seen that much being on the underside. The fin flash was also doubled up with one from the older Modeldecal sheet.
| CONSTRUCTION CONTINUES |
 Now that the decals were on and properly dry, the last little bits were done. This included painting the tail strut and wheel silver then gluing on the aft ski. The forward wheels were also repainted silver on the outside and the skis glued in place. You'll note that the ski attachment points are molded as in-flight so you'll have to do a touch of sanding to get them at an on-ground angle. (Naturally, I found out after I had built the model that the skis should have been painted in aluminum or natural metal) The prop was painted black with yellow tips and stuck into the engine. The final bits were the exhaust. These were painted burnt iron and pressed in place, the fit is that tight. No exhaust stains were applied as I figured the plane would have been kept in very good condition. Besides, the constantly blowing wind and generally low airframe hours on these planes would have not allowed for a large build-up. The last step was to take off all the masking and do any touch-up painting that was needed.
| CONCLUSIONS |
Hobbycraft should be commended for producing this and other Canadian subjects. While it is lacking the ultra-detail of other kits, the outline is good, the external detailing is good and it provides a basis for those who HAVE to have a ton of detail in their kits. The overall fit of the kit is quite good and it is one that I can recommend to nearly all levels of modeler without hesitation.
December 2001
Copyright ModelingMadness.com. All rights reserved.
Review kit courtesy of me and my wallet!
If you would like your product reviewed fairly and fairly quickly, please contact the editor or see other details in the
Back to Reviews Page 2020