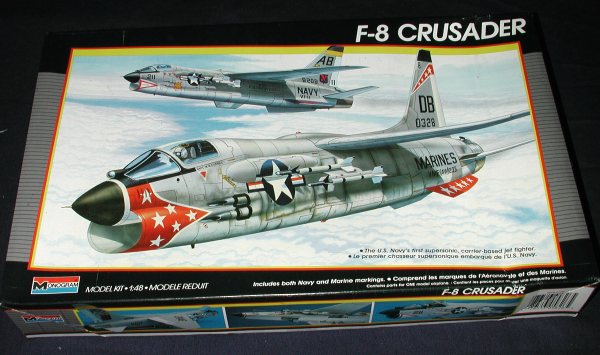
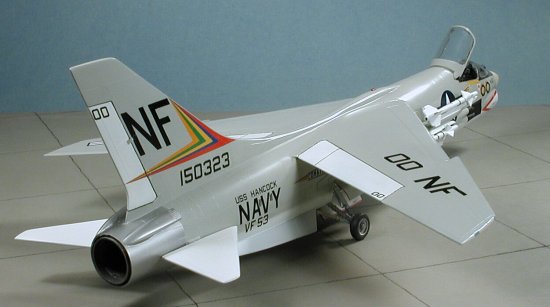
Monogram 1/48 F-8E Crusader
|
KIT # |
5826 |
|
PRICE: |
$13.75 when last reissued |
|
DECALS: |
Two Aircraft |
|
REVIEW: |
|
|
NOTES: |
1988 issue |
|
BACKGROUND |
For a look at what is in the box and a short historical section, please visit the preview.
|
CONSTRUCTION |
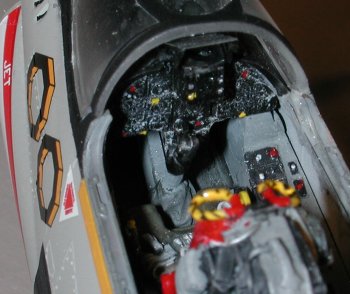
Really, the reason for building this kit was to use the latest FM detail sets F-8 Crusader resin cockpit. We all need motivation for things from time to time and for me it is generally some sort of neat aftermarket goodie that gets me building a kit. That being the case, let's start with the cockpit. First of all the large resin block was removed from the bottom of the tub and the seat. You have to do this so that the intake piece will fit below the tub. After about 10 minutes with a razor saw, the parts were separated. Both were then painted in Dark Gull Grey, which is a standard USN interior color. Very little cleanup other than the resin block removal were needed and the parts had no air bubbles nor any short molded parts. Once the grey was painted, a number of other colors were used to paint the rest of the seat and interior. The box cover is an excellent guide for this. Since I am a slow builder, it took over a week to get all the painting, washing and drybrushing done. I used filthy thinner for the wash after spraying a semi-matte clear acrylic over the parts to prevent the thinner eating the paint.
 Meanwhile, I thought it would be a great idea to start doing some subassemblies.
The first one was to glue the wings together. While that was drying, the wheels
were cemented and I started sanding off ejector pin marks from the fuselage
missile pylons. I'm doing a USN F-8E so won't be using the under wing bomb
racks. At this time I also opened up the fuselage holes for the launch rails.
Moving to the back of the fuselage, I got the afterburner (or reheat) parts out
and started to look to see how they fit. The whole deal is a bit confusing.
Monogram would have you glue the fuselage together and then insert the burner
section. However, it also seems as if you can glue the two parts together and
then install it in one fuselage half as there are alignment slots there for the
burner section. This is what I did.
Meanwhile, I thought it would be a great idea to start doing some subassemblies.
The first one was to glue the wings together. While that was drying, the wheels
were cemented and I started sanding off ejector pin marks from the fuselage
missile pylons. I'm doing a USN F-8E so won't be using the under wing bomb
racks. At this time I also opened up the fuselage holes for the launch rails.
Moving to the back of the fuselage, I got the afterburner (or reheat) parts out
and started to look to see how they fit. The whole deal is a bit confusing.
Monogram would have you glue the fuselage together and then insert the burner
section. However, it also seems as if you can glue the two parts together and
then install it in one fuselage half as there are alignment slots there for the
burner section. This is what I did.
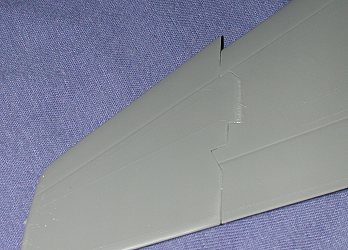
Then I turned my attention to the wings and specifically gluing on the wing outer sections. After some serious test fitting, I saw why most Monogram Crusader models in shows have the wings folded. To put it mildly, the fit is horrid. It is because of the wing center section not being properly aligned or something, but while the upper wing fit was fair, there was huge gap in both lower sections. The images below show the better side. The only way to properly fill those gaps is with stretched sprue and filler.
|
|
|
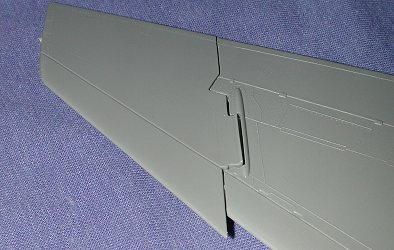
After a couple of sessions of filler, things were pretty well smooth, but the hinge detail was lost. There are templates available to replace it if you so desire. I then moved on to installing wing edge lights. This is something I do from time to time and it really is very easy. All you need are some scrap red and green plastic (perhaps from cocktail stirrers or an old toothbrush handle). First cut out the light sections from the wing tip. Then cut chunks of red or green plastic that will fit into the cut out sections. Then glue them in place and do a good job of gluing. When it is dry, start sanding the plastic down. I use a coarse sanding stick to get things close and then follow up with finer grades. In no time at all, you have very nice wing light areas. They look a lot nicer than paint.
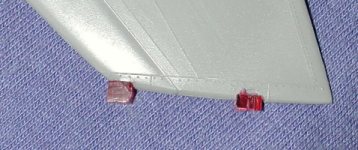 Blocks of plastic glued in place |
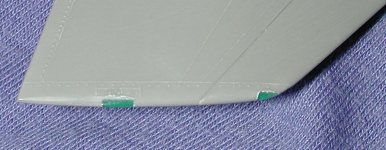 Area sanded down and buffed |
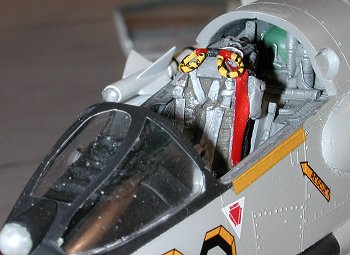
Back at the cockpit, it was time to make some judgment calls. Here's the deal. The FM set is not really an F-8E set. According to a trusted source (who used to fly the Crusader), the tub is for an early F-8, the instrument panel for an RF-8 and the control stick is not for an F-8 at all. The tub deal isn't a big one as the only real changes are in the placement of the various console black boxes. If you didn't fly it or work on it you probably wouldn't notice. The resin seat is fine for a pre-1968 F-8 as it isn't the rocket seat that was installed in later versions and retrofitted in the earlier ones. Even then, the seats are quite similar. The instrument panel is a big deal as is the control stick. Those in the Monogram kit are correct for an F-8E so those are the ones that I used.
 With the tub finished and the
control stick in place, it was glued into the right fuselage half. Do not remove
the mounting lugs in the fuselage as the resin cockpit uses those. It really
makes things quite easy to install. Next to go in was the instrument panel. This
had to have two small circular lugs removed from the back in order to fit. Once
the instrument panel was in place, the intake section was glued in place. This
is all a bit of a tight fit. So much so that I glued the fuselage in sections,
clamping each area and allowing it to thoroughly dry before going on to the
next.
With the tub finished and the
control stick in place, it was glued into the right fuselage half. Do not remove
the mounting lugs in the fuselage as the resin cockpit uses those. It really
makes things quite easy to install. Next to go in was the instrument panel. This
had to have two small circular lugs removed from the back in order to fit. Once
the instrument panel was in place, the intake section was glued in place. This
is all a bit of a tight fit. So much so that I glued the fuselage in sections,
clamping each area and allowing it to thoroughly dry before going on to the
next.
With all that done, it was no surprise to me that I needed to use filler on much of the fuselage seam. Unfortunately, this meant trashing the detail in these areas, but I have come to expect this with Monogram kits and it is just part of the construction process. The lower intake seam was also filled and sanded as smooth as I could get it. It won't be perfect, but it will be a LOT better than this huge seam being visible. At this time the SAM warning antenna was removed as my F-8E will be one before this mod was added.
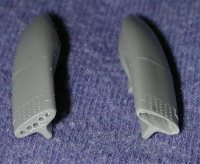
 Turning my attention to the rear underside, the ventral strakes were cleaned up
and glued in place. As seems to be common with this kit, the fit was not good
and so filler was needed to take care of the gaps. While in this part of the
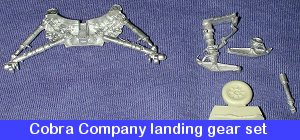
plane, I installed the metal landing gear from the Cobra Company set which
increased the height of the rear of the aircraft. you can see the difference in
the two parts from the
Turning my attention to the rear underside, the ventral strakes were cleaned up
and glued in place. As seems to be common with this kit, the fit was not good
and so filler was needed to take care of the gaps. While in this part of the
plane, I installed the metal landing gear from the Cobra Company set which
increased the height of the rear of the aircraft. you can see the difference in
the two parts from the 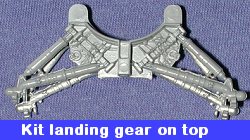 image to the
right. This was
quite a struggle to get it into place, as the metal is somewhat more pliable
than the plastic and so I had to be very careful not to overstress the metal
bits. Had I not already bought this set several years ago, I'd have modified the
plastic landing gear. I do believe that it would be less hassle. Also a lot
cheaper. Moving forward, the nose gear well was installed. This is a very tight
fit and cannot be done with the nose gear in place as you must slide the
assembly forward and then back to get a snug fit. Though it really didn't need
it, I glued it in place.
image to the
right. This was
quite a struggle to get it into place, as the metal is somewhat more pliable
than the plastic and so I had to be very careful not to overstress the metal
bits. Had I not already bought this set several years ago, I'd have modified the
plastic landing gear. I do believe that it would be less hassle. Also a lot
cheaper. Moving forward, the nose gear well was installed. This is a very tight
fit and cannot be done with the nose gear in place as you must slide the
assembly forward and then back to get a snug fit. Though it really didn't need
it, I glued it in place.
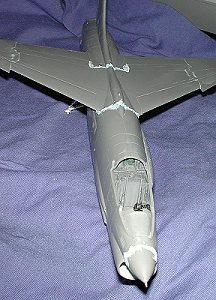
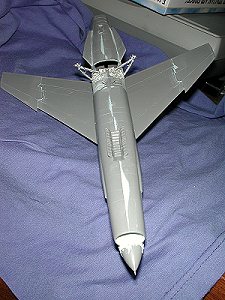 With the wing finally about as smooth as
I was going to get it, it was glued to the upper fuselage. Thanks to the gaps,
out came the filler. At this time, the nose cone was also glued in place and,
you guessed it, filler was applied to seal up the gaps in that construct as
well. As you can see by the images to the left, there is a lot of filler used on
this particular kit. From my experience, it is about the normal amount for a
Monogram kit of this vintage. In most cases, one application wasn't enough and
some spots needed two, or sometimes three slatherings to do the job. Those
opting for aftermarket bits and having the wing raised will use MUCH less
filler. This undoubtedly accounts for the fact that few kits are seen with
everything closed up as they were normally found on the ramp!
With the wing finally about as smooth as
I was going to get it, it was glued to the upper fuselage. Thanks to the gaps,
out came the filler. At this time, the nose cone was also glued in place and,
you guessed it, filler was applied to seal up the gaps in that construct as
well. As you can see by the images to the left, there is a lot of filler used on
this particular kit. From my experience, it is about the normal amount for a
Monogram kit of this vintage. In most cases, one application wasn't enough and
some spots needed two, or sometimes three slatherings to do the job. Those
opting for aftermarket bits and having the wing raised will use MUCH less
filler. This undoubtedly accounts for the fact that few kits are seen with
everything closed up as they were normally found on the ramp!
Since I was getting so much use from the filler, I assembled the Sidewinder rails and filled the gaps on those as well. The instructions are a bit vague on the proper alignment of these items as to which part of the rail goes forward, so I put the longer of the two ends facing to the front.
With the filler smoothed out, it was back to the underside to attach the main gear door assembly. This also includes the actuating arms for the gear doors as well as the main gear retraction struts. The struts were glued to the underside of the door assembly and the actuating arms were blued to the center gear well. Then the door assembly was glued in place. Due to the repositioning of the main gear in the metal replacement gear, the retraction struts will not properly mate with their mounting points on the gear. They were tacked in place while the center door assembly dried. Then out came the filler to take care of the gaps.
 While this was drying, I opened up the afterburner cooling scoops. Doing these
is really quite simple (see image to the right). First, drill out a series of holes where you are going to
remove stuff. Then, using your knife or other sharp instruments, simply cut
between the holes and dig out the plastic in there. I find a needle file to be
quite helpful. When you have it all dug out, take your glue (preferably the
'hot' variety) and brush a bit on the inside. This basically smoothes things
out. When done, they were glued to the tail section.
While this was drying, I opened up the afterburner cooling scoops. Doing these
is really quite simple (see image to the right). First, drill out a series of holes where you are going to
remove stuff. Then, using your knife or other sharp instruments, simply cut
between the holes and dig out the plastic in there. I find a needle file to be
quite helpful. When you have it all dug out, take your glue (preferably the
'hot' variety) and brush a bit on the inside. This basically smoothes things
out. When done, they were glued to the tail section.
I also fit in some brass bits I had neglected before putting in the cockpit tub. These were the sills and areas just below them. Fit was quite good. When it came to the gun sight. I hadn't a clue as to how this really fit. Figuring it was pretty close to the pilot's side of the anti-glare panel, I filed down the old gun sight on the top of the kit instrument panel. Then the replacement gun sight section was glued to the panel, and when dry, painted flat black. At this stage, the windscreen was glued on to make sure everything fit OK. The various openings were masked as needed and it was off to get some painting done.
|
PAINT |
First thing I did was to look at the scheme I was doing from the decal sheet. The Crusader was basically light gull grey over white, but there were differences, especially when it came to the radome. This particular aircraft had it in its 'natural' color so that was first painted with radome tan. When dry, it was masked off and I hoped that it wouldn't slip during all the painting that was to come. Next, the hot section was painted Burnt Iron from Testors on the inside and then several coats of dark aluminum Alclad II were misted outer section. This was then masked off.
 The underside of the airframe and the upper control surfaces were then given
several coats of Floquil Reefer White. This is a matte white and covers quite
well. When it had all dried it was lightly buffed with a rag to knock off some
of the flat. I also painted the stabilizers this color. Then I used a ton of
masking tape to mask off the ventral strakes, the nose gear doors, the upper
control surfaces, and the underside of the wing. This was all to prevent
overspray from collecting on those areas. Once that was done, I used Testors
gloss Light Gull Grey for all the upper surface areas of the plane. There
is no hard demarcation line between the upper grey and lower white so one just
has to work on it. The kit was then set aside to dry for a few days.
The underside of the airframe and the upper control surfaces were then given
several coats of Floquil Reefer White. This is a matte white and covers quite
well. When it had all dried it was lightly buffed with a rag to knock off some
of the flat. I also painted the stabilizers this color. Then I used a ton of
masking tape to mask off the ventral strakes, the nose gear doors, the upper
control surfaces, and the underside of the wing. This was all to prevent
overspray from collecting on those areas. Once that was done, I used Testors
gloss Light Gull Grey for all the upper surface areas of the plane. There
is no hard demarcation line between the upper grey and lower white so one just
has to work on it. The kit was then set aside to dry for a few days.
|
OTHER STUFF |
 Meanwhile, back at the ranch, I had other things to do. First off, the
Sidewinders got some attention. The ejector pin marks were either filled in or
sanded off as the case might have been. Then they had the exhaust opened
up using drill bits and the missiles were painted white. I had discovered
that the missile mounts were light gull grey and the rails were white so the
assembly was painted white and then masked for the light gull grey. These were
allowed to dry for a while as well.
Meanwhile, back at the ranch, I had other things to do. First off, the
Sidewinders got some attention. The ejector pin marks were either filled in or
sanded off as the case might have been. Then they had the exhaust opened
up using drill bits and the missiles were painted white. I had discovered
that the missile mounts were light gull grey and the rails were white so the
assembly was painted white and then masked for the light gull grey. These were
allowed to dry for a while as well.
I brought the model from the paint shop as I realized that I had forgotten the IR sensor and the etched brass bits for the cockpit. I cut a piece of clear plastic from an old toothbrush, cut the sensor head from the IR sensor fairing, glued the clear plastic on to it and sanded it as smooth as I could. It was then glued to the front of the windscreen. The brass bits were glued to the appropriate place in the cockpit and when dry, painted dark gull grey to match the rest of the interior. With these things done, the nose area and area around the guns was masked off in preparation for a bit more painting. These spots needed painted with flat black. I also removed all of the fuselage masking and sprayed the matte white areas with clear gloss acrylic in preparation for the decals.
|
DECALS |
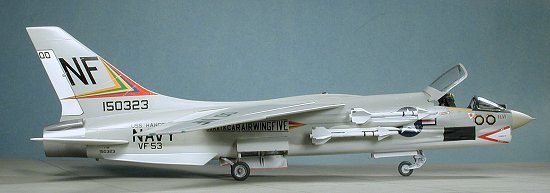
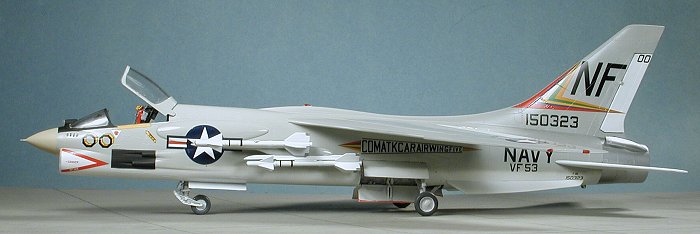
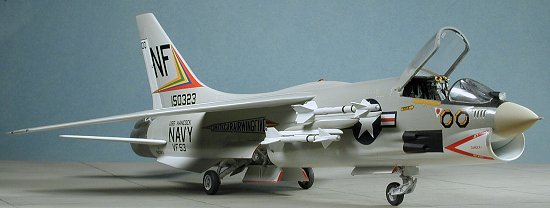 This aircraft was to be marked as a VF-53 CAG bird circa 1966 or so. I used
Aeromaster 48-404 for this purpose. These decals were printed by Cartograf and are really well done and very colorful. As usual, I started with
the common markings and that included the insignia. With those down I went to
the special markings. The Cartograf decals are quite thin and I had trouble with
the long markings, the one on the right side tearing into several pieces. To say
that I was bummed would be accurate. However, nothing to do but make the best of
it and continue. I managed to get the rest of the markings on with minimal
hassle, though I had to be VERY careful. I used Solvaset to make sure that they
stuck where they were placed. The Aeromaster sheet has minimal stencil markings
and the kit decals offer little more.
This aircraft was to be marked as a VF-53 CAG bird circa 1966 or so. I used
Aeromaster 48-404 for this purpose. These decals were printed by Cartograf and are really well done and very colorful. As usual, I started with
the common markings and that included the insignia. With those down I went to
the special markings. The Cartograf decals are quite thin and I had trouble with
the long markings, the one on the right side tearing into several pieces. To say
that I was bummed would be accurate. However, nothing to do but make the best of
it and continue. I managed to get the rest of the markings on with minimal
hassle, though I had to be VERY careful. I used Solvaset to make sure that they
stuck where they were placed. The Aeromaster sheet has minimal stencil markings
and the kit decals offer little more.
|
THE FINAL BITS |
Once the decals were on, it was time for the rest of the stuff. Gear doors were the first order of business. Actually, just the upper ones. The fit of these can only be called fair as it took quite a bit of fiddling and trimming to get a decent fit. The tail planes were glued in at this time, though you could probably leave them uncemented as the fit is relatively tight. The nose gear was glued into the well and the main wheels cemented. Thanks to the altered landing gear so that it didn't sit so low, it also meant that the gear didn't have the slight angle that is so common with the F-8. Attempts at inducing this trait were unsuccessful and I figured I'd quite while ahead to keep from breaking anything.
The fuselage pylons were then glued on. The right side fit well, but the left side proved to be a problem as the holes were too far apart to match the pylons mounting pins. No, I didn't have them reversed as it was the same with the other pylon. A bit of trimming allowed the pylons to fit. These things are nothing but ugly and on the next F-8, I'm going to leave them off.
 Turning to the cockpit, the seat,
was installed. I cut the pull handles off the kit seat and glued that small
assembly onto the resin seat. Making those circular-ish handles from wire would
not have succeeded for me at all. Imagine my thrill to find that the cockpit had
somehow been glued in off kilter. There was a definite list that was only
accentuated by the seat. SIGH!! I guess this kit was just not destined for
greatness, but I still like it. The brass bits were glued to the inside of the
canopy and then these parts painted.
Turning to the cockpit, the seat,
was installed. I cut the pull handles off the kit seat and glued that small
assembly onto the resin seat. Making those circular-ish handles from wire would
not have succeeded for me at all. Imagine my thrill to find that the cockpit had
somehow been glued in off kilter. There was a definite list that was only
accentuated by the seat. SIGH!! I guess this kit was just not destined for
greatness, but I still like it. The brass bits were glued to the inside of the
canopy and then these parts painted.
Masking was removed from the kit and the canopy snapped into place in the open position. There is no canopy actuating arm and frankly, I'd be clueless as to where to put one properly anyway. The landing light was then installed in the left gear door. This had a #29 MV lens installed in place of the clear one the kit provided.
All that remained were the Sidewinders. These had been painted white and I used some old Scalemaster stripes to dress it up a bit. I also found some non-descript data decals and added them as well. When done, they were glued onto the racks and the kit was done. I'm sure the markings on them are not correct, so please hold the e-mails. I thought I was done, but I noticed that I had forgotten to paint the edges of the gear doors red. Now this isn't exactly my favourite thing in the world to do so I started looking around for a quick fix. I found it in a set of pastel pencils that I'd bought. In it were a couple of red shades, one of which was too dark and the other a bit too light. I picked the lighter shade, sharpened it to a point and went to work on the door edges. A bunch easier than paint and any goofs can be just wiped off.
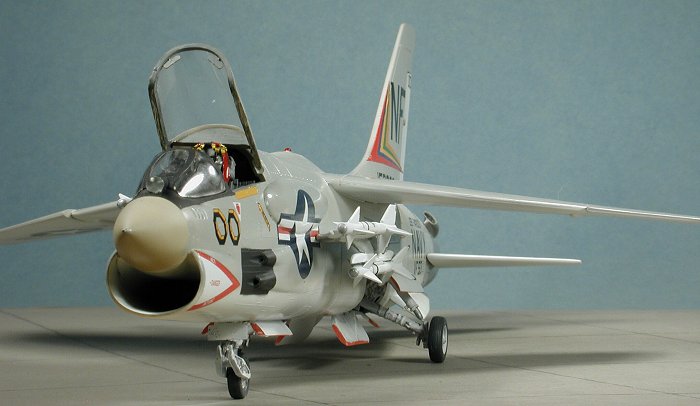
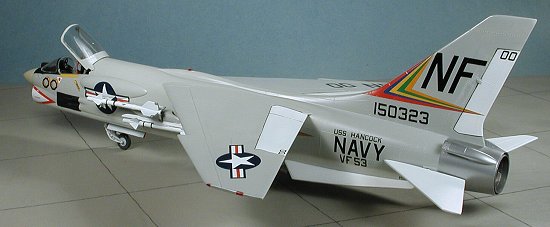
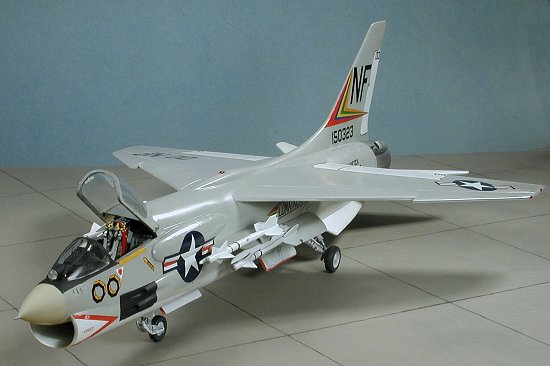
Now any really good modeler would weather the dickens out of this kit as the F-8 was rarely pristine. However, I'm not a really good modeler and so left it relatively clean. While I really like the end result, it won't be going to any shows thanks to the many glitches I made during construction. What it will do is added to my 1/48 P-1 to F-35 collection and sit proudly between my Monogram F-4C and Revell F-14D. It also clears space on my workbench so that I can start another kit!
|
CONCLUSIONS |
Since it is really the only game in town, if you want a 1/48 F-8, this is it. It has all the characteristics of Monogram 1/48 jets: it takes work to make it into a good model. Fortunately, it isn't impossible (though there are times when one wonders...) and with the help of aftermarket, you can easily spend yourself to a very nicely detailed aircraft. There are enough aftermarket sets by FM Details, Black Box, Cobra Company, Eduard, KMC and others to easily quadruple the price of the kit.
Shake and Bake it isn't, but the end result is well worth the effort, especially if you like Crusaders!
May 2002
Copyright ModelingMadness.com. All rights reserved. No reproduction in part or in whole without express permission.
If you would like your product reviewed fairly and fairly quickly, please contact the editor or see other details in the Note to Contributors.
Back to Reviews Page 2021