Airfix 1/72 F-84F Thunderstreak
Kit Number: 3022
Price: $6.00
Decals : One version: USAFE
Date of Review: 30 Nov, 1996
Comments: The F-84F is an updated version of the straight winged F-84E/G that gave sterling service in Korea. In fact, the F-84F is for all intents and purposes an all new aircraft, but in order to get the money for development, it was touted as an improvement of the F-84E. Eventually, the F-84F saw service with many allied countries including almost all the NATO countries; among them France, Germany, Belgium, Netherlands, Norway, and Italy.
 The Airfix kit is made up of light grey plastic and finely raised lines for
detail. It also includes four underwing weapons pylons and four drop
tanks. This kit is often compared to the Italeri kit that was released
many years later. Comparison shows many similarities in weapons load
and other features. The biggest difference is that the canopy area
of the Airfix kit is much narrower than that offered by Italeri. The
Italeri kit just looks a lot better and more refined. Nonetheless,
I was determined to make a nice model of the Airfix kit. This building
took place back in 1993 when I was building a number of stand models. As
such, there were a few modifications that needed to be made which will be
dealt with in the buildup.
The Airfix kit is made up of light grey plastic and finely raised lines for
detail. It also includes four underwing weapons pylons and four drop
tanks. This kit is often compared to the Italeri kit that was released
many years later. Comparison shows many similarities in weapons load
and other features. The biggest difference is that the canopy area
of the Airfix kit is much narrower than that offered by Italeri. The
Italeri kit just looks a lot better and more refined. Nonetheless,
I was determined to make a nice model of the Airfix kit. This building
took place back in 1993 when I was building a number of stand models. As
such, there were a few modifications that needed to be made which will be
dealt with in the buildup.
The first thing I did was to sand off all the detail with the exception of control surfaces. This left a very smooth airframe that looked more normal for a stand model. The gear was cemented in the up position and the resulting large gaps were puttied over. There were several sink marks where the attachment points were on the fuselage and wings and those were also puttied smooth. The interior was given a cursory detail and the kit's pilot was painted up for placement in the cockpit. I also puttied the outer holes for the pylons as I just wanted to carry the two large fuel tanks. Extra putty was needed at the wing/fuselage joint as the wings proved to be larger in section than the corresponding mounting point at the fuselage. Unlike Italeri, Airfix provides an exhaust to prevent the see-through look.
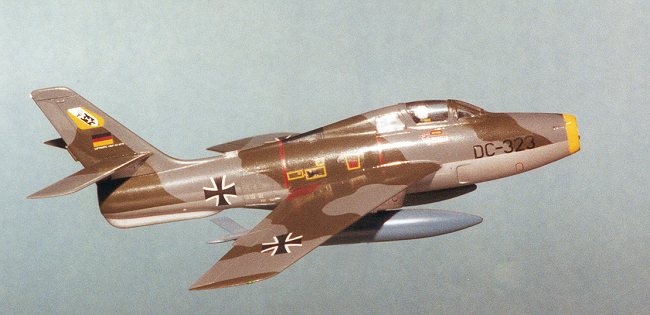
Once the aircraft was basically together, it was time for a camouflage/marking
scheme. I had decided to do a camoflaged F-84F from the German unit
JBG 33 as I had an excellent Modeldecal sheet covering this marking. The
first thing I did was overspray the entire airframe in white. This
was to enhance the silver underside and the yellow nose markings. Once
dry the yellow was sprayed on to the nose ring. This was later masked
off and the entire underside of the aircraft painted silver. This and
the topside green and grey came from Xtracolor's selection of RAL paints
and they went on perfectly. The underwing drop tanks were painted
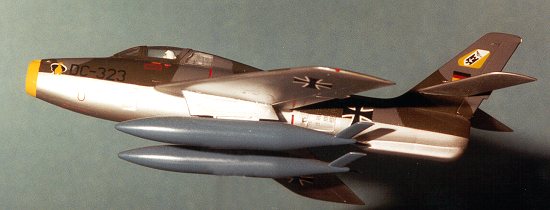 PRU
blue, using the Modeldecal instruction sheet as a guide. Since Xtracolor
is a gloss paint, once dry the airframe was ready for decals. Although
the decals were over 15 years old, they performed beautifully with no air
bubbles
and no yellowing, reacting well to my usual concoction of diluted Solvaset.
Once that was dry, the aircraft was wiped down to remove any remaining
Solvaset. I have learned from experience that excess decal setting
solution will eventually turn a nasty brown color, effectively ruining your
model unless completely removed within a few days of use. All it takes is
a damp rag to clean off the excess.
PRU
blue, using the Modeldecal instruction sheet as a guide. Since Xtracolor
is a gloss paint, once dry the airframe was ready for decals. Although
the decals were over 15 years old, they performed beautifully with no air
bubbles
and no yellowing, reacting well to my usual concoction of diluted Solvaset.
Once that was dry, the aircraft was wiped down to remove any remaining
Solvaset. I have learned from experience that excess decal setting
solution will eventually turn a nasty brown color, effectively ruining your
model unless completely removed within a few days of use. All it takes is
a damp rag to clean off the excess.
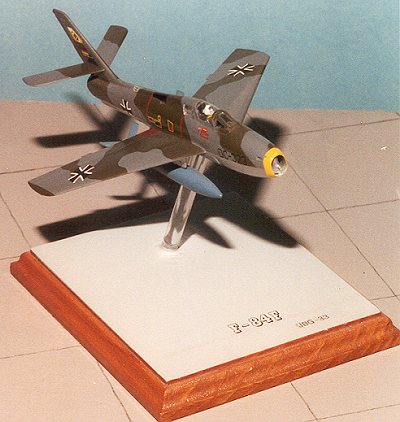
All that was left was to mount it on an appropriate stand. I cut a hole in the bottom of the fuselage to accept a Lucite rod and placed the other end on a 4x4 inch pine base. The top of the base was painted light aircraft grey and the legend then applied to the base using dry transfers. The finished model looks quite good and is a nice addition to several other stand models that I have built. If you have not done one, give it a try.
Copyright ModelingMadness.com. All rights reserved. No reproduction in part or in whole without express permission.