Hasegawa 1/72 Fuji T-1A
|
KIT # |
JS-058 |
|
PRICE: |
$1.30 when new (back before some of you were born) |
|
DECALS: |
One option |
|
REVIEWER: |
Scott Van Aken |
|
NOTES: |
|
BACKGROUND |
For a look at what comes in the box and a brief history of the type, please visit the preview.
|
CONSTRUCTION |
On a kit that is this simple, construction really isn't a very long and drawn out affair. I do know that I was swept with a wave of nostalgia when starting on this one. It has been decades since I really got involved in heavy-duty modeling, and like most of us in the 1970s, we built kits like this one. As I sanded away the heavy mold lines and filled in the ejector pin marks on the very generic seats, I thought back to those days of care-free model building. It was a time when I wasn't concerned about niceties as aftermarket decals, or resin, or etched brass. I'd never seen a vacuformed model built and didn't think that I'd ever get the required skill to build one. I didn't obsess over panel lines (I still don't), and the raised ones were fine with me.
 After gluing the seats to the floor, I test fit it into the cockpit
section to make sure it fit. In the beginning, I would just have tossed
it in there and painted it after it had been glued in and the
fuselage closed. With a paint brush, of course. This time, I didn't do
that as I'm more of a 'serious' modeler (which seems like saying that the
joy is gone, but that isn't really the case). I did remove the alignment
pins from the drop tank halves before gluing them as they caused them to
be misaligned. I also glued the lower and upper wings together. This kit
has the entire wing fence molded in with the upper wing sections and a
slot in the lower wings for it to fit. Makes sure of positive alignment!
After gluing the seats to the floor, I test fit it into the cockpit
section to make sure it fit. In the beginning, I would just have tossed
it in there and painted it after it had been glued in and the
fuselage closed. With a paint brush, of course. This time, I didn't do
that as I'm more of a 'serious' modeler (which seems like saying that the
joy is gone, but that isn't really the case). I did remove the alignment
pins from the drop tank halves before gluing them as they caused them to
be misaligned. I also glued the lower and upper wings together. This kit
has the entire wing fence molded in with the upper wing sections and a
slot in the lower wings for it to fit. Makes sure of positive alignment!
Wanting to keep in the spirit of things, I painted the seats and interior with Dark Gull Grey then brush painted the headrest red and the seat surfaces a medium green using the Testors paints in the small bottles. I then glued the fuselage halves together, trapping the cockpit between them. Digging through my weights, I found one that would fit into the nose, glued it in with superglue and then glued on the intake piece. I also glued the wing into position. This fit quite well for a kit of this age.
It was at this stage that I applied filler to the seams. The one on
the tail being particularly large. After drying, the usual sanding took
place. Unlike most kits, only one filler application was needed. As this
removed many of the raised panel lines, I replaced them by scoring over
where they were with an X-acto knife blade. This produces a slight
depression, but also leaves raised plastic on either side. It is a lot
more than I would have done in the past. I've many models where the
detail 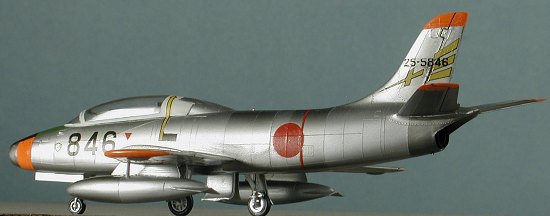 disappears near a seam, only to magically reappear on the other
side of it! For the few engraved details (like the engine separation line
on the aft fuselage) I used a finger saw to provide a new engraved
replacement.
disappears near a seam, only to magically reappear on the other
side of it! For the few engraved details (like the engine separation line
on the aft fuselage) I used a finger saw to provide a new engraved
replacement.
Next up was to attach the tail planes. These fit quite well and one really should make sure that they have the proper dihedral. There are no head-on images in the instructions but one can pretty well figure out how much is needed from the side drawing. I also snapped into position the lower speed brake. The fit for this is extremely tight. One could glue it open, but then there would be a deep hole to have to clean up and so gluing it in the closed position is a lot easier. With that in position, I then glued on the canopy and windscreen, after first painting the interior anti-glare panel black and doing some touch-up on the grey. There is a central piece for the canopy actuator to attach to that goes in the middle of the canopy, and that was glued on before gluing the canopy itself. Fit of these parts is quite good. The canopy/windscreen was masked and then it was time to head for the paint shop.
|
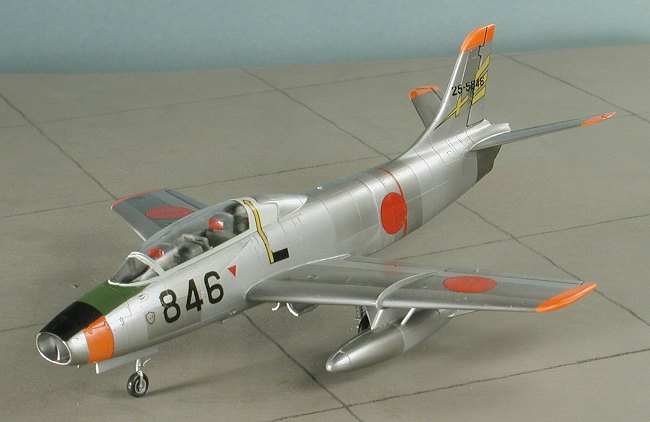
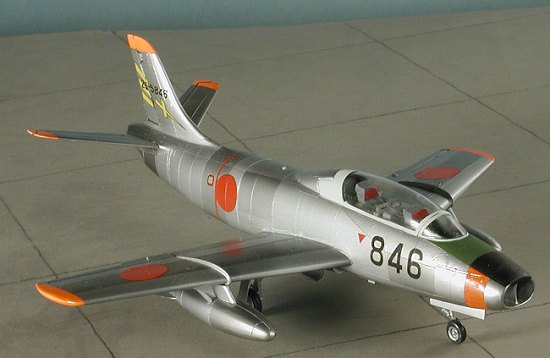
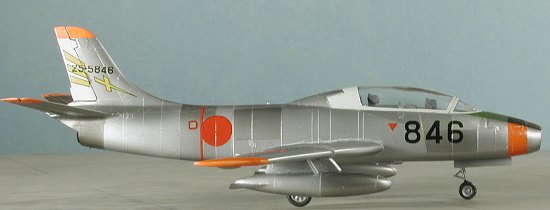
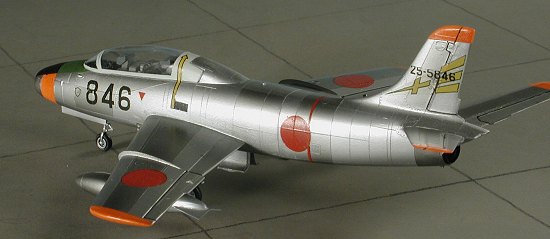
COLORS & MARKINGS |
I decided to do a bare metal version. The other option, from what
references I have, is white, but those planes have very large
International Orange designs on them and those were not current when my
kit was issued. I do believe that later boxings of the T-1A have those
other markings. Anyway, I started by spraying the canopy area with Dark
Gull Grey to match  the interior. At this time I also sprayed the nose,
and tips of the fin, tail planes and wings with Da-glo Orange using some
Humbrol paint that I have. Actually, the tin had Blaze written on it.
Coverage was not good, a real problem with Da-glo paints. The best I've
ever used has been Testors, but my bottle had dried out so I had to
resort to the Humbrol. After getting the best coverage I could and
letting it dry, these areas were masked. The kit is kind enough to
provide raised panel lines as a guide for these markings!
the interior. At this time I also sprayed the nose,
and tips of the fin, tail planes and wings with Da-glo Orange using some
Humbrol paint that I have. Actually, the tin had Blaze written on it.
Coverage was not good, a real problem with Da-glo paints. The best I've
ever used has been Testors, but my bottle had dried out so I had to
resort to the Humbrol. After getting the best coverage I could and
letting it dry, these areas were masked. The kit is kind enough to
provide raised panel lines as a guide for these markings!
Then the entire airframe was sprayed with Alclad II Aluminum. This was followed by masking sections and using Dark Aluminum, followed by more masking and the application of Duralulmin. Really, quite labor intensive and the usual hour of masking followed by five minutes of spraying. The area around the tail pipe was painted using Steel.
After all the metallics were on, I masked the nose anti-glare panel and painted it a medium green. This was then masked when dry and the forward section painted matte black. After all that was done, more masking and the canopy and windscreen frames were painted in white. While this all sounds a bit weird, I do have slides dated 1976 that show T-1As painted in this scheme. I thought the canopy/windscreen was a replacement part, but the two slides I have of different planes show the same thing. Much to my delight, very little back and forth painting was needed to get things in good shape.
The kit headed back to the bench to have the landing gear installed so
that decal application could commence. I should mention that this kit's
nose gear has an integral wheel and like many old Hasegawa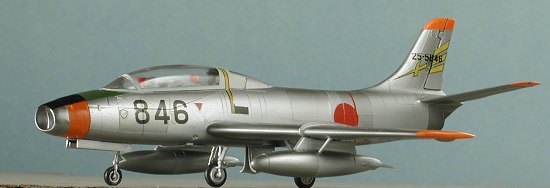 aircraft kits,
the nose wheel is off center with relation to the tire (or is it the
other way around). A rather odd situation with a molded in wheel/tire,
but quite typical of some of the glitches in these early kits.
aircraft kits,
the nose wheel is off center with relation to the tire (or is it the
other way around). A rather odd situation with a molded in wheel/tire,
but quite typical of some of the glitches in these early kits.
With the gear in place, it was time for the decals. This would make or break the model and I can tell you that using 30 plus year old decals can be a problem. Aftermarket replacements are not available so it was kit or nothing. These took an age to remove themselves from the backing and several of them proved to be too brittle to use as they easily tore. This was true of the large ones like the wing walk decals which proved to be unusable. I did manage to get most of the others on with some care. I used Microscale's solutions on them and that seemed to work fairly well. A shot of Solvaset on the underside insignia proved to be too much as they bubbled quite a bit.
|
FINAL CONSTRUCTION |
 With the decals finally in place, I attached the remaining
bits. This consisted of the main wheels, gear doors and the drop tanks.
There are small braces for the tanks, so don't toss them out. I then
removed the masking from the canopy, pushed in the exhaust, and I was finished. The real joy in
these old Hasegawa kits is that they are very straight-forward without the
fiddly bits for multiple variants that you find today. You won't even find
boxed in wheel wells in many of them and no need to obsess over cockpit
detail as there isn't any. That is what the pilot figures are for; to mask
the lack of detail!
With the decals finally in place, I attached the remaining
bits. This consisted of the main wheels, gear doors and the drop tanks.
There are small braces for the tanks, so don't toss them out. I then
removed the masking from the canopy, pushed in the exhaust, and I was finished. The real joy in
these old Hasegawa kits is that they are very straight-forward without the
fiddly bits for multiple variants that you find today. You won't even find
boxed in wheel wells in many of them and no need to obsess over cockpit
detail as there isn't any. That is what the pilot figures are for; to mask
the lack of detail!
|
CONCLUSIONS |
 This is about as close to a weekend project that I can
find. It took about a week to build and most of that was painting. There is
something to be said for these old kits. They have the real benefits of
being pretty easy to build and what's more, you can usually find them for
an extremely reasonable price. This one was purchased in a store for a mere
$4.00. They are often found cheaper at swap meets. It is a kit that most
won't build and it is too bad as it makes into a nice model. It is one that
I can recommend for a restful and relaxing build.
This is about as close to a weekend project that I can
find. It took about a week to build and most of that was painting. There is
something to be said for these old kits. They have the real benefits of
being pretty easy to build and what's more, you can usually find them for
an extremely reasonable price. This one was purchased in a store for a mere
$4.00. They are often found cheaper at swap meets. It is a kit that most
won't build and it is too bad as it makes into a nice model. It is one that
I can recommend for a restful and relaxing build.
May 2004
#1314 in a series
Copyright ModelingMadness.com. All rights reserved.
If you would like your product reviewed fairly and fairly quickly, please contact the editor or see other details in the Note to Contributors.