AMT/ESCI 1/72 A-7D Corsair II
| KIT #: | 8803 |
| PRICE: | $3.00 'used' |
| DECALS: | Three options |
| REVIEWER: | Scott Van Aken |
| NOTES: | ESCI tooling |
| HISTORY |
The Ling-Temco-Vought A-7 Corsair II was a carrier-capable subsonic light attack aircraft introduced to replace the Douglas A-4 Skyhawk. The A-7 airframe design was based on the successful supersonic Vought F-8 Crusader, although it was somewhat smaller and rounded off. The Corsair II initially entered service with the United States Navy during the Vietnam War. It was later adopted by the United States Air Force, including the Air National Guard, to replace the Douglas A-1 Skyraider, North American F-100 Super Sabre and Republic F-105 Thunderchief. The aircraft was also exported to Greece in the 1970s, and Portugal in the late 1980s.
 The United States Army has not been permitted to operate fixed-wing combat aircraft since the establishment of an independent United States Air Force in 1947. To meet its need for close air support of its troops in South Vietnam, the Army pressured the Air Force to procure a specialized subsonic close air support fixed-wing aircraft that would suit its needs better than the general-purpose supersonic aircraft that the USAF preferred.
The Vought A-7 seemed to be a relatively quick and inexpensive way to satisfy this need. However, the USAF was initially reluctant to take on yet another Navy-designed aircraft, but Secretary of Defense Robert McNamara was insistent. On 5 November 1965, Secretary of the Air Force Harold Brown and USAF Chief of Staff General John P. McConnell announced that they had decided to order a version of the Corsair II, designated A-7D, for the Tactical Air Command.
The A-7D differed from the Navy's Corsair II in several ways. For one, the Air Force insisted on significantly more power for its Corsair II version, and they selected the Allison TF41-A-1 turbofan engine, which was a license-built version of the Rolls-Royce Spey. It offered a thrust of 14,500 pounds, over 2000 pounds greater than that of the TF30 that powered the Navy's Corsair IIs. Other changes included a head-up display, a new avionics package, and an M61A1 rotary cannon in place of the two single-barreled 20-mm cannon. Also included was a computerized navigation/weapons delivery system with AN/APQ-126 radar and a head-up display.
The USAF A-7D flew a total of 12,928 combat sorties during the Vietnam war with only six losses – the lowest of any U.S. fighter in the theater. The aircraft was second only to Boeing B-52 Stratofortress in the amount of ordnance dropped on Hanoi and dropped more bombs per sortie with greater accuracy than any other U.S. attack aircraft.
| THE KIT |
 I found this kit in with the sale items at the LHS. The tag inside stated 'Parts from two kits'. Well, this was correct and after looking things over, I decided to pick it up. AMT's instructions did not include a parts layout, but after sleuthing what was in there, I found that the only things missing were the Shrike and Maverick missiles along with their pylons (the 'J' sprue). Not a major loss as I have Hasegawa weapons sets that include these items and the odds are that when building the kit I wouldn't include these items anyway.
Molded in a brown plastic, this one has nicely engraved panel lines that would look good on any modern molding. There are no ejector pin marks on the inside of gear doors or on wheels or gear legs. Why ESCI could pull this off 30 years ago and some better known companies couldn't is beyond me. The cockpit tub is adequate with a bang seat, control stick, and instrument panel. This all fits into a tub and one uses decals for instruments. A decal for the seat harness is also provided. I like having these included as they are better than nothing and not everyone wants to either make a harness or buy an aftermarket one.
Wings are a full upper surface with an insert for the lower inside. This insert has the two inner pylon areas already drilled out. The outer pylon is a butt join and all pylons are single piece moldings. To model folded wings, the builder will have to do some surgery. To my knowledge, the only 1/72 A-7 that can be built with folded wings is the Matchbox kit. For things under wings you have a pair of drop tanks, a TER and MER with lots of Mk 80 bombs to attach to them. You can also mount either Shrike or Maverick missiles, both of which are appropriate for the USAF version of the Corsair II. I should mention that there are fuselage mounted Sidewinders, but these were frequently not installed so for most cases one shouldn't bother attaching the pylons.
 Landing gear is well done and it seems that the wheels included are appropriate for the USAF variant (Navy wheels were a different design). The nose gear is lacking the catapult bar, which is correct. When ESCI tooled this kit, it appears they did different sprues for the USAF and USN versions. This sprue includes the proper antennas (including the Pave Penny pod under the chin) and vents for each version. On this kit one gets the upper fuselage refueling receptacle that is typical of all but the earliest 68-xxxx serial A-7Ds. Those earlier planes had the USN style probe so keep this in mind when doing your build if using aftermarket decals as the USN bits are not included. Finally, the clear bits include a separate windscreen and canopy so you can model this open. Frankly, without an aftermarket cockpit, it would be best to keep it closed as the cockpit is rather Spartan.
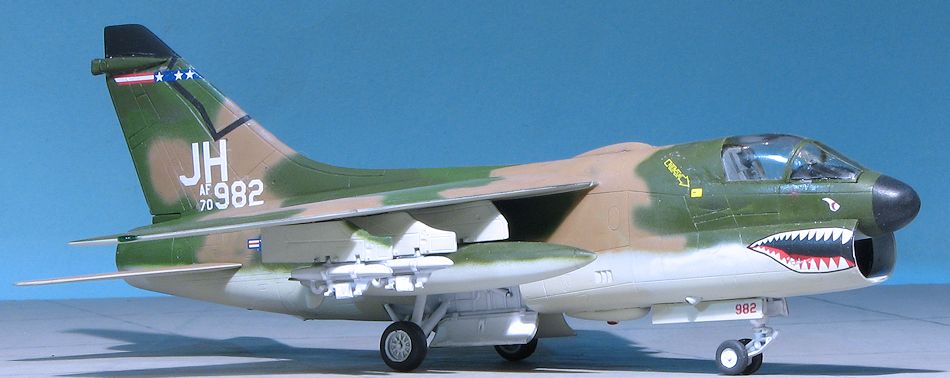
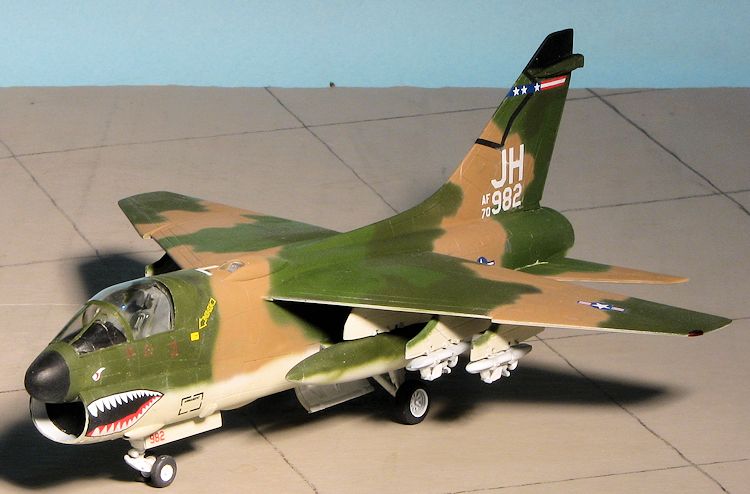
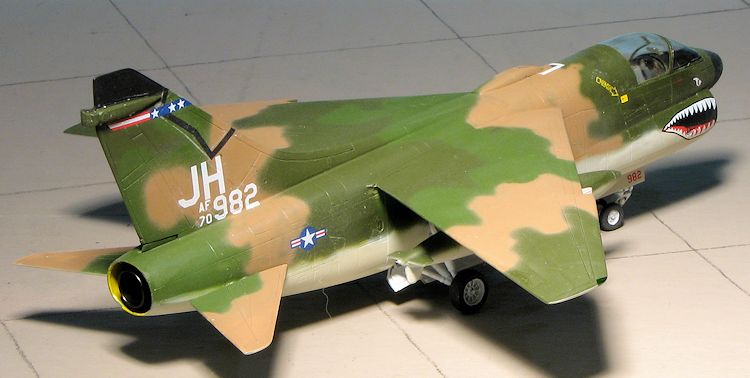
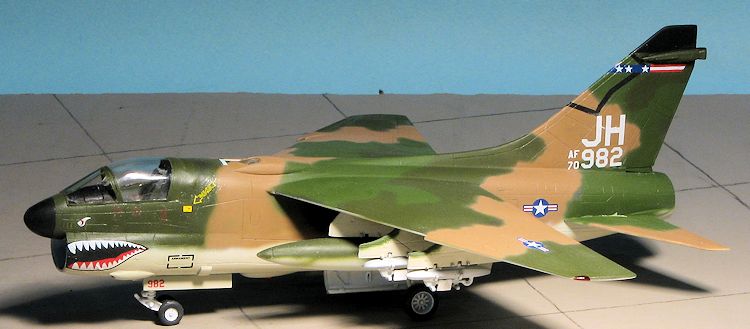
Instructions are well done providing FS 595 color references. There are three markings options, all in SEA or similar camouflage. One in the standard four color SEA scheme is with the Greek Air Force's 388 Filo (that may be the 338 Filo). The two US Air National Guard planes are in the SEA wraparound scheme of three colors. The box art plane is from the 120 TFS, Colorado ANG, while the second option is with the 149 TFS, Virginia ANG. The latter is in the markings before they started using tail codes. The decals are well printed, but typical of AMT decals are quite glossy and quite thick. ANG A-7Ds wore all four of the camo schemes used by the Corsair II so with the use of aftermarket decals you can have quite a selection.
| CONSTRUCTION |
This kit was on the 'junk kits' table at the LHS. The previous owner had done a bit of work on it such as gluing the rear bulkhead into the cockpit and attaching the lower wing inserts. He also provided a couple of intakes as apparently he was planning to open up the one in the kit and use those. I'm not sure where they came from as they are molded in green plastic which leaves out Fujimi. Fitting one into a fuselage half, I can see why he never went any farther as it would take a LOT of cutting and filler to get it in place.
 First thing I did was to complete the cockpit assembly and paint it and the surrounding inner fuselage with dark gull grey. Then I applied quite a bit of filler to the lower wing inserts as they are not a snug fit. This took several applications. While you could fill in the pylon holes, I would not as it was rare for these aircraft to not have at least the four inner ones attached. The kit decals were applied to the seat and cockpit tub/instrument panel once these were painted. There is a considerable amount of clear carrier surrounding these so they were trimmed prior to application. Despite their age, they stuck well to the matte surface.
After adding 10 grams to the nose, the cockpit was installed and the fuselage halves cemented together. I left off the exhaust piece as it can be installed even with the halves together. There are several rather hefty sink areas opposite alignment pins and sockets that needed to be filled. With this completed and the fuselage seams taken care of, the wings had the seams filled and sanded down, a rather lengthy process. These were then glued on and the joins filled. I then masked and installed the clear bits. The canopy does not fit at all well in the back, leaving quite a gap. This was filled with super glue and sanded down. There are quite a few vents and probes to be attached and that was done. I then painted the intake and wheel wells with white before filling them with Silly Putty in preparation for paint.
| COLORS & MARKINGS |
I decided to go with an S.E.A. paint scheme as I like it and had some nice aftermarket decals for one. I used Testors Model Master enamels for all the colors, something I won't be able to do for long as they have discontinued the underside grey and the upper surface dark green. I think they have also discontinued the tan and lighter green, but at least the LHS still had a bottle or two of those.
 I started with the light grey, painting the underside of the airframe and flight surfaces as well as the wing pylons with this shade. I then used the dark green FS 34079 followed by the FS 34102 and finally the FS 30219. A lot of back and forth then commenced in order to take care of overspray. The bits of the pylons that stick out also get the nearby upper wing color and the very upper part of the upper gear doors get some camo on them as well. As complex and time consuming as it may be to do these sorts of schemes, I like doing them. All the colors were freehanded though you could easily mask them as well. I've seen this scheme on real planes that sometimes looks very tight and other times has lots of overspray.
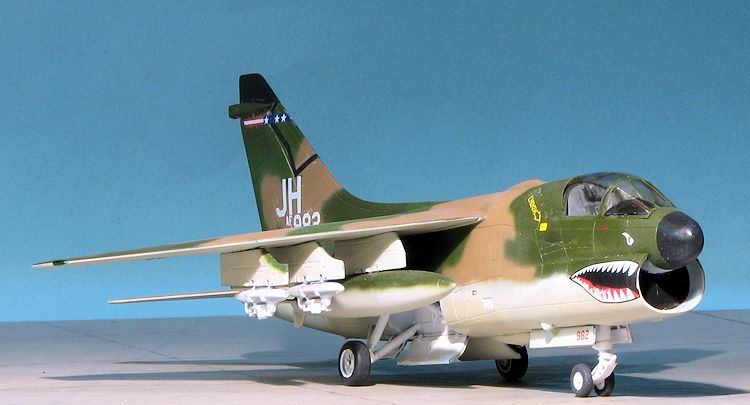
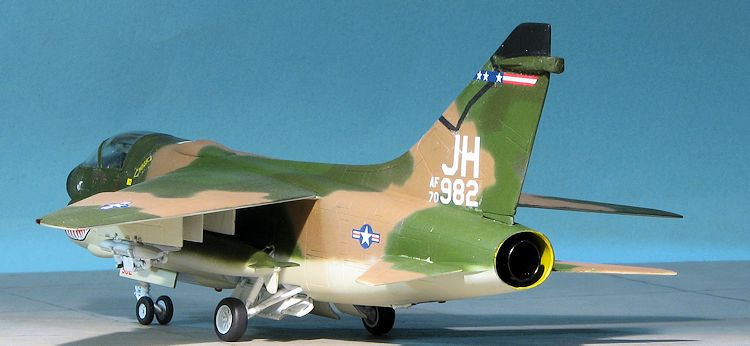
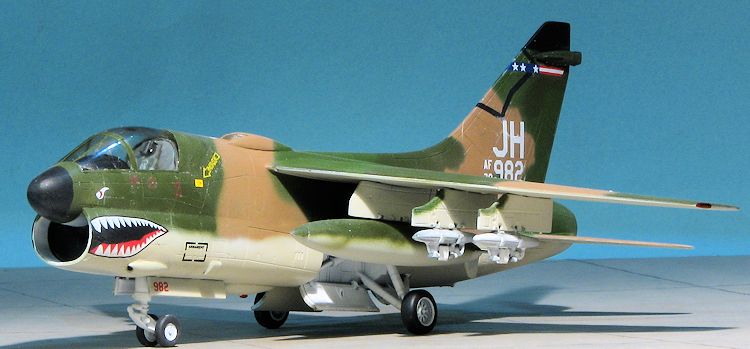
The landing gear were installed after the silly putty masking was removed. The nose gear is very loose and I used super glue to fix it in place. Once the gear were installed, I sprayed a gloss clear on it in preparation for decals. For this build, I used Wolfpak Decals 72-003. It has a number of nice Vietnam era planes, including an A-7D from the 3TFS/388TFW based at Korat in 1975. This unit was involved in the SS Mayaguez operation in mid 1975. The decals have a LOT of clear carrier on them so you may want to trim them before use if you have this sheet. Though it states it will work on the ESCI kit, I ran into a number of issues. This leads me to believe that perhaps the ESCI kit may not have good fidelity to shape or some of the markings are the wrong size. For instance, the HF radio antenna lines on the fin do not match the kit engraved areas, the tail band on the sheet is too short, and the codes/serials seem to be too large as they fit pretty far down the fin. The decals are very thin so one has to be cautious when applying them.
| FINAL CONSTRUCTION |
 Lots of additional pieces for this one. This basically consisted of attaching the wheels, then the gear doors. I had forgotten to glue on an upper beacon light but it became a moot point when it went flying off after I cut it from the sprue. I decided not to attach the nose probes as they are hugely out of scale. The tail hook had to have black stripes painted on it. I also took the time to attach the exhaust and while I was back there, the tailplanes as well. Then the pylons were glued in place and the drop tanks attached. For the outer pylons, I attached small sections of wire and then drilled a hole in the wing to accept them. I did the same thing for the drop tank to pylon attachment. Though I was running out of time to clean and paint bombs, I did attach TERS to all the outer pylons for future use. The reason I had four was the inclusion of additional sprues in this box which also had a portion of the one with the racks. It was at this time that I realized that the aircraft should not have the Pave Penny pod under the chin. Out came the cutters and sand paper and some careful repainting. With everything in place, the airframe was given a coating of clear matte and the masking removed. Some work with a detail pen (which I used to paint the intake) and that was it.
| CONCLUSIONS |
 The build went pretty much as expected so there were no real surprises. I would have liked to have had a fully boxed in nose gear well and a deeper intake (or at least a cover as supplied with the A-7E kit), and some of the bits were clunky, but overall it is still a nice kit and ahead of the Airfix version. I'd still place the Fujimi kit at the head of the line, mainly because I've heard mutterings of discontent about the Hobby Boss offering. I was a bit disappointed in the decals due to the issues mentioned above, but I assure all of you that only the first few sheet have the huge amount of excess clear that this one displays. The rest are not like that. Checking their web site, I see that the sheet is sold out anyway so guess it is a moot point as well. I consider the kit worth the time required to build it and should you run across one, pick it up.
| REFERENCES |
https://en.wikipedia.org/wiki/LTV_A-7_Corsair_II
November 2015
Copyright ModelingMadness.com
Thanks to me for the review kit and Wolfpak Decals for the decal sheet. If you would like your product reviewed fairly and fairly quickly, please contactthe editor or see other details in the