Fujimi 1/72 A-6A Intruder
| KIT #: | 72016 (H-16) |
| PRICE: | Around $20.00 when it was new |
| DECALS: | Five options |
| REVIEWER: | Scott Van Aken |
| NOTES: |
| HISTORY |
Initially designated A2F, the Intruder first flew in mid 1960 and was just what the Navy needed. The aircraft was requested for use by the Marines in the close air support role and to take over the long range interdiction role for the Navy. Both of these roles were being performed by the AD Skyraider and a fast jet replacement was needed. Though the final design is nothing that one could call sleek and sexy, the purposeful Intruder was able to meet all the goals set for it. A first for BuAir was that the airframe manufacturer was responsible for all aspect of the plane from engines to avionics. In the past the Navy has required the airframe manufacturer to use specified equipment, but that had produced a number of fiascos such as the F3H Demon and others who were saddled with unsatisfactory engines.
 Naturally, there were some problems in development, but those
were ironed out and the first production A-6s (as they were called from 1962
onward). In late 1962, the first production aircraft were delivered to VA-42 the
East Coast fleet replacement squadron (FRS). It was quickly integrated into the
fleet and by the time the Vietnam war had heated up, there were a number of A-6A
squadrons aboard carriers and carrying out strike missions against targets in
both North and South Vietnam.
Naturally, there were some problems in development, but those
were ironed out and the first production A-6s (as they were called from 1962
onward). In late 1962, the first production aircraft were delivered to VA-42 the
East Coast fleet replacement squadron (FRS). It was quickly integrated into the
fleet and by the time the Vietnam war had heated up, there were a number of A-6A
squadrons aboard carriers and carrying out strike missions against targets in
both North and South Vietnam.
Over the years, several different versions of the plane were developed, but only the A-6E with its improved sensor suite was ever put into production. Many A6Es were actually rebuilt A-6A airframes and they did not always incorporate the full sensors until the program was well underway. There are two ways to tell an A-6E from an A-6A. One is from the FLIR pod that juts below the nose radome. The other is from the rear airbrakes. On new build A-6Es these are either solid or not there at all. A-6As had perforated airbrakes. E models also have a large cooling scoop just forward of the fin. Other A-6As were developed into dedicated tankers and called KA-6Ds.
In the 1980s, a vastly improved A-6F was developed. This had all
the latest bells and whistles as well as improved turbofan engines. It would
have been the next generation of Intruder. However it was not built, though some
of its systems were used in the last batch of 12 A-6Es to be built. These
aircraft dribbled off the production line over several years and were very
costly to produce. It was finally decided the the A-6 was too expensive to
maintain and Intruder units either went away or transitioned to the much less
capable F-18
 Hornet. As a result, many A-6s, some with very few airframe hours
on them, were either cut up, dumped into the Gulf of Mexico or used as targets
on various ranges. With the demise of the Intruder, so
went the tanker fleet.
There are times when those of us who are military aircraft enthusiasts wonder
what in the world the people who make these decisions are thinking. Now the Navy
has no truly capable long range interdiction aircraft and no dedicated
carrier-based tankers. Fortunately, the F-18Ds that are operated by the Marines
are relatively capable, but still do not have the range/payload of the older
A-6s.
Hornet. As a result, many A-6s, some with very few airframe hours
on them, were either cut up, dumped into the Gulf of Mexico or used as targets
on various ranges. With the demise of the Intruder, so
went the tanker fleet.
There are times when those of us who are military aircraft enthusiasts wonder
what in the world the people who make these decisions are thinking. Now the Navy
has no truly capable long range interdiction aircraft and no dedicated
carrier-based tankers. Fortunately, the F-18Ds that are operated by the Marines
are relatively capable, but still do not have the range/payload of the older
A-6s.
| THE KIT |
The Fujimi 1/72 A-6A kit is really a superb looking kit. Yet I have never seen one built. Why not is a real mystery to me. The kit has everything one could want from a model of the late 80s; finely engraved panel lines, a full cockpit with raised detail on the instrument panel and side consoles (or you can put decals over them), crystal clear canopy that can be displayed open or closed, complete intake and exhaust trunking with engine compressor faces, a full weapons load, separate leading edge slats, and a superb decal sheet with five colorful examples. This kit is just as nice as their A-7 series.
I can only guess that since it isn't as sexy as other
planes that it isn't as popular. And it is a shame as this
 one looks to be a
great kit. OK, it isn't perfect. I did find some ejector pin marks in places
that could be difficult to remove them. They were found on a few gear door
interiors, the inside of the exhaust trunks, and on the nose gear strut. It will
also be difficult to get a smooth finish on the exhaust trunking as it is
convoluted and will be tough to sand, but you can paint it black and no one will
know.
one looks to be a
great kit. OK, it isn't perfect. I did find some ejector pin marks in places
that could be difficult to remove them. They were found on a few gear door
interiors, the inside of the exhaust trunks, and on the nose gear strut. It will
also be difficult to get a smooth finish on the exhaust trunking as it is
convoluted and will be tough to sand, but you can paint it black and no one will
know.
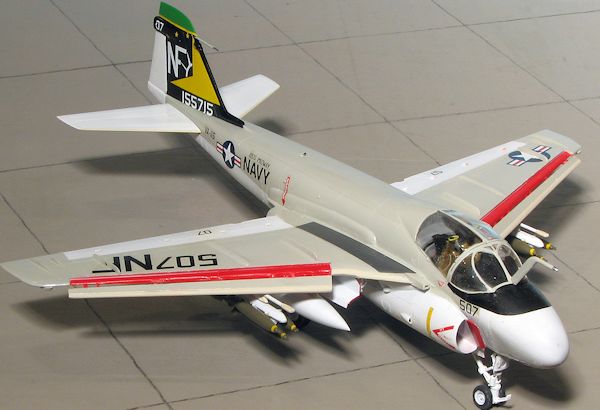
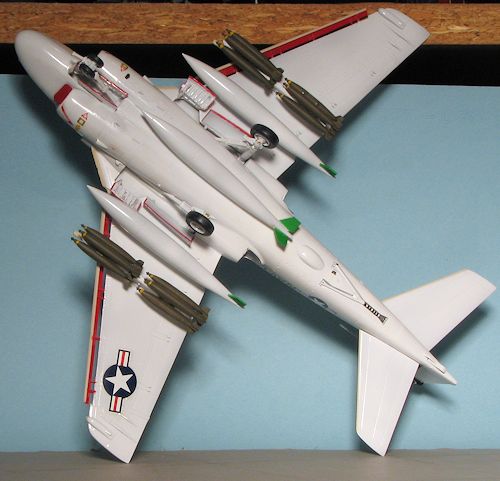
In addition to the goodies I mentioned above, there are two sets of fuselage speed brakes and things under wings includes three drop tanks (one for the fuselage centerline), and two MERS with a full load of Mk 80 series slick bombs. The kit supplied MERS and bombs are a nice as what you'd find on the Hasegawa weapons set.
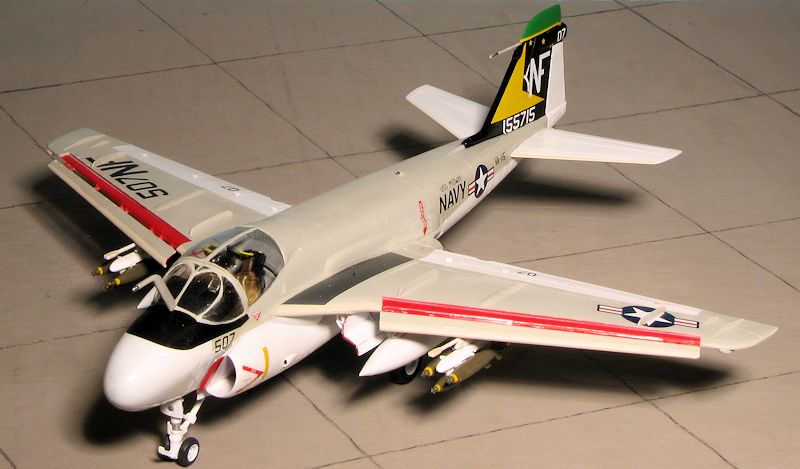
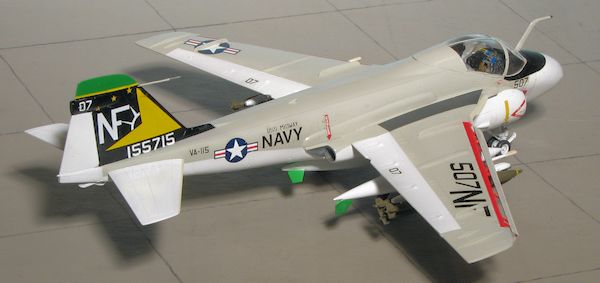
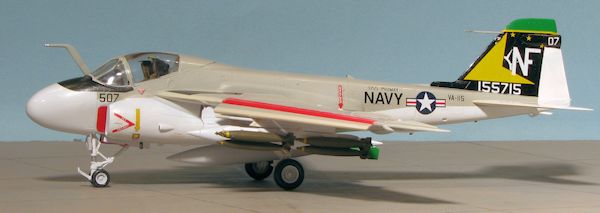
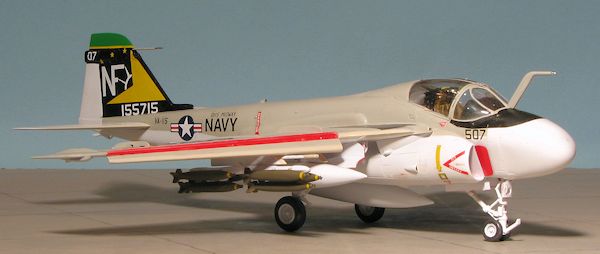
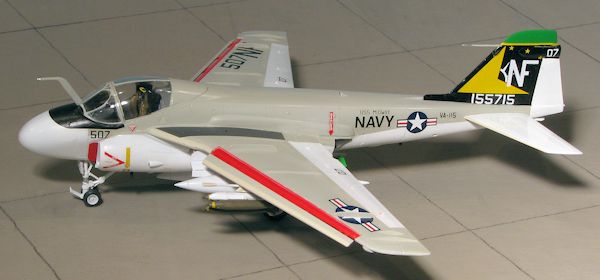
Instructions are very good and comparable to those from Hasegawa. Paints are referenced to Gunze and given generic names. No FS numbers are given, but we all know that these birds were painted light gull grey over white so that really isn't an issue for most of us. What is really a killer is the decal sheet. As you can see from the image, you get a lot of markings. There are aircraft from VA-52, VA-75, VA-85, VA-165 and VMA-533. All of them in the colorful markings of the late 60's and early 1970s before low viz took over. All of them are Vietnam veterans. You also get the walkways and other common markings. I would replace the national insignia as they just don't look right, the 'wings' look too long.
While this is not the only 1/72 A-6 (both Hasegawa and Italeri do one and there may be others), for many modelers, this one is the one to get.
| CONSTRUCTION |
This is probably only the second or third A-6 I have built with the others being a Hasegawa EA-6B and in 1/48 Fujimi's really old A-6A, and the newer Revell A-6E. I have heard a lot of good things about this one and since there is a hole in my collection at the moment, it seemed like a good opportunity to give one of these a go.
 First thing I did was to paint the interior bits with FS
362341 dark gull grey, the standard color for US planes for decades and it still
is today. I also assembled the bang seats. These are fairly well done, but quite
fiddly and they do not fit together all that well. These were set aside once
they were painted. The kit has raised instrument detail, but also supplies
decals so I used the decals atop the detailing.
First thing I did was to paint the interior bits with FS
362341 dark gull grey, the standard color for US planes for decades and it still
is today. I also assembled the bang seats. These are fairly well done, but quite
fiddly and they do not fit together all that well. These were set aside once
they were painted. The kit has raised instrument detail, but also supplies
decals so I used the decals atop the detailing.
Other bits assembled were the drop tanks and the exhaust bits. The latter items were painted with Vallejo tinny tin. The intake sections that hold the compressor faces were first painted white (actually, I painted a LOT of bits white while they were still on the sprue), and then the aluminum painted faces were glued on the back. These are handed and while they are rather open, there is a reason for it as they fit into some pretty tight spaces.
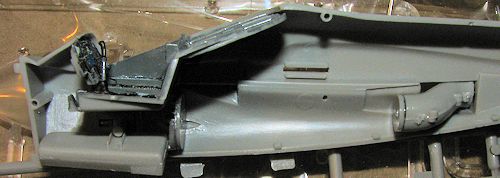 With the
cockpit bits glued together, I installed them into the right fuselage half. The
next bits I glued were the exterior exhaust nozzles. Then the exhaust trunking
was glued in place. There is no positive locator for this and while there is an
indentation on one side, the instructions are moot as to where it fits.
Eventually they were glued in so they aimed down as I figured that was where the
engine was and not higher in the fuselage. You have to wiggle it around quite a
bit to be sure it lines up with the exterior exhaust nozzle piece. The front
compressor section was glued in as well and before it dried, I installed the
nose gear well. You can see how all this fits in the image. It is not pretty,
but does work.
With the
cockpit bits glued together, I installed them into the right fuselage half. The
next bits I glued were the exterior exhaust nozzles. Then the exhaust trunking
was glued in place. There is no positive locator for this and while there is an
indentation on one side, the instructions are moot as to where it fits.
Eventually they were glued in so they aimed down as I figured that was where the
engine was and not higher in the fuselage. You have to wiggle it around quite a
bit to be sure it lines up with the exterior exhaust nozzle piece. The front
compressor section was glued in as well and before it dried, I installed the
nose gear well. You can see how all this fits in the image. It is not pretty,
but does work.
The same was done to the other fuselage half and before it
all dried, I cemented the fuselage halves together. I was glad I did not
 let it all set solidly as I'd have
had some real fit issues if I had. With the glue still pliable, I was able to
get all the pieces in place.
let it all set solidly as I'd have
had some real fit issues if I had. With the glue still pliable, I was able to
get all the pieces in place.
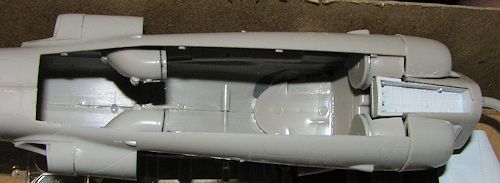
I then glued on the intakes after assembling the halves, and then inserted the forward lower center section. It is important to fit this lower piece before the intakes dry all the way or there may well be a step to deal with and the need to do trimming that isn't necessary. Generally, the fit is not all that good as the intakes and exhaust sections, for example, had some rather large gaps. Nothing that filler cannot handle, but be advised they are there. I should mention that the scheme I am going to use does not have the perforated dive brakes so I did not have to open up the hinge areas and simply glued the optional plates in place.
I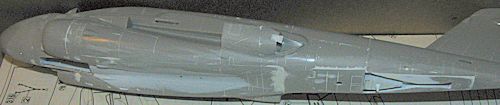 then installed
the rear bits to the fuselage, followed by the usual filler. I overdid the
sanding on one of the ending exhaust areas so had to install a small section of
card to take care of the gap. I also put 7 grams of weight in the nose and
attached the nose cone. Meanwhile, the wings had the halves assembled after
drilling out the holes in the lower wing for the pylons. The forward mating join
is right in the middle of all the slat actuating arms. One wing was fine and
some scraping took care of the seam, but the other needed filling. This was not
fun. These were then attached and as usual, there were gaps on the top seam.
then installed
the rear bits to the fuselage, followed by the usual filler. I overdid the
sanding on one of the ending exhaust areas so had to install a small section of
card to take care of the gap. I also put 7 grams of weight in the nose and
attached the nose cone. Meanwhile, the wings had the halves assembled after
drilling out the holes in the lower wing for the pylons. The forward mating join
is right in the middle of all the slat actuating arms. One wing was fine and
some scraping took care of the seam, but the other needed filling. This was not
fun. These were then attached and as usual, there were gaps on the top seam.
With the wings in place, I then added the landing gear. The forward hole for the nose gear needed to be drilled out. The retraction struts for the main gear are a rather unusual fit and were difficult to get into place. I also took the time to add some antennas and scoops. The fin tip was painted green and the intake splitter plates painted red and then masked off. I also painted the underside of the slats and the slat are in red as well. This was all masked. The seats were installed, the clear bits were masked off and glued in place.
| COLORS AND MARKINGS |
USN planes of this era was light gull grey over white with
white upper control surfaces. So I painted everything on the underside in 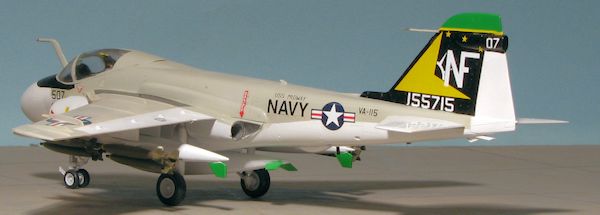 white
along with the rudder and the flaps and ailerons. This included the radome, gear
doors, wheels and a number of other bits. When dry for a few days, this was all
masked off, a rather long job. Then the fin was painted black. I used Tamiya
gloss white and black for these. The rest of the airframe was painted light gull
grey using Testors Model Master paints. I then masked off the leading edges of
the tailplanes and wings and painted those a light tan color. I used Model
Master sand for this and perhaps a darker shade would be easier to see. As you
can see, even a 'simple' scheme requires a lot of masking to look good.
white
along with the rudder and the flaps and ailerons. This included the radome, gear
doors, wheels and a number of other bits. When dry for a few days, this was all
masked off, a rather long job. Then the fin was painted black. I used Tamiya
gloss white and black for these. The rest of the airframe was painted light gull
grey using Testors Model Master paints. I then masked off the leading edges of
the tailplanes and wings and painted those a light tan color. I used Model
Master sand for this and perhaps a darker shade would be easier to see. As you
can see, even a 'simple' scheme requires a lot of masking to look good.
| FINAL BITS |
When that was done, I painted the edges of the gear doors with
a red Sharpie and started slowly attaching gear doors. The aft main gear door
rear stub has to be cut off to allow the door to properly fit. All the other
 doors were a pain to attach as they are butt joins. Meanwhile, I used the Fujimi
nose antiglare and wing walk decals as the Microscale sheet I was using
did not provide those. The Fujimi decals took an age to come loose from the
backing and the antiglare one was a bit too large and required some trimming to
fit.
doors were a pain to attach as they are butt joins. Meanwhile, I used the Fujimi
nose antiglare and wing walk decals as the Microscale sheet I was using
did not provide those. The Fujimi decals took an age to come loose from the
backing and the antiglare one was a bit too large and required some trimming to
fit.
For the remainder of the markings, I chose Microscale sheet 72-128 that has four sets of markings for the A-6. Typical of their very early sheets, this one includes no national insignia, those markings to come from another sheet of insignia. I chose to do an A-6A of VA-115 'Chargers' as I saw these planes on the ramp or in the hangar where I worked when with VQ-1 in the early 1970s. Despite this or a similar scheme being offered in the ancient Hasegawa A-6A kit and that fact that I did my Revell 1/48 A-6E in their later low viz markings, I've always liked the ones I saw in my youth.
I used Microscale sheet 72-084 for the insignia, and despite their age, they worked just fine. I had to cut the one on the upper wing because of a wing fence. I also discovered that this sheet, designed for the ancient Hasegawa kit had markings that were a tad large for the Fujimi kit. This was apparent with the tail markings which barely fit. I was quite pleased that, despite their age, the decals performed as expected. I left off most of the data markings as those old Microscale sheets were pretty weak on placement info.
 Once all the
markings were in place, there was the usual plethora of bits to attach. All the
pylons were attached and a good dozen bombs were cleaned up, painted and glued
onto the MERs. The various small antennas and lights were then attached. I
reattached the refueling probe probably four times as it is so easy to knock
off. The tail hook was painted and installed. I had to sand off a small tab on
the bottom of the outer pylons in order to install the MER. The masking was
removed from the clear bits and that was it.
Once all the
markings were in place, there was the usual plethora of bits to attach. All the
pylons were attached and a good dozen bombs were cleaned up, painted and glued
onto the MERs. The various small antennas and lights were then attached. I
reattached the refueling probe probably four times as it is so easy to knock
off. The tail hook was painted and installed. I had to sand off a small tab on
the bottom of the outer pylons in order to install the MER. The masking was
removed from the clear bits and that was it.
| CONCLUSIONS |
Until something else comes along in this scale, the Fujimi kit is pretty much the best one around. Not to say the old Hasegawa kit is bad, nor is the Italiari version, but many prefer this one. The kit is quite fiddly to build, thanks to the way the kit is engineered and I probably made most of the mistakes one can make when building this one. I like jets, but I don't like all that stuff you have to put under the wings to make it look right. Sort of hard to not do that with a plane like the A-6 or any other attack type as carrying stuff was what they did. These kits are still out there and not all that difficult to locate, so if you want one, a bit of searching will locate one to add to your collection.
| REFERENCES |
Grumman Aircraft since 1929 by Rene J Francillon
June 2013
Review kit courtesy of me and my wallet!
If you would like your product reviewed fairly and fairly quickly, please contact the editor or see other details in the Note to Contributors.