| KIT #: | 1224 |
| PRICE: | Gift |
| DECALS: | Four options |
| REVIEWER: | Scott Van Aken |
| NOTES: | ESCI mold |
| HISTORY |
The Navy was sufficiently impressed with the increased power offered by the A-7D Spey engine used by the Air Force, and decided to use this engine for its own version of the Corsair II. The designation A-7E was assigned, and this version was to succeed the A-7A in production. However, there were delays in the deliveries of the TF41-A-2 engine specified for the A-7E, so the first 67 aircraft of the order were delivered with the TF30-P-5 engine. These aircraft had all of the other improvements planned for the A-7E, including the improved avionics and the M61 rotary cannon, and were re-designated A-7C after delivery.
The first Spey-powered A-7E flew for the first time on 9
March 1969. The A-7E differed from the USAF A-7D in retaining the
probe-and-drogue midair refueling system of the earlier A-7A/B. It entered
service in 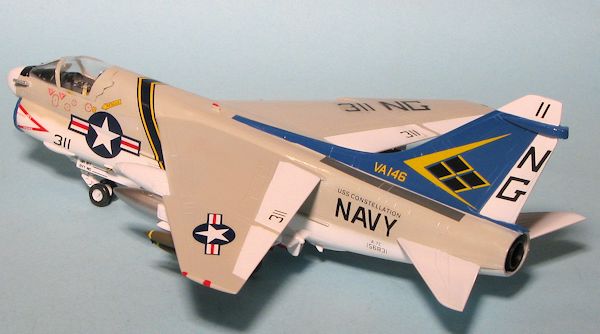 Southeast Asia in May 1970 with VA-146 and VA-147 deployed aboard
the USS America. The
A-7E participated in numerous close-air support missions over both North and
South Vietnam, the A-7E's state-of-the-art bombing and navigation system being
particularly reliable and accurate. Most air wings operating Douglas A-4
Skyhawks and early A-7s were re-equipped with A-7Es. The A-7E participated in
the mining of Haiphong harbor in 1972, and played a vital role in the Linebacker
I and Linebacker II operations that led up to the formal end of US involvment in
the Vietnam war on 24 January 1973.
Southeast Asia in May 1970 with VA-146 and VA-147 deployed aboard
the USS America. The
A-7E participated in numerous close-air support missions over both North and
South Vietnam, the A-7E's state-of-the-art bombing and navigation system being
particularly reliable and accurate. Most air wings operating Douglas A-4
Skyhawks and early A-7s were re-equipped with A-7Es. The A-7E participated in
the mining of Haiphong harbor in 1972, and played a vital role in the Linebacker
I and Linebacker II operations that led up to the formal end of US involvment in
the Vietnam war on 24 January 1973.
On 15 May 1975, A-7E aircraft operating from the USS Coral Sea, in conjunction with A-7D aircraft assigned to the 3d TFS at Korat RTAFB, provided air cover in what is considered the last battle of the Vietnam war, the recovery of the SS Mayagüez after it was hijacked by Khmer Rouge gunboats. By the time Operation Mayaguez was over, three USAF Sikorsky CH-53 Sea Stallion helicopters had been shot down, two airmen, 11 Marines and two Navy Corpsmen had been killed in action and a further three Marines were missing in action. A-7Es also participated in action over Grenada, Lebanon, Libya, and finished out its career with the last two squadrons participating in Desert Storm in 1991.
| THE KIT |
The thing about ESCI was that it either did a super job or a really bad one when
it came to kits. Fortunately, this is one of the good ones. It is natural to
compare this one to the Fujimi line of Corsair IIs. In that light, the ESCI
comes out second best. Mostly because of the full intake trunking of the Fujimi
kit and Fujimi's slightly
 better interior. ESCI, however, does have superior
ordnance included in the kit and is probably a bit easier to build, as the Fujimi kit is a fussier model to assemble.
I have not built the Hobby Boss kit so cannot make comparisons.
better interior. ESCI, however, does have superior
ordnance included in the kit and is probably a bit easier to build, as the Fujimi kit is a fussier model to assemble.
I have not built the Hobby Boss kit so cannot make comparisons.
Like the Fujimi kit, all of the detailing is engraved panel lines. A bit heavier than Fujimi's, but not too much so. The kit comes with options to have the canopy open or closed and a rather substantial weapons load. There are two MERs, two TERs, and a pair of drop tanks for the pylons. For weapons, there are Snake-eye bombs, Shrike ARMs and Maverick AGMs. Two Sidewinders are also included for the fuselage mounted launch rails. Just FYI, few Navy Corsairs carried Mavericks. Those were mostly an AF weapon.
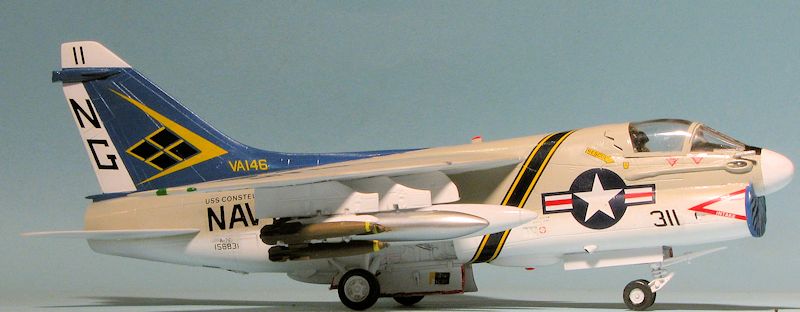
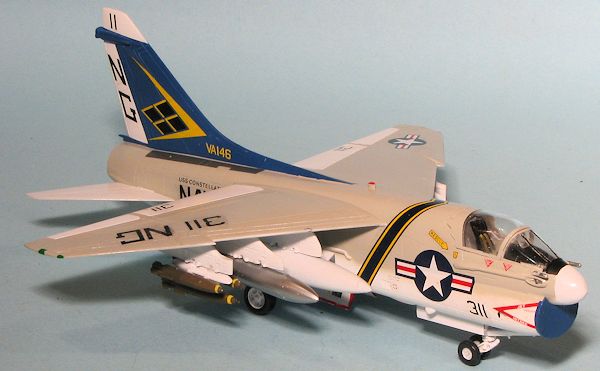
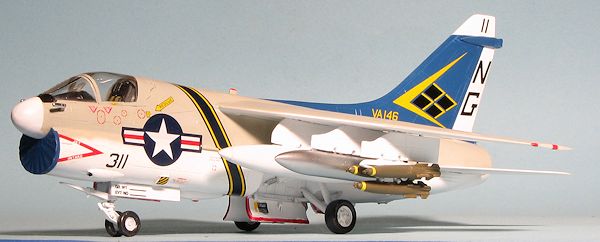
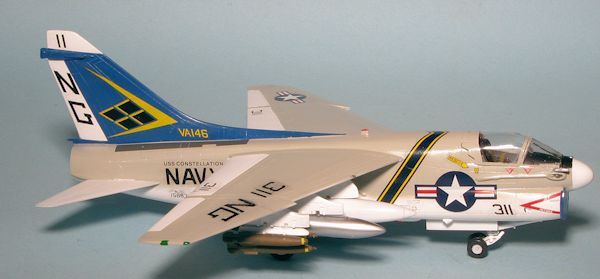
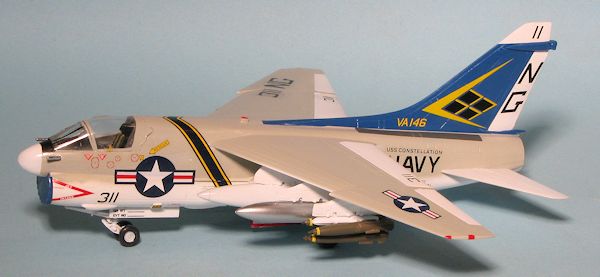
Instructions are typically good with paint information given in FS 595 and Testors colors as well as generic names. Italeri has never been given to shirk on markings for their kits and this one is no exception. Three of the four are in the old light gull grey and white scheme, while a fourth is in overall FS 36231 Dark Gull Grey. Those aircraft provided are VA-93, VA-147 and VA-87. The low viz aircraft is VA-86.
| CONSTRUCTION |
As is my wont, I started looking for subassemblies and found a few. I glued
the drop tanks together as well as the Maverick missiles. The wings have large
inserts for the inner lower section. These are quite loose fitting in the
opening so you'll have to choose where to have things tight and where you will
need to add
 filler. I chose the front and outer sections. The cockpit had the
rear wall and control stick glued to the lower section. I also attached the
instrument panel decal, only to find it quite a bit undersized. Should have
painted the panel black first, but usually decals are a bit too big!
filler. I chose the front and outer sections. The cockpit had the
rear wall and control stick glued to the lower section. I also attached the
instrument panel decal, only to find it quite a bit undersized. Should have
painted the panel black first, but usually decals are a bit too big!
Once I had all the interior bits together (minus the seat), I glued the nose well to one side of the fuselage and taped the halves together to be sure the well dried in the proper position. This is a bit of an unusual set up as the actual attachment point for the nose gear is actually on the two fuselage halves. With that dry, I did the same procedure with the cockpit. After it had dried, I added in the 7 grams of nose weight, not an easy task as the space is somewhat limited. I then cemented the fuselage halves together after opening up the holes that were required. I did not open up the sidewinder pylon holes as the A-7 was most frequently seen without these mounted. As with many older kits which we remember fondly, this one required quite a bit of filler in all joins.
I next added the wings. One has to be careful to get these
properly aligned with each other. Moving to the nose, the two halves of the
intake were attached. This is a particularly poor fit and so I used super glue
to fill the rather large void I had on the lower join. I then attached all of
the various vents and antennas that were needed for the lower part of the
aircraft. Figuring to get a leg up on things, I painted everything that would
 be
white, which included the gear doors, gear legs, wheels and various parts of the
airframe. I knew I'd be repainting some of these later after removing mold
seams, but it is something I generally do anyway. For the white, I used Tamiya
X-2 gloss white thinned with lacquer thinner.
be
white, which included the gear doors, gear legs, wheels and various parts of the
airframe. I knew I'd be repainting some of these later after removing mold
seams, but it is something I generally do anyway. For the white, I used Tamiya
X-2 gloss white thinned with lacquer thinner.
At this time, I also attached the pylons. This would make doing some of the fuselage painting a bit tougher, but I thought it best to get these on. The mounting holes in many cases were larger across than the width of the pylon. The bang seat was painted and installed. The clear bits were masked and glued in place. The fit is quite good. I also attached the fin mounted antenna and fairing. Ensuring that I had all the various small bits for the underside of the fuselage in place, I headed for the paint shop
| COLORS & MARKINGS |
I did more painting of the underside in white. I also did the
upper surface control surfaces as well as the rudder and fin tip in white. After
drying for a few days, these upper surf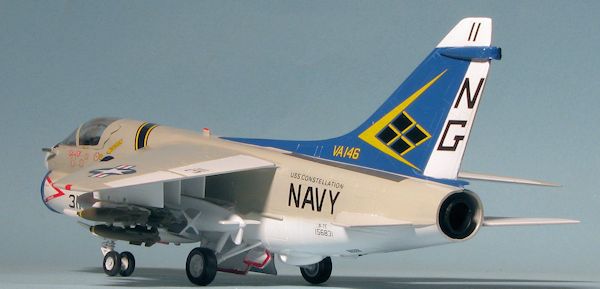 ace areas were masked off. I then used FS
15102 blue on the fin and the engine cover that is supplied in the kit. Often
units would make these covers in the squadron color to keep them from being
'borrowed' by the other unit flying the same plane.
ace areas were masked off. I then used FS
15102 blue on the fin and the engine cover that is supplied in the kit. Often
units would make these covers in the squadron color to keep them from being
'borrowed' by the other unit flying the same plane.
These areas were then masked off and the light gull grey, FS 16440 was painted on. I used Testors paints for the blue and grey. With that done, I added the wheels. The front axles are smaller than the holes in the front wheels so I had to use super glue on that. Then the decals were put on. Despite their age, the Microscale decals from set 72-420 for VA-146 went on without any real trauma, though the fuselage stripes were wider on one end than the other. No matter which way I tried to install them. I used the kit decals for the nose insignia as the Microscale ones were too large. Microsol worked just fine on both decals. I stupidly tried some Mr. Mark Softer on one that was silvered and it caused the ink to run.
| FINAL CONSTRUCTION |
After getting all the markings on, I attached the gear doors.
I love 60s and 70s Navy jets but totally suck when it comes to painting the red
gear door areas, which is why I never entered any in contests! Another area
where I'm not good is getting ordnance straight on bomb racks and such. For this
one, I used fuel tanks for the inner pylons, napalm tanks from a Hasegawa set
for the middle ones and the kit TERs and snakeyes
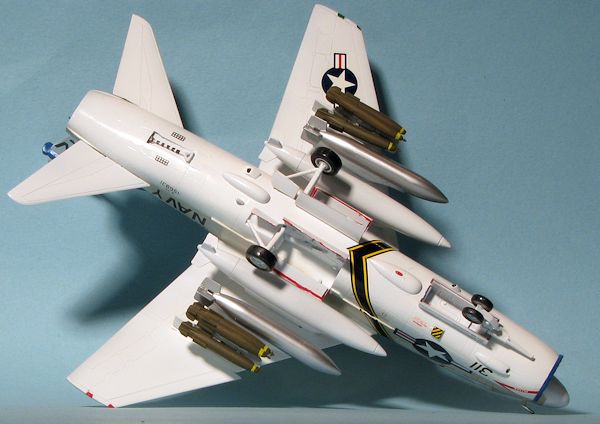 for the outer
rack. It is beyond me why Italeri/ESCI put indentations in all their bombs, but
only put tabs for them on the center attachment area. It just begs for klutzes
like me to get the rest of the bombs install cock-eyed, and I did an exceptional
job of it on this one.
for the outer
rack. It is beyond me why Italeri/ESCI put indentations in all their bombs, but
only put tabs for them on the center attachment area. It just begs for klutzes
like me to get the rest of the bombs install cock-eyed, and I did an exceptional
job of it on this one.
The tail planes were then glued in place as was the exhaust bit. I realized I'd forgotten the small anti-glare panel on the nose, so brush painted that. The formation lights were painted and the tail hook was installed after brush painting the black stripes. The final bits before pulling up the masking on the clear bits was the attachment of the grossly oversized nose pitots and the installation of the intake cover. A bit of the usual touch up was required from the painting department and the kit was done.
| CONCLUSIONS |
 With other,
nicer A-7 kits out there by Fujimi and Hobby Boss, one may wonder why spend the
time on one that isn't the best. Well, it is a case of it was there, I had the
time, and why not? It has its issues, some of them self inflicted, but the end
result isn't all that bad and it actually looks pretty nice on the shelf with a
few others. If you like 60s/70s USN and the colorful tail markings carried by
these planes, you really can't get much more colorful that the A-7.
With other,
nicer A-7 kits out there by Fujimi and Hobby Boss, one may wonder why spend the
time on one that isn't the best. Well, it is a case of it was there, I had the
time, and why not? It has its issues, some of them self inflicted, but the end
result isn't all that bad and it actually looks pretty nice on the shelf with a
few others. If you like 60s/70s USN and the colorful tail markings carried by
these planes, you really can't get much more colorful that the A-7.
| REFERENCES |
http://en.wikipedia.org/wiki/A-7E_Corsair_II
June 2013
Thanks to my friend Kevin for giving this to me for a Christmas present a few years back.
If you would like your product reviewed fairly and fairly quickly, please contact the editor or see other details in the Note to Contributors.