Roden 1/48 T-28B Trojan
| KIT #: | 0441 |
| PRICE: | $54.99 SRP |
| DECALS: | Three options |
| REVIEWER: | Scott Van Aken |
| NOTES: | New tool kit |
| HISTORY |
 The North American Aviation T-28 Trojan is a piston-engined military trainer aircraft used by the United States Air Force and United States Navy beginning in the 1950s. Besides its use as a trainer, the T-28 was successfully employed as a Counter-insurgency (COIN) aircraft, primarily during the Vietnam War. The last USN unit to fly the T-28 was VT-27, flying its last mission in early 1984.
Though none are currently in military use, the aircraft was widely exported in all of its different variants and is a popular warbird, due to the easy availability of parts and relative ease of maintenance.
| THE KIT |
The T-28 is one of those aircraft that has a pretty big following and many were hoping for a decent new tool kit to replace the ancient Monogram version. Now that wait is over as Roden has produced the first of what will surely be several versions of the T-28.
They chose the T-28B which is the land based version and the one most frequently seen in warbird colors. These aircraft remained as trainers with the USN well into the 1970 and with other nations even longer than that.
 The kit itself is very nicely molded with the expected engraved panel lines. I found some depressed areas on the gear doors and some flash on a few parts. There are also some ejector towers that may need to be trimmed before assembling the parts. It is obvious that there will be several boxings of this kit as the base sprues include gun pods as used by the T-28D and a separate rear section under the fin to accommodate the tailhook of the T-28C. It also has areas in the lower wing to open up for installing bomb pylons on the COIN version.
The 1820 engine is well done with a wiring harness. The cockpit has separate rudder pedals, control sticks, instrument panels and seats. Armor plating for the seats is on the sprue but not used in the trainer version. The control sticks are very scale and fragile. I broke both of them removing them from the sprues. Despite gentle sawing with the finest blade I have, they both broke at exactly the same place. You have decals for the instrument panel or you can use separate aftermarket instruments as the bezels are molded on the panels. The proper high pressure wheels/tires for a Navy version are supplied along with the correct nose wheel.
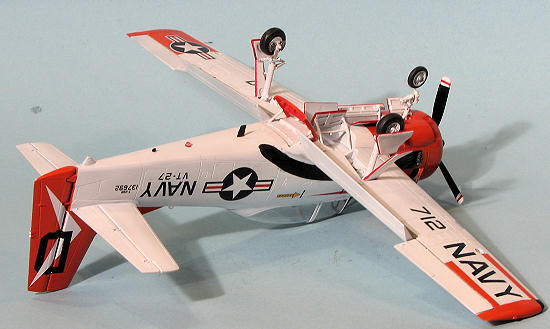
 Both the flaps and the ailerons are separate items. It was normal for the flaps to be down when the aircraft was on the ground. I also noticed that the little actuating rods for the three cowl flaps were part of the kit. The speed brake can also be posed down. Gear wells are nicely done and appear to be pretty accurate. The gear is nicely detailed and the nose gear is quite scale, which means it may be easily broken. This is especially true once sufficient nose weight is installed, as a great deal will be needed. Finally, the canopy sections are separate with the glass separate from the frame for the rear piece.
Instructions are well done with references for four major paint lines. All the colors needed during build are clearly shown. There are markings for three planes. First is an aircraft assigned to the 'parachute group' at NAF El Centro in overall white. Next is the box art plane is from Kaneohe Bay and in the standard International Orange and White colors. The last is in the very early yellow scheme while assiced to the Pacific Fleet All Weather Training Squadron in 1970. Decals are superbly printed and very glossy. Roden decals do not have a good reputation for stick so many will be hoping for an aftermarket sheet or two for this plane.
| CONSTRUCTION |
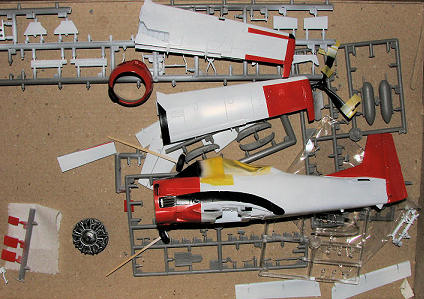
I was pretty standard in tackling this by first building the cockpit. I was dismayed by the huge ejector pin mark in the center of the seat bottom. I am not sure how I missed that. I chose to leave it as is in this out of the box build. You know about the broken control sticks. Getting the rudder pedals will require tweezers and a steady hand. The throttle quadrant piece does not want to fit as the hole is drilled too far forward. This was later all painted a dark grey. Even later, it was painted a lighter dark grey as the color I picked (lacking a bottle of FS 36231), was closer to RLM 66 that I really liked.
I then built a few other things. For instance, the wings were glued together (use tape to hold them together as they are not into bonding), as were the flap halves. The ailerons have hinges that need to be trapped between halves. I do not think these are supposed to be movable so I glued them in place. I also added the gear door struts to the main gear legs. This seems like a good 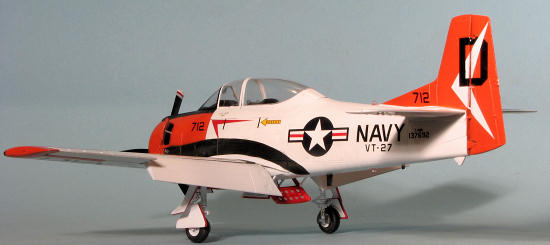 time to talk about the plastic. It is softer than you may be used to. This creates some issues when removing items from the sprue as you can see the stress areas where the plastic turns a lighter shade of grey (good name for a song, eh?). The up side is that it is easy to sand. I used this trait when attaching the wing tips, which did not want to fit back far enough. There was also a gap on the underside that needed filled (super glue of course). Staying with the wings, the flap guides were glued in.
I then took this opportunity to paint a bunch of things white, like the wings, ailerons, flaps, rudder halves, horizontal stabs, rear canopy frame and so on. Some of the parts that had not been sanded yet, showed a tendency to reject the paint so perhaps cleaning the bare plastic bits might not be such a bad idea. I had painted the instrument panels black and then used the instrument decals. They were totally oblivious to Mr.Mark Softer, even when placed in a pool of it. However, Solvaset seemed to work though it took a couple of applications. I then did some detail painting of the cockpit with black and silver, gently drybrushing the black bits with a light grey.
I also assembled the main wheels and the engine as well as the ADF loop antenna mount that will fit behind the back seat. I also took this time to assemble and paint the engine. I used Alclad II Dark Aluminum and did a wash so that the engine cylinders would stand out more. After getting the interior together, I went to see if it would fit. It did not. Some of the sidewall detail prevented it from sitting high enough so I had to remove some. I also found that the mounting guides for the ADF antenna interfered with getting the back of the cockpit in position so those were trimmed a bit. Another glitch I found when assembling the instrument panels is that though there are mounting guides for the front shown in the instructions, those are not present on the actual parts. You will need to mount this panel as far towards the seat as you can for the cockpit to fit in place.
 I also took the opportunity to open the fully flashed over holes for the exhaust and then glued the exhaust stacks in place. Instructions would have you glue the engine to the exhaust collector piece and then to the firewall. Do not do this as the key for the exhaust collector is misaligned and you will end up attaching the engine at the wrong angle. I removed the key from the collector piece, placed the collector piece on the firewall and then aligned the engine before gluing it to the collector. I left the engine unattached for now.
Back at the fuselage, I test fit it and did a bit of sanding to get things to fit flush. Then the interior was glued in place using both super glue and standard cement. The other half was taped on to make sure it all lined up properly. Then the other half was glued in place. When dry, the firewall was glued on and before that dried, I attached the lower fuselage insert to be sure all lined up well. You will have to cut away the ejector towers on the bottom of the fuselage to fit this piece in. This lower insert is a very tight fit and was pulled out to let the fuselage and firewall dry.
The kit instructions suggest 25 grams of nose weight. That is a LOT. I used tape on wheel weights that come in 14 gram sections, using two of those with one attached near the top of the nose to the firewall back and the other right against it, but attached to the cockpit. Be sure nothing juts below the cockpit floor or you will not get the lower insert in place. The insert was then glued on as was the lower tail piece. I then test fit the wings, noticing a large gap on the upper surface. This is because the upper and lower wing pieces are not the same length. The lower one is longer by about 1/32 inch. This required me to take my motor tool and grind away at as much of the extra length as I could. This reduced much, but not quite all, of the gap.
I next glued on the windscreen and masked the forward canopy section. This piece was painted White with Dark Gull Grey insides. The aft canopy frame was glued in and this was followed by the cockpit section. The windscreen was then masked and the open back was masked off in preparation for painting.
| COLORS & MARKINGS |
 The aircraft is in White with large areas of International Orange. For the White, I used Tamiya and Testors for the International Orange, both thinned with lacquer thinner. The kit took a TON of masking as one does not want the White to show the tiniest bit of overspray on it. As I had not attached the wings or engine or cowling, it was pretty easy to mask. I had to hand cut the mask for the large exhaust area on the fuselage side and fear I did not do a great job on it, but it is adequate. The direct area behind the exhaust was painted steel. I tacked on the cowling while painting the nose anti-glare panel. I also painted on the wing walk areas. As you might imagine, there was painting going on pretty well through the build as once pieces were removed from the sprues and cleaned up, they had to be painted. For the red on the inside edges of the gear doors, I used a red Sharpie. It is a lot less messy than thinned red paint, though perhaps it does go on a bit wide. I suggest a fine point when doing this on yours.
| FINAL CONSTRUCTION |
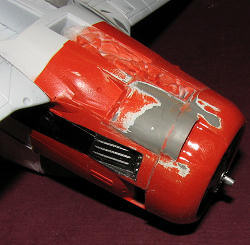 Now that I had most of the parts painted, it was time to join them. The wings were not a good fit and needed even more sanding on the roots to get even a close to acceptable fit. Even then, there was a gap on the bottom of one that required filling. The engine was glued in place followed by the cowling. The fit here was also poor. In fact, I had to use filler and sand around the lower intake to make that acceptable. This meant repainting it. The tail planes fit well so no worries there.
I now turned my attention to the landing gear. The main gear legs needed the attachment holes drilled deeper and were glued on along with the retraction strut and the small gear door brace. The nose gear wheel fork is very weak and with all the nose weight required, will surely break if not reinforced. I applied several coatings of super glue to help stiffen things up a bit and while still wobbly, should hold. SAC will do metal gear and provide a beefier nose gear leg. I recommend getting it just for the nose gear if nothing else. It may be due to the smaller diameter USN nose wheel, but the airplane has a nose down stance when on the ground and the aircraft should sit level. I am not sure if it is because the main gear legs are too long or the nose gear is too short. Were I to build this kit again, I would use the larger diameter USAF nose wheel as that should take care of some of the error if not all. Soon the gear and wheels were firmly dry and so I started applying decals.
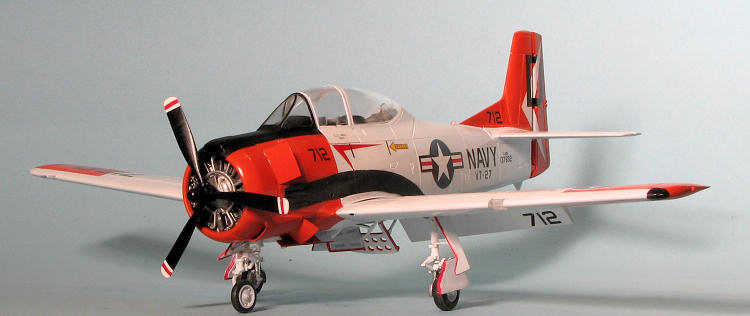
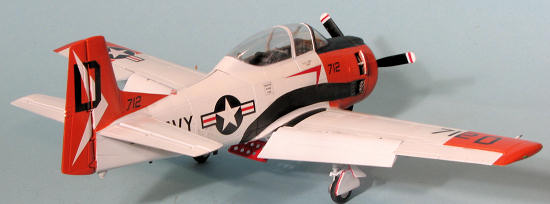
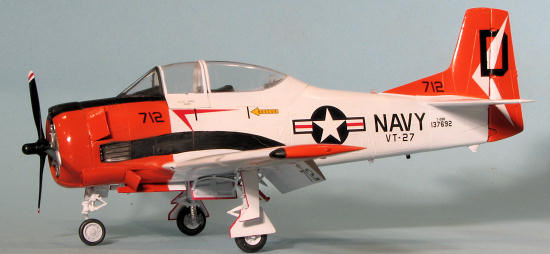
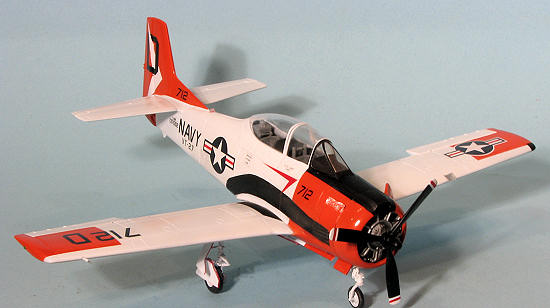
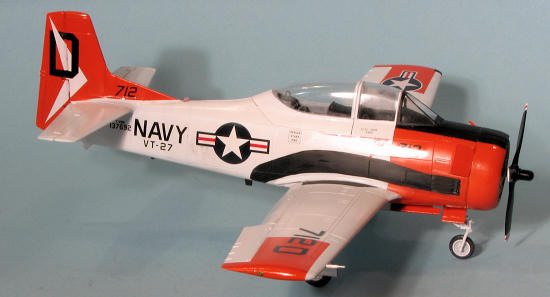
For this kit, I chose an old Aeromaster sheet, #48-614. I wanted to do the VT-27 option and while the sheet markings are for a T-28C, the unit had a lot more T-28Bs than Cs and were similarly marked. The decals went on well and while sized for the Monogram kit, which apparently has some dimensional differences, they are superior to what Roden has supplied. In fact, I only 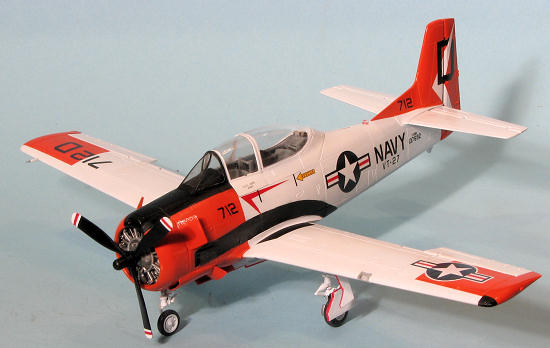 used the serial number and instrument panel markings from the Roden sheet. The whites on the Aeromaster sheet do a very good job of keeping the underside colors from bleeding through. You can tell if you look closely, but in photos they look perfect. Due to my lack of faith in Roden decals, I did not use any of the myriad stencil decals provided on their sheet.
While the decaling was going on, I attached the gear doors, antennas and the cowl flaps. This was not a quick process as all the gear doors have actuating struts that need to be attacked. Same goes for the cowl flaps. The mating surfaces for the doors are only what I would call fair and I had to cut away a bit on the lower gear strut to get the long main gear doors in place. The cowl flaps fit is only fair and they also do not mate cleanly with the cowling area. I then glued on the flaps and found that they were also less than a good fit. During all this, the nose gear broke precisely where I figured it would. I cemented it back in place and reinforced some more with super glue in hopes that it will at least hold up until I finish taking pictures.
Then I started attaching the bits that had so far been left off. This was mostly clear pieces. The ADF loop antenna was glued into the area behind the rear seat. For the under wing lights, I used MV Lens #128, my only deviation from OOB save for the decals. The anti-collision lights were painted red on their bases then glued on. I used clear gloss paint for attaching all the clear bits. This includes the rear canopy section. The front was cemented in place with standard glue as it had a tendency to spread apart past the cockpit side walls. The black areas were then given a brush of clear matte and light exhaust stains were added with pastels. I then glue on the speed brake and actuating supports. Finally, the lower UHF antenna was added as was the prop.
| CONCLUSIONS |
 It seems like Roden makes the builder work for all their kits. This kit was no exception as it took me weeks longer to finish than I had originally anticipated. Part of that is due to my slow building pace and part because it takes me days to apply decals as I only do small sections and make sure they are dry before moving on. This is in case I brain fart and touch an area that was just done. Roden kits are such that they have sufficient detail to please most and are subjects that many want to build. I know I have built a few of them and while challenging, the end result was always quite pleasing. Would it be easier to build the Monogram kit with the plethora of upgrades needed to bring it to current standards? Probably not and this one would be less expensive in the long run. If you have wanted a modern kit of the T-28 then this is your best chance. I can pretty well guarantee there will be at least two if not three more boxings for the T-28D, Fennec, and T-28C.
| REFERENCES |
March 2012
Copyright ModelingMadness.com. All rights reserved. No reproduction in any form without express permission from the editor.
If you would like your product reviewed fairly and fairly quickly, please contact the editor or see other details in the
Back to the Review Index Page 2026