Anigrand Craftworks 1/72 Rockwell XFV-12A
| KIT #: | AA-2026 |
| PRICE: | $49.50 MSRP |
| DECALS: | One option |
| REVIEWER: | Scott Van Aken |
| NOTES: | Short run resin kit with vac canopy |
| HISTORY |
Please visit the preview for more information on this aircraft. You'll also find an image of the bits from the box.
| CONSTRUCTION |
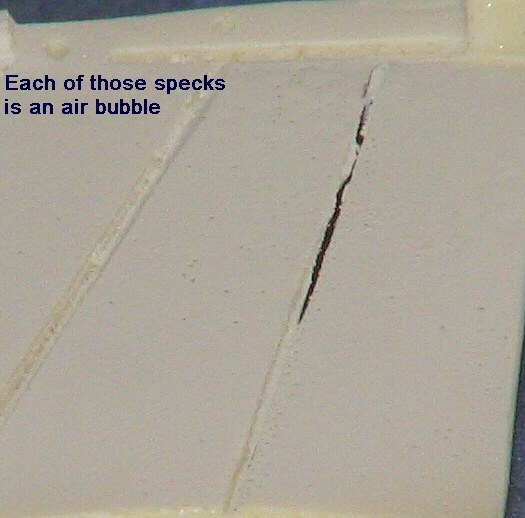 With a kit like this, the initial step is to try to cut down on the number of air bubbles in the wing. I did this by first coating the major areas with super glue, zapping it with accelerator and then sanding down the glue before it fully cured. Then the wing was given a coat of flat so that I could see how many more I had to fill. Well, that really opened up a can of worms. Not only did I not get as many with the super glue as I'd thought, but there were a hell of a lot more that I hadn't seen on the bare resin. It is things like this that not only put one off completing the kit, but give the makers a rather poor reputation for allowing such things get out to the buying public.
 After several weeks of attempts to fix the problems, I gave up on it as it was just too bad. I then decided to contact the importer to get a new wing. Well, in the time between starting work and deciding on asking for a new wing, the importer changed. I asked the new importer for a wing, sending along this previous image and ones from the preview showing all the air bubbles. He then contacted Anigrand and a new wing was on the way.
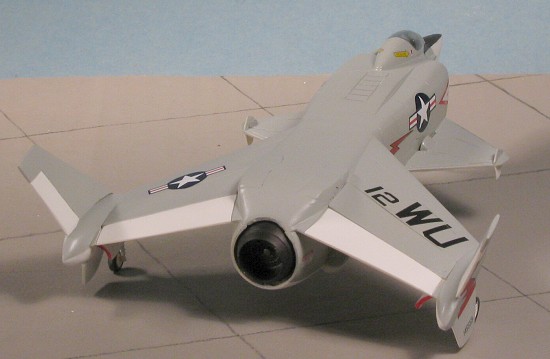
In the mean time, I went to work on the rest of the kit. The lower fuselage on one side was paper thin in one spot so that was backed up with superglue to prevent accidentally punching through during handling. As it turns out it didn't fully help as I did open a crack in it. I also filled the holes in the intake and near the exhaust using super glue and then filler. Then I sanded the mating surfaces of the fuselage, stuck some nose weight in it (which I don't think I needed), and carefully glued the fuselage halves together. I also inserted the upper intake vanes (the closed ones) in place. I fully intended to wimp out and do this one with all the vanes and intakes in the 'normal flight' pose. It is great that Anigrand provides the option to have everything opened up, but I just wasn't ready for that sort of a challenge.
It took several applications of filler to get all the holes and seams filled, which totally wiped out the engraved detail in those areas. Some of that was replaced, but some was also ignored. The interior of the intakes was painted white as were the splitter plate/intake bits. The back of the splitter plate assembly was painted black and the construct was glued into the intakes. No worries!
 I took this time to build up the front wings. On one side the lower plate of the little end plates was totally short-shot so the remnants were removed and a new one made from plastic card. I should also point out that on one side the forward insert was a bit shorter than the other, something I didn't really notice until after it had been super glued in place. I should have done more test fitting.
Then I waited for the main wing.
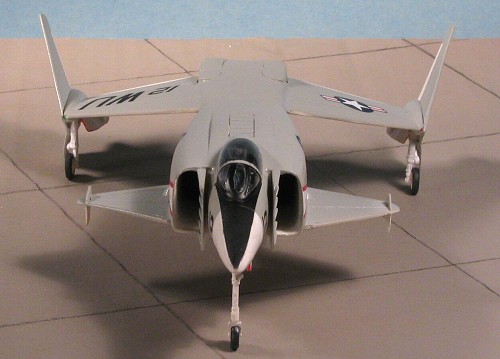
After about three weeks, the wing arrived and it was a HUGE improvement over the one supplied in the kit. It still had a few large air bubbles, but those were quickly filled and sanded down. Then the end caps were glued in place as was the wing center section and the little caps that went atop them on the fuselage. These center sections I talk about were on pivots and so when the aircraft was in vertical mode, they would have been opened up 90 degrees to the surface of the wing. The flaps and ailerons would have been fully lowered as well to provide minimal resistance to vertical flight and to provide a place for excess downwash gasses to escape from under the aircraft.
 With those in place, the wing was glued to the fuselage. Fit is pretty good with no major problems. It has a bit of a gap as it seems one should really attach the wing at the same time the fuselage is glued together so that one can flex things about to get the best fit, but I have no complaints about how it fit. The front wings were glued in place, and other than that one center section I mentioned, fit very well. These were butt joined using super glue. You may want to pin them for more strength. I then used some filler on a few joins to take care of seam work showing and started hunting for A-4 landing gear.
| COLORS & MARKINGS |
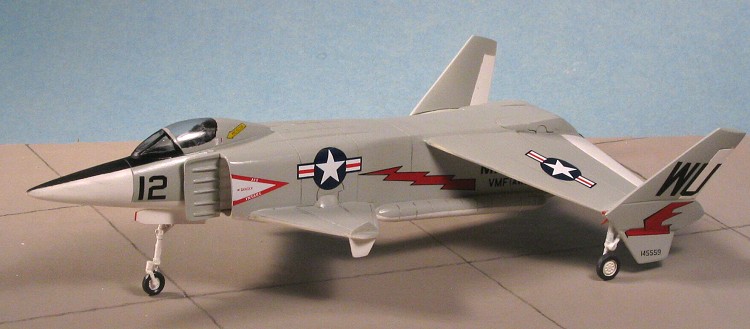
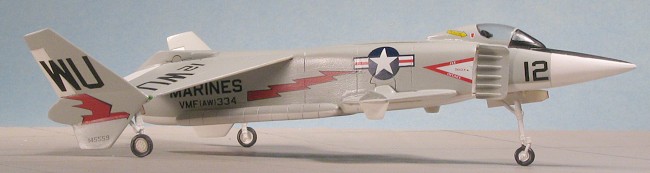
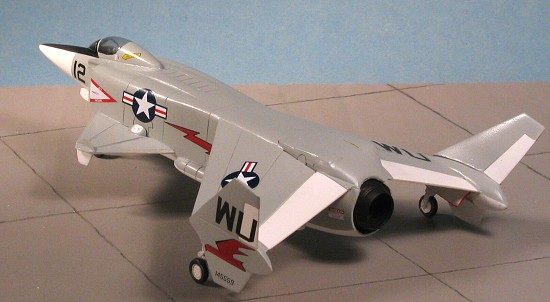
 Once the seams had been sanded smooth I took the kit to the paint shop and painted the underside as well as the gear doors and the upper control surfaces with Floquil Reefer White. I'd decided to do a nice 'what if' scheme using the Light Gull Grey and White scheme so prevalent when this aircraft was being developed. It was also the scheme given in the instructions though I'm going to use other decals on this one. When the white was dry, I returned to the work bench for some more gluing and detail painting.
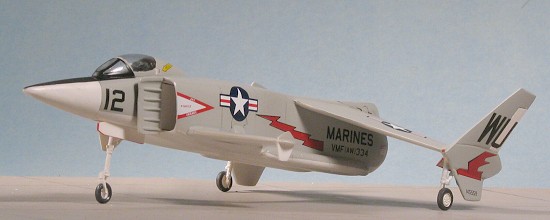
My quest for 1/72 A-4 landing gear turned up nothing but already built Skyhawks that I wasn't ready to trash just yet! That being the case, I had no choice but to use the kit gear. The molding on these is, well, it could be better. One main gear is fatter than the other and both show problems from mis-aligned molds. The nose gear isn't bad and I kept the resin pour point between the wheel and rest of the gear intact as I didn't think that slender bit of resin was enough to hold it up. I also brush painted the interior Dark Gull Grey using Testors Model Master enamels. Then the bang seat, back of the cockpit and and instrument panel area were painted flat black. The seat is not well molded and really needs replaced. I tried a cast metal Aeroclub MB.5 seat, but it was too tall and I didn't want to fuss with grinding down the bottom of the seat so used the kit version, painting it black and giving it a bit of a dry-brush to show some sort of detail. No instrument or console detail or decals are given. I broke the control stick into three places cleaning up the flash so left it out.
Then, I carefully masked the canopy (a difficult task as the frame lines are somewhat indistinct), then cut it out. You only get one so can't screw it up unless you want to buy (yes, buy) another from Anigrand. I've said before that I think providing two vac canopies is mandatory in these sorts of kits and don't know why Anigrand doesn't. Then the canopy was super glued in place by first tacking it down on the front and rear, then filling in the gaps later on.
The landing gear were then glued into place. The nose gear gave little trouble. The main gear do not fit properly. The best I could do was to have them angle in slightly. The retraction strut 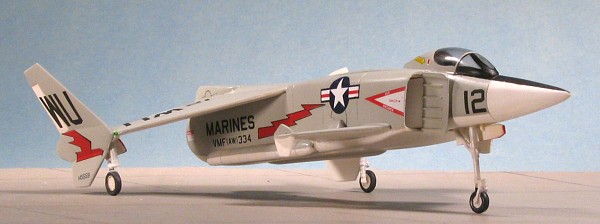 seems to be on the wrong side from the axle so you can get them to fit with the wheels facing in, but not when facing out as they should.
I then masked the heck out of the underside of the kit in preparation for the upper side color. I used a hard demarcation line as it would not be out of character for the time period. Especially on factory fresh aircraft. The ratty look was more prevalent after multiple sailor-applied camouflage (as in a rattle can on the flight deck). Then the upper surface was painted with Gloss Light Gull Grey using Testors Model Master enamels. When dry, an anti-glare panel was done in black all the way out to the tip of the nose in a manner similar to the F-104. The exhaust was painted using Alclad II Jet Exhaust on the inside and Testors Metallizer Burnt Iron on the outside and set aside until after decaling.
 At this stage, I started rummaging around for a set of markings. The Anigrand ones are a known quality in that they are well printed, a bit thick and don't like a lot of curve. They are also not amenable to setting solutions. I found a nice Microscale sheet for F-8 Crusaders (72-086) that looked as if it would fill the bill. The price printed on the sheet was $1.50 so this sheet has to be 30 years old if it is a day. I was a bit worried that it would fall apart so tried one marking that I wasn't going to use. It worked just fine. A bit fragile, but it wasn't yellowed so I started cutting out the unique markings for the VMF-334 F-8C to transpose to my XFV-12. I used all the unique markings as they actually fit pretty well. A bit of the Microscale (now Superscale) decal system was more than enough to get them to cooperate. I also used some nearly as old (only 20 years) insignia from a Microscale sheet I bought in 1982 (priced at $3.00). Again, no problem with yellowing or being overly fragile. The clear carrier wasn't trimmed as my experience with older decals showed that if I did that, it would cause the edges to chip. The model was given a coat of matte clear to seal in the decals once they had dried and the kit was washed. I chose mattes vice gloss for a reason you'll see a bit later.
| FINAL CONSTRUCTION |
Not much to this section. I attached the main wheels as best I could. The axles are way too short so I glued the upper portion of the wheels to the strut and ran a string of superglue from the axle stubs to the center of the wheel. Then I hit it with accelerator and it forms a pretty strong bridge. The wheels are not well formed and I would hi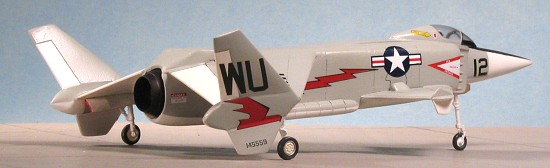 ghly recommend getting a trashed Skyhawk kit and robbing landing gear and wheels from it for this kit as it really would benefit from them. I then painted the edges of the gear doors red and glued them in place. Nose gear door fit very well, with the main gear doors just being butt joins. I chose not to install the kit supplied Sparrows as all the fins had air bubbles in them and I couldn't find a suitable set of plastic ones. Not really a problem as planes spend the vast majority of their time unarmed. The kit was then given a misting of clear gloss (Future) to add a bit of sheen to things. Even the most weathered USN planes of the period were not totally flat and besides, flats are MUCH easier to photograph (no glare problems). The misting of gloss gave me a nice semi-gloss that is much more pleasing to the eye. I pulled the masking from the clear bits and, after being amazed at no fogging from the super glue, hurried off to photograph it before something broke.
| CONCLUSIONS |
 Once again, a really neat subject from Anigrand Modelworks. Once again, it takes some work to get it finished. Though the box says it is not for children under 14, it should say 'For Experienced Modelers' on the box as that is really much closer to the truth of things. I've been asked if these kits would be good for a beginner to resin kits. I'd have to say yes. This one in particular is not a difficult build once the parts have been cleaned up and the molding glitches taken care of. Those who head into the resin kit realm should already be somewhat proficient in the types of repair skills and problem solving that many resin kits provide. I personally find building these to be a greater pleasure than an easier kit. There are problems to try to solve and they are usually not so overwhelming as to be frustrating (though the wing on this one certainly is and I do hope that Anigrand is equally receptive to the buying public as it was to me). The end result is a kit that probably only 100 or fewer people will actually have built and are displaying on their shelves. For sure it will be a conversation piece and I know that I've had a lot of pleasure building this and other Anigrand kits.
Oh yeah. I'm sure that there is at least one thing crooked. No need to tell me about it as I can live with it.
February 2005
#1349 in a series
Many thanks to DMC Models for the review kit.
UPDATE: Nostalgic Plastic is now the US Importer for Anigrand. Please contact them for more information.
If you would like your product reviewed fairly and fairly quickly, please contact the editor or see other details in the