Roden 1/32 Fokker Dr.I
| KIT #: | 601 |
| PRICE: | $35.98 MSRP |
| DECALS: | Four options |
| REVIEWER: | Scott Van Aken |
| NOTES: |
| BACKGROUND |
Please visit the preview to see what comes in the box.
| CONSTRUCTION |
Step one in this case was to scope out the instructions. Roden has decided that the best way to do this kit is by sub-assemblies, a method that I agree with. There are quite a few consisting of the seat section, floor section, fuel tank, and the wings. It was with the wings that I ran into a tiny problem. You see, Roden designed the kits with separate wing tips. Simply butt glue them in place. Seems easy enough. However, when one comes to the first wing, the upper one with the ailerons, it tells you to glue parts 11D to the tip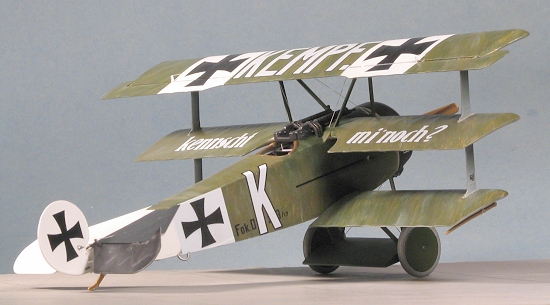 s. These are a bit long, but one may assume that one simply trims off the bits that stick out. Don't do it. Parts 7A and 8A are for the upper wing and are already shortened to fit.
You'll also run into a bit of trouble trying to find out exactly how part 2C fits on the floor section. I just put it where it looked like it fit over the control rod. Probably wrong. I also found the fit of parts 9E and 2E the exhaust and push rods for the engine to need some tweaking as they did not want to cooperate. Pay close attention on the first step concerning the seat frame. I almost blew it when trimming mine. In addition, you'll have to do some trimming on the inside of the outer parts of the ailerons as they tend to hit the wing tip.
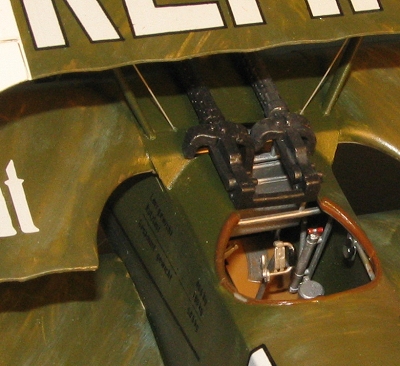
Moving to getting all the interior bits installed, the first bits are the interior frame work. The instructions are a tad vague, but basically, this framework needs to follow the lines of that molded into each fuselage half near the back. Leave a bit of space for the back of the seat assembly to fit and butt the front of the little bit that sticks down against the 'hump' for the lower wing. Once it was glued in place, I started attaching other pieces. What I did was to glue all the bits to one fuselage half, tape the halves together until the glue dried, then go on to the next piece. In this way, I was sure that the bits fit and I wouldn't have any surprises.
 First was the seat assembly. It is a tight fit and seems a bit oversize in terms of height. You may want to trim the upp
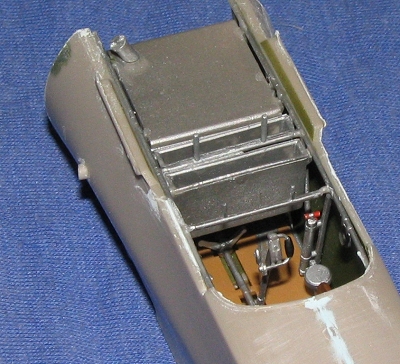 er corners. I didn't, but had to fiddle with it a lot. Next is the floor. The instructions are quite vague on this. If you go by the upper mounting, it will be too far back. There are two small pegs jutting from each side of the interior framework. The floor has two indentations and this is how to glue it. The floor piece will eventually sit atop the lower wing hump. The upper piece will glue to the forward of the two sets of 'bumps' on the upper frame. Sounds odd, but when you get there, you'll see what I mean. Once that was in place, I then did the same
  for the aft cross piece, and the two ammo containers. These glue to either side of the forward crosspiece as well. Last bit is the fuel tank.
After I was sure that all those pieces would fit, I glued the tail skid in place and then the fuselage halves together.
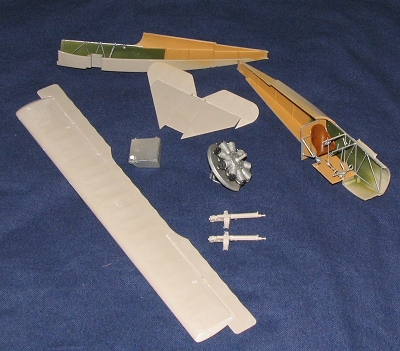 Meanwhile, I'd also built up the engine and the firewall assembly. The guns had the belts glued to them and I glued the elevators to the horizontal stab. You'll have to slightly open up the slots for the control horns as they are a bit too narrow. This is true of all control surfaces. Under advice from counsel, I decided that this was as good a time as any to start painting. Since I was doing Kempf's plane, I needed to paint most of the big pieces first.
| COLORS & MARKINGS |
 Grabbing my handy tinlet of Humbrol 87 (a sort of bluish grey), I proceeded to spray the undersides of all the wings and the winglet between the wheels. I also did the gear struts and wing struts, just in case they were the same shade. Took a couple of coats as I think I thinned it too much. I also sprayed the horizontal stabilizer and the rudder with Floquil Reefer White.
Meanwhile, I sanded down the first round of filler on the fuselage and did some touch-up painting on the engine/firewall subassembly. Some test fitting showed that trimming would be needed to get a snug fit, but I won't deal with that until a bit later, after the fuselage is painted and it is time to attach the flight surfaces.
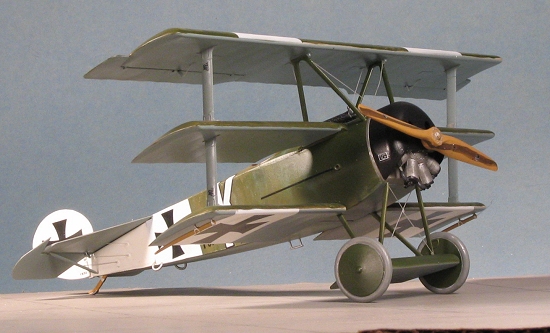
Then I sprayed the upper surfaces of the wings and fuselage with a light tan. I'd asked a number of questions about painting the upper colors and was told to first paint the upper surfaces tan (though no info on light or dark was provided). Once that was done, the colors were sealed in using Model Master Metalizer sealer. This is a lacquer and so would block the enamels I was using from damaging the paint beneath. It took many coats of sealer to give a gloss finish, but it dries very fast.
I then used Humbrol #155 (as recommended in the instructions) and a 1/4 inch wide flat brush to start streaking. On the wings I went at a 45 degree angle while on the fuselage it was up and down and across. It was fun to do this as the streaking was quite prominent. I then let it dry. It seemed to me to be too brown as I was informed that this would be a dark green similar to RLM 71. I had some FS 34079 already mixed up so I decided to go over what I had with this color. It made things a lot darker and still managed to retain the streaking. I added even more streaking with some Vallejo 'Sky' to add a touch of brightness to things. Now I 'm not really sure how successful my painting is; only showing it to you will give me any feedback. However, it looks ok to me and I'm pleased enough with my first effort.
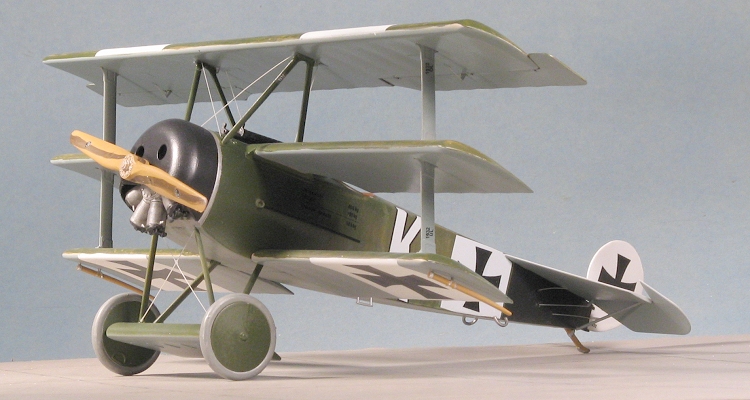
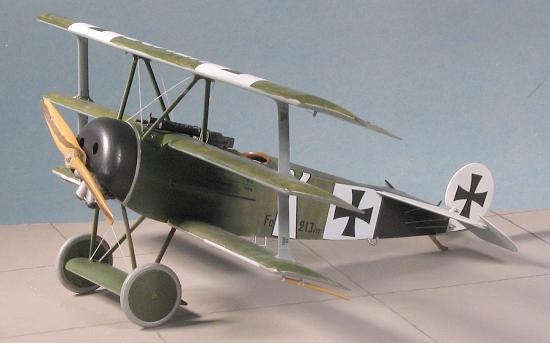
 I then painted the front of the fuselage with solid 34079 dark green and this was done to the wheels and upper surface of the winglet between the wheels. The tires were painted with Dark Gull Grey, but in retrospective, something even darker may have been more appropriate. I then let things dry for a while. and gave the overall fuselage and wings a couple of coats of Testors Metallizer Sealer to gloss things up for the decals. The aft portion of the fuselage sides were painted white on the right and black on the left. I also painted the left size of the elevators and horizontal stab in black. Though the instructions stated that this color should be on the underside as well, I was told by those who know that this wasn't the case so left it in the underside shade.
The middle and lower wing were then glued in place and I also glued in the outer struts. These need careful trimming to fit and I still didn't get them as flush as I'd have liked. The middle wing has to be carefully fit to the upper fuselage and once that was done, a bit of sanding was done on the edges to smooth things out. The landing gear was assembled and this is a rather wobbly affair as the struts are quite scale so quite thin. I also glued on the upper cabane struts, taping the wing in place to assure a proper fit. You'll have to trim the upper attachment area on these struts so do that before gluing them to the upper deck. I didn't and wish I had. The engine and firewall section was also glued on. This needed some trimming to the lower fuselage to properly fit.
![]() I then started to apply the decals. I first went with the huge 'Kempf' marking on the center of the wing. The new Roden decals are superb performers but thin as tissue and must be very gently handled. A lot of water is needed to get them in place. It seems they take a
I then started to apply the decals. I first went with the huge 'Kempf' marking on the center of the wing. The new Roden decals are superb performers but thin as tissue and must be very gently handled. A lot of water is needed to get them in place. It seems they take a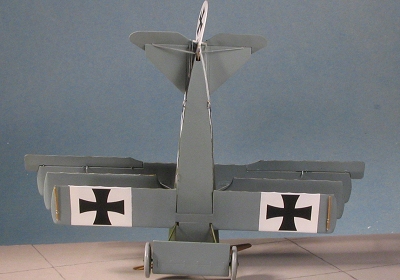 bit longer than usual to come off the backing and require a bit of a 'nudge' to break free. With that on the upper wing, I started looking for the upper crosses on white backgrounds. There weren't any. I had to paint those on. Well, nothing to do but to seal the decal already in place with Metallizer sealer and when dry, I used Tamiya tape to cover it while I masked off the upper wing for the white bands. Same was done with the lower wing. Fortunately, no problems when I removed the tape as it not only prevented any bleed-under, but also didn't damage the decal!
I continued to apply decals, this being a bit more time consuming than the norm thanks to the very thin nature of the decals. I also discovered that there were no white background fuselage decals either. Rather than paint those on (as it would have been much more difficult), I just reversed another set of later markings that had the white background and used those. They are really too big for the fuselage and so had to be trimmed. It seemed to me that the 'K' on the side was too large as well as it overlapped to the upper fuselage. I should also point out that the white is a bit transparent.
| FINAL CONSTRUCTION |
Now that the decals were in place, the entire airframe was given a couple more coats of sealer. I glued on the wheels, being quite careful. The wheels are designed to spin but are a sloppy fit so they were glu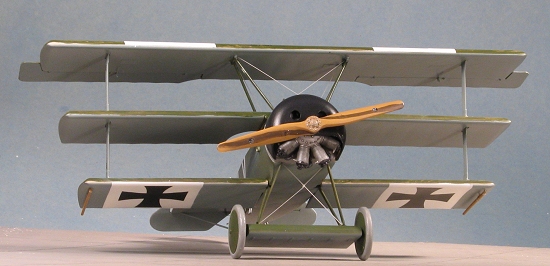 ed. The guns were then fully assembled and painted, then glued in place. The various feed and waste chutes are supposed to fit into or over the appropriate bins so care needs to be taken when fixing these in place. The upper wing was then glued on, taking care to get the cabane struts properly affixed. Then the little wing tip skids were glued on after being painted wood. I also painted the prop in this color and tried to paint on some large grain, but it looks hokey. Not something I'm good at.
The tailplane support struts, elevators and rudder were glued on as were the step and lifting rings. The cowling was barely tacked on. Supposedly the engine should turn, but to have that happen, you'd have to grind out the inside of the cowl as it is too thick and interferes. I used small pieces of stretched sprue for the small amount of rigging and the control cables to the ailerons and such. Istrongly recommend doing the gear rigging with wire as the sprue kept breaking under the flexing of the gear. A bit of touch up painting, an overall coat of semi-matte, the prop was pushed on and the kit was now a model.
| CONCLUSIONS |
 I have to say that the model turned out a lot better than I'd hoped. It does take careful construction and test fitting is highly recommended. It isn't a kit for beginners, but the vast majority of you will have no problems in building it. Painting it might be a different story, but Roden has seen fit to provide some simple camo schemes to handle that. If you have the Revell 1/28 kit, give it to a friend or a kid as this one has become the new king of the roost. I can only hope that Roden continues and does a series of D.VIIs. This scale is perfect for WWI aircraft.
April 2005
# 1360 in a series
Copyright ModelingMadness.com. All rights reserved. No reproduction in part or in whole without express permission from the editor.
If you would like your product reviewed fairly and fairly quickly , please contact
the editor or see other details in the