LTD 1/48 CAC Boomerang
| KIT #: | 9806 |
| PRICE: | $25.00 when new |
| DECALS: | Three options |
| REVIEWER: | Spiros Pendedekas |
| NOTES: | Short run kit |
| HISTORY |
The origins of the Boomerang can be traced in late 1941,
when Lawrence Wackett, manager and chief designer of Commonwealth Aircraft
Corporation (CAC) examined the possibility of designing and building a new
fighter aircraft, a first for Australia’s aviation industry. To minimize risks
and speed things up, Wackett implemented elements of the domestically produced
Wirraways for the airframe (themselves based on the North American NA-16) and
Bristol Beauforts for the powerplant (Australian-made Beauforts used
license-built R-1830 Twin Wasps).
The emerging design, designated as CA-12, used the wing, tail assembly,
undercarriage, and center section of the Wirraway in combination with a new
forward fuselage to house the larger Twin Wasp engine, which gave it a stubby
appearance. It had a new cockpit with a sliding hood and carried an armament of
two 20 mm Hispano-Suiza HS.404 cannons along with four .303 machine guns.
The proposal was presented to the Australian Government, which promptly gave its
approval, authorizing an immediate order for 105 “Boomerangs” (as they were
named shortly thereafter). The fact that the order was fixed before even any
prototype had been constructed could be due to a combination of reasons,
including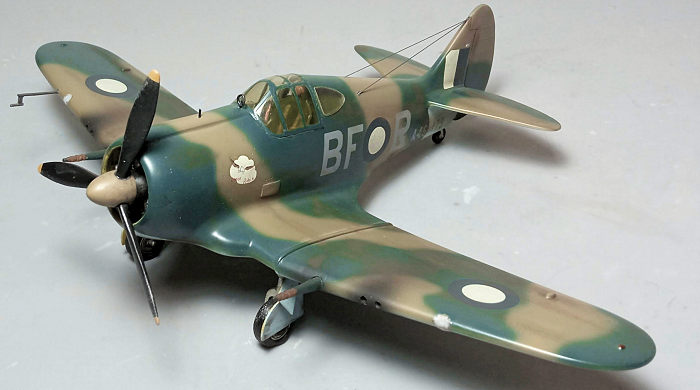 ,
among others, urgency of demand due to war, insurance against delay or
cancellation of the RAAF’s P-40 order and the expectedly low risk of the project
itself, as it would use many readily available components (although the latter
finally materialized to a lesser degree than originally envisaged).
,
among others, urgency of demand due to war, insurance against delay or
cancellation of the RAAF’s P-40 order and the expectedly low risk of the project
itself, as it would use many readily available components (although the latter
finally materialized to a lesser degree than originally envisaged).
Though the engine's performance was adequate at low altitudes, it fell rapidly
above 15000 ft, so, the fact that the plane rarely engaged in aerial combat came
as no surprise. Attempts to fit the R-2600 power plant did not come to fruition
due to non-availability, whereas the locally manufactured R-2800 would
practically stress the landing gear beyond acceptable limits if fitted.
As it stood, the Boomerang was agile, easy to fly, with good range, sufficient
armament and could withstand significant battle damage. While it might have
never been recorded as having destroyed any enemy aircraft, it performed well in
the light ground attack role, used by Army co-operation squadrons, often
replacing the lightly armed Wirraway. It was also used for artillery
spotting, aerial supply drops, tactical reconnaissance, and anti-malarial
spraying. In total, 250 examples were built.
RAAF No. 5 Squadron flew Boomerangs in New Guinea, the Solomon Islands and
Borneo Campaign, also in the close support role, with marked success. Flying in
pairs (one to observe the ground, the other to observe the air around them),
their tasks included bombing, strafing, close infantry support and artillery
spotting. They often operated in conjunction with larger aircraft, where they
would get in close to confirm the identity of the target and mark it with a 20
lb smoke bomb, with the cooperating larger aircraft delivering the major
ordnance from a safer distance. A partnership between No. 5 Squadron Boomerangs
and Royal New Zealand Air Force Corsair fighter-bombers during the Bougainville
Campaign was said to be particularly successful.
| THE KIT |
LTD was an American
limited run kit company that had its molds made in the Czech Republic. Their
1/48 Boomerang came out in 1996 and it is a typical limited run representative
of the era. The specific copy was discovered forgotten on a shelf of an Athens
hobby shop back in 2002, carrying a price tag that sounded reasonable. having a
soft spot on rare subjects, I grabbed it immediately.
The kit came in a flimsy and partly beaten-up side opening box, carrying a nice
box art depicting RAAF’s 4 Squadron bird “Hep Cat” during a strafing attack.
Upon opening the box, I was greeted with 47 light gray styrene parts, arranged
in three sprues. Molding is typical low-pressure/limited-run of the past with
thick sprue gates and lots of flash that has to be cleaned off. Panel lines are
recessed but soft and shallow, with
 most of
them probably going to disappear after the inevitable sanding, due to the pebbly
and somehow uneven surfaces. Fabric representation is good. Regarding overall
accuracy, the fuselage is shorter than it should, emphasizing even further the
plane's stubby looks.
most of
them probably going to disappear after the inevitable sanding, due to the pebbly
and somehow uneven surfaces. Fabric representation is good. Regarding overall
accuracy, the fuselage is shorter than it should, emphasizing even further the
plane's stubby looks.
Cockpit is adequately represented, but you will need to beef it up should you go
for an open canopy. The R-1830 engine looks good, as does the prop. The exhaust
is of the "hedgehog" flame damper type and is nicely casted in resin. Landing
gear is also sufficiently done with bulged wheels optionally offered (with the
bulge somehow overdone for my taste).
Transparencies are vac formed and quite sharply done, however their base
material is of the type that goes yellow after many years, which is the case
here. Instructions come in the form of a 6-page leaflet, containing a short
history of the type, with the construction spread in four steps, the last two
being quite dense in information, needing some extra study, something easily
tackled by the experienced modeler to whom the kit is definitely aimed at. Color
callouts are given throughout in both FS numbers and in generic form.
Three schemes are provided, all having light blue undersides, the first two
featuring foliage green topsides with the third one done in foliage green/earth
brown. Decals are nicely printed by Superscale, seemingly enduring time well.
The first two steps of the instructions want you to assemble the engine/prop and
cockpit respectively, then, in the third step, the aforementioned subassemblies
have to be trapped between the fuselage halves, along with the rear-view
windows’ inner plates and the air intake bottom. The tail planes are next,
followed by assembly and installation of the main wing, landing gear, optional
belly tank, transparencies and final small bits, ending a build which, though on
paper seems not too complicated, will definitely pose a certain degree of
complexity due to the limited nature of the kit.
| CONSTRUCTION |
 First
thing I did was to remove all parts from the sprues and clean-off the
significant amount of flash present. Willing not to take extra risks, I
performed the radical act of reading and, for the most part, following the
instructions, starting with assembling and fitting the engine to its firewall.
The crankcase was painted light gray, the cylinders were painted black, then
heavily dry brushed with silver, whereas the firewall itself was painted zinc
chromate.
First
thing I did was to remove all parts from the sprues and clean-off the
significant amount of flash present. Willing not to take extra risks, I
performed the radical act of reading and, for the most part, following the
instructions, starting with assembling and fitting the engine to its firewall.
The crankcase was painted light gray, the cylinders were painted black, then
heavily dry brushed with silver, whereas the firewall itself was painted zinc
chromate.
Cockpit assembly was next, where, foreseeing fit issues, I chose to attach the
floor, rear bulkhead and instrument panel to the right fuselage half and, before
glue curing on the cockpit elements, dry fit the left fuselage half and align
parts. Upon glue curing, I attached the seat, stick and rudder pedals. The inner
plates of the rear view windows were next attached, followed by the lower part
of the front air intake. The fuselage halves were then glued together, trapping
also the assembled engine in between.
Basic cockpit color was Hu226 Interior Green, with the instrument panel, gun
sight base and stick grip painted black. The raised instruments were dry brushed
with silver and some red and white knobs were “pinned” with like paints. The
head cushion was painted “brown leather” and seat belts were added from masking
tape. Cowling innards were painted zinc chromate.
The wings were next assembled and, after gluing the upper bay wall to the
fuselage, they were attached underneath, followed by the tail planes. I decided
to use the belly tank, which was assembled and attached in place, concluding
basic model assembly.
Overall fit, as expected, was of the “test fit three times before applying glue”
kind, with the majority of parts needing various degrees of trimming in order to
fit. This was expected from this kind of limited run kits of that era and, truth
be told, assembly proved easier than initially envisaged. After a few rounds of
filling and sanding, I blanked the engine and cockpit openings with wet tissue
and took the bird to the paint shop!
| COLORS & MARKINGS |
 I first
gave all undersides, including doors, a coat of Hu65 Light Blue, then masked it
off. For the topside foliage green, I chose Hu149 Dark Green, whereas for the
earth brown I chose Hu110 Wood. These shades were the closest (from the ones I
had available…) to what my perception of the RAAF foliage green and brown was,
so no shade accuracy is claimed whatsoever. A coat of Future prepared the bird
for decals.
I first
gave all undersides, including doors, a coat of Hu65 Light Blue, then masked it
off. For the topside foliage green, I chose Hu149 Dark Green, whereas for the
earth brown I chose Hu110 Wood. These shades were the closest (from the ones I
had available…) to what my perception of the RAAF foliage green and brown was,
so no shade accuracy is claimed whatsoever. A coat of Future prepared the bird
for decals.
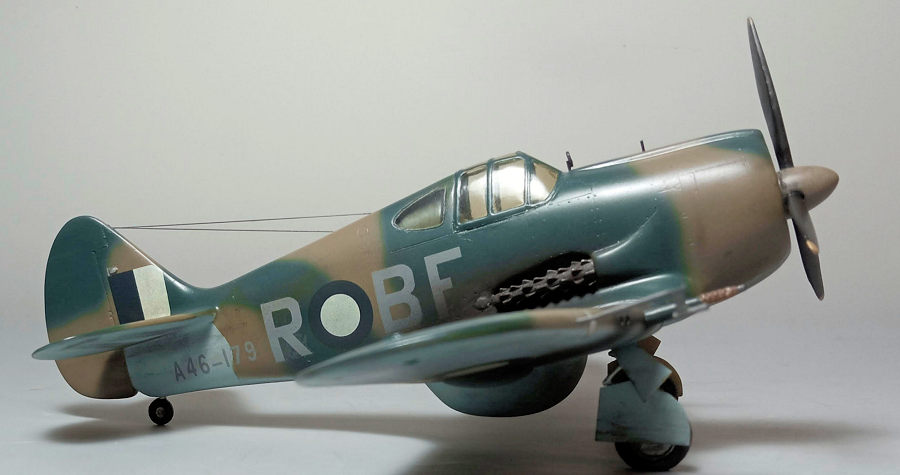
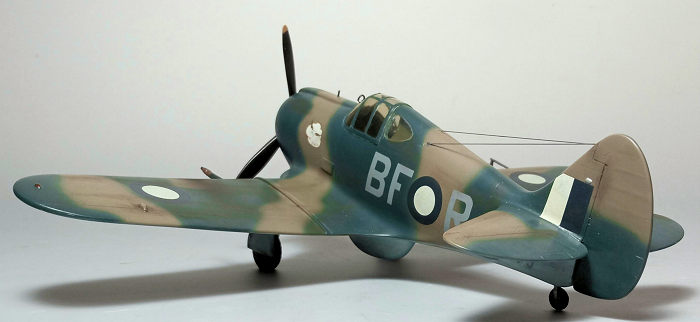
I used the kit decals, in order to represent 5 Sqn’s “BF-R”, #A46-179, named “Recce
Robin”, flown by Pilot Officer C. Rasmussen. The Superscale decals behaved very
well, adding a feeling of satisfaction after the challenging build. A coat of
Future sealed the decals.
| FINAL CONSTRUCTION |
The main landing gear legs were assembled and attached in
position, followed by the rear wheel/strut assembly, then the main wheels (I
chose the bulged ones, but lightly filed their sides, as the effect was
overdone) and finally , the doors. Landing gear legs and rims were painted
steel, oleos were painted chrome, tires were painted black and, finally, bays
and door innards were painted zinc chromate.
The prop was assembled and attached in position. It had dark brown spinner,
black blades and yellow tips, with some silver dry brushing applied to the
leading edges towards the tips area, to simulate wear. The two Hispano-suiza
cannons were attached in position. Their bodies were painted per the surrounding
camo, their covers brown leather and their tips gunmetal, with the latter color
used for the starboard located pitot.
 The
distinctive hedgehog style exhaust was painted testors Burned Metal and attached
(its placement is neither depicted nor mentioned at the instructions, but it’s
easy to figure out where it goes). Falsely assuming that its rear section would
be hollow, to my dismay, I cut-off the final angled tube and drilled-out the
opening, only to realize that I should have just left it as it was…nevertheless,
a suitably sized styrene piece was bent to shape and attached, somehow restoring
the exhaust’s original shape.
The
distinctive hedgehog style exhaust was painted testors Burned Metal and attached
(its placement is neither depicted nor mentioned at the instructions, but it’s
easy to figure out where it goes). Falsely assuming that its rear section would
be hollow, to my dismay, I cut-off the final angled tube and drilled-out the
opening, only to realize that I should have just left it as it was…nevertheless,
a suitably sized styrene piece was bent to shape and attached, somehow restoring
the exhaust’s original shape.
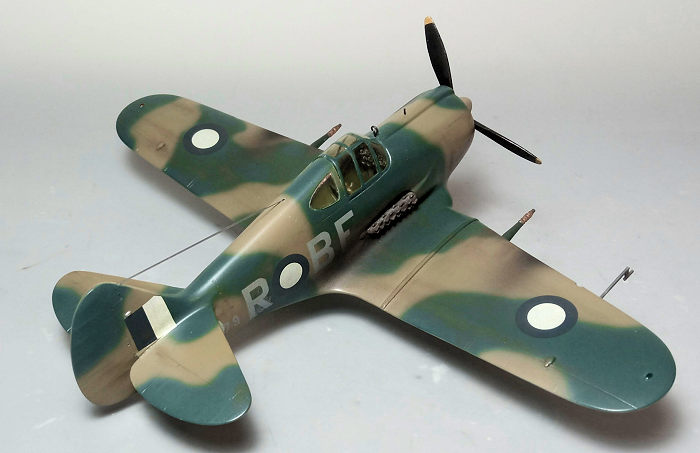
I decided to apply an amount of weathering, in order to represent the harsh
conditions this bird was operating in. I first gave the engine, landing gear
area and all undersides a black wash. Next I airbrushed some exhaust and gun
smokes towards the direction of the airflow (where I certainly overdid it,
especially with the gun smokes). Finally dark brown and black pastels were
applied at places where dirt or grime would reside, with a satin coat giving the
bird its final hue.
I decided to use the vac clear parts despite having yellowed over time. The
canopy had its quite well defined frames hand painted and attached, followed by
the rear view windows. Fit of the latter was average, with the gaps treated with
white glue. To keep my sanity I omitted using the vac wing mounted landing light
covers, but, instead, I filled the cutouts with white glue that dried
semi-transparently.
The fin-mounted white light was replicated by “pinning” a fine tip silver pen
onto the corresponding bulges, whereas the wingtip lights were represented by
tiny blobs of red and green clear paint. The aiming ring and bead were not
provided by the kit, so they were made from stretched sprue, painted black and
attached in the positions shown at net available pics. Two pieces of stretched
sprue were run from the fin towards two suitably drilled holes onto the fuselage
top to represent the aerial wire, before calling the Boomerang done!
| CONCLUSIONS |
Special Hobby came in 2008 with their quarter scale
Boomerangs, which, though still limited run in nature, are accurate and very
well detailed. If you want an excellent 1/48 Boomerang, the Special Hobby kit is
clearly the way to go.
This elderly LTD kit, apart from the short fuselage, offers a decent
representation of the Boomerang with acceptable level of detail. Despite its
very short run nature, it is buildable with some extra effort. The
transparencies will most likely have yellowed over time and this must be taken
into account. Scarce to find nowadays, this kit is reminiscent of the past
heroic modeling days. If you resist the temptation to keep it as a collectors
item and go on building it, a very nice Boomerang will emerge.
Happy Modeling!
Spiros Pendedekas
8 March 2024
Copyright ModelingMadness.com. All rights reserved. No reproduction in part or in whole without express permission from the editor.
If you would like your product reviewed fairly and fairly quickly, please contact the editor or see other details in the Note to Contributors.