Modelsvit 1/48 P-51H Mustang
| KIT #: | 4821 |
| PRICE: | $48.00 |
| DECALS: | Four options |
| REVIEWER: | Tom Cleaver |
| NOTES: | Short run with p.e. parts and rubber tires. |
| HISTORY |
 The original
Allison-powered Mustang was a lightweight fighter with excellent handling
capability. North American was aware of this during the aircraft’s original
wartime development, and put considerable effort into trying to come up with a
lightweight Mustang that gave the maneuverability of the earlier models with the
altitude performance and range of the later models. The XP-51F and XP-51G were
the result. Using the same Merlin V-1650-7 engine as the P-51D, the loaded
weight of the airplane was reduced to 9,060 pounds - as compared to a loaded
weight of 10,100 pounds for the P-51D. This was accomplished through
simplification of the structure, the deletion of some equipment, and the use of
new materials such as plastics, while aerodynamics were improved with a longer
bubble canopy. The net result was a savings of 1,100 pounds and a top speed of
466 mph. The XP-51G was fitted with the Merlin 145 engine and achieved a top of
472 mph.
The original
Allison-powered Mustang was a lightweight fighter with excellent handling
capability. North American was aware of this during the aircraft’s original
wartime development, and put considerable effort into trying to come up with a
lightweight Mustang that gave the maneuverability of the earlier models with the
altitude performance and range of the later models. The XP-51F and XP-51G were
the result. Using the same Merlin V-1650-7 engine as the P-51D, the loaded
weight of the airplane was reduced to 9,060 pounds - as compared to a loaded
weight of 10,100 pounds for the P-51D. This was accomplished through
simplification of the structure, the deletion of some equipment, and the use of
new materials such as plastics, while aerodynamics were improved with a longer
bubble canopy. The net result was a savings of 1,100 pounds and a top speed of
466 mph. The XP-51G was fitted with the Merlin 145 engine and achieved a top of
472 mph.
Development of the lightweight Mustang resulted in the P-51H, which entered production towards the end of 1944. Powered by a Packard-Merlin V-1650-9 delivering a maximum 2,218 horsepower (as opposed to the maximum 1,695 horsepower of the P-51D), the maximum range of 1,000 miles on internal fuel could be extended to 1,500 miles with two 110-gallon drop tanks. The P-51H had a shorter “bubble” canopy than the XP-51F/G, and a full 6-gun armament, the result was that the overload weight of 10,500 pounds was only a few hundred less than the P-51D. Nevertheless, it was the fastest production P-51, with a top speed of 487 mph. 1,445 P-51Hs were ordered in January 1945, but the end of the war in August brought production to a halt with a total of 555 aircraft.
 The P-51H
equipped a few regular USAAF units in the immediate postwar years, including the
Mustang-phobic 56th Fighter
The P-51H
equipped a few regular USAAF units in the immediate postwar years, including the
Mustang-phobic 56th Fighter
Group on their arrival back at Selfridge Field and during a deployment to Alaska, before it along with the P-47N, equipped the postwar Air National Guard when jets replaced propeller- driven fighters in the U.S. Air Force. The V-1650-9 Merlin was temperamental and units equipped with the P-51H seldom experienced more than 50% availability. This more than anything else was responsible for the P-51H not being called to active duty during the Korean War.
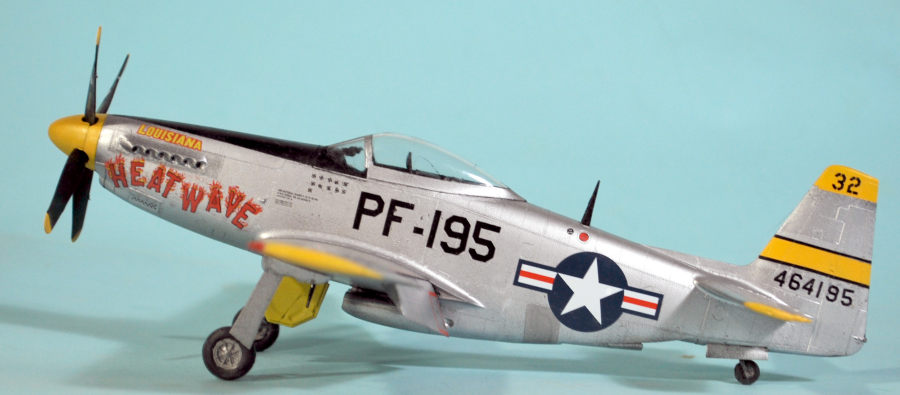
Claude J. Crenshaw, a 7-victory ace with the 359th Fighter Group in World War II was a member of the 14th Fighter Group from 1947-49, which had re-equipped with the P-51H after being inactivated in Italy at the end of World War II. Crenshaw gave his P-51H the same name as his P-51D, “Louisiana Heatwave” and it also carried his World War II score of 7 aerial victories and four “ground kills.”
| THE KIT |
 In 1999, Classic
Airframes released a P-51H that was one of the more difficult kits from a
company famous for “difficult kits.” It took doing two for me to get one that
looked like the prototype. The other was released by HiPM, a company whose
products were it finally resulted in them going out of business. The only thing
I can recall of that kit was that it vaguely resembled a P-51H, and was one of
the few plastic kits I have ever built that not only was thrown against a wall
but was stomped into its component atoms.
In 1999, Classic
Airframes released a P-51H that was one of the more difficult kits from a
company famous for “difficult kits.” It took doing two for me to get one that
looked like the prototype. The other was released by HiPM, a company whose
products were it finally resulted in them going out of business. The only thing
I can recall of that kit was that it vaguely resembled a P-51H, and was one of
the few plastic kits I have ever built that not only was thrown against a wall
but was stomped into its component atoms.
Modelsvit, a Ukrainian producer of high-quality short-run kits, released their P-51H in January 2020. This kit effectively replaces all other kits of this airplane. The kit parts have delicate surface detail that demonstrateds Modelsvit paid attention to what Eduard did with their P-51D. This second release, which came out earlier this year, is the same kit with different markings, for two postwar units in the period when the USAAF became the independent USAF, from the 56th and 57th Fighter Groups when they were part of the Alaska Air Command. There is also a F-51H from the New York ANG in 1953 and an F-51H that was a target tug used by the Pennsylvania ANG in 1954, painted red.
| CONSTRUCTION |
The most important thing I to remember is this is a high-end LIMITED RUN KIT. It does look like the Eduard kit when assembled in terms of nice detail, but if you think it’s the Eduard kit while working on it, you will be sorely disappointed and unsuccessful. Remember the rule: test fit three times before gluing once. If you do, and take care in assembly, you too can have a model that has minimum filler on it - I only had to apply some CA glue to the centerline seam in the radiator scoop.
When assembling the
cockpit, the major sub-assembly, I first attached all the small parts to the
larger parts (sidewalls and floor), then painted everything still on the sprue.
Modelsvit wants you to then assemble the cockpit completely and glue it to a
fuselage half, which I did with this kit. As designed, the seat and armor
backing will sit too low. I attached the seat to the armor backing and then
attached that little sub-assembly to the rear bulkhead about 1/16 inc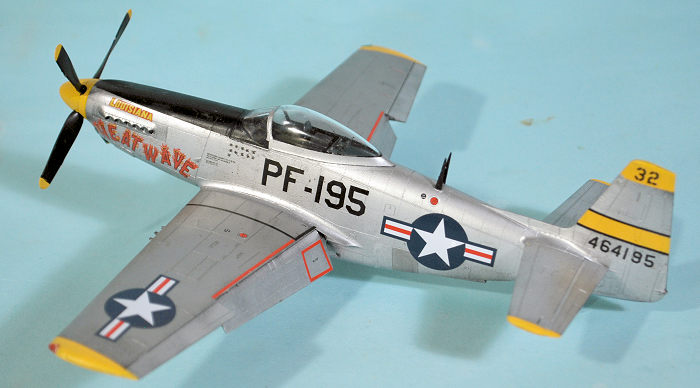 h
higher than the attachment points would have it. This put it right, according to
photos. Everything came together with perfect fit. I fitted the radioator
exhaust and rtail wheel well in the right fuselage half then glued the fuselage
together/
h
higher than the attachment points would have it. This put it right, according to
photos. Everything came together with perfect fit. I fitted the radioator
exhaust and rtail wheel well in the right fuselage half then glued the fuselage
together/
The other major sub-assembly is the wing. I scraped down the walls of the gear well so they fit inside the wing. Getting the wing sub-assembly to fit properly will lead to you being able to attach it to the fuselage without filler at the upper wing-fuselage joint.
The horizontal stabilizers fit well – be sure to check alignment to be certain they are level. The elevators as designed fit in the neutral position. The antennas are butt-fitted and that’s not good. I dug out a little bit at their attachment points to give them a little “snuggle space” and glued them in. Be careful, they’re going to be easy to knock off whatever you do.
The canopy is thick but clear and offers both closed and open options. I did the open option on the first kit, so decided to do it closed this time. I “futured” the canopy, which got rid of the slight distortion. I needed to sand back the front edge of the canooy so the windscreen would fit properly. Test fit three times before gluing once.
| COLORS & MARKINGS |
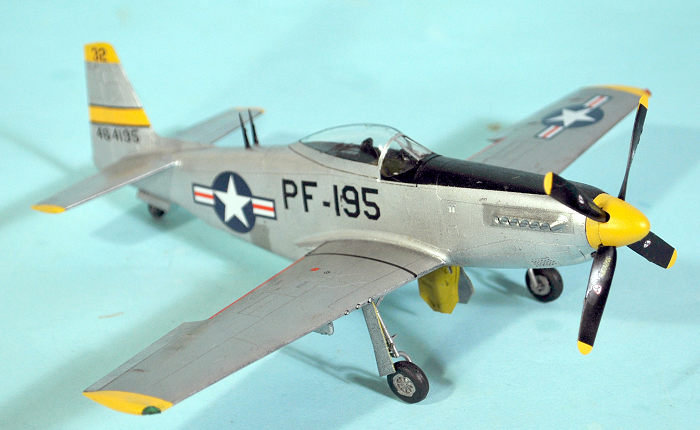
I painted the yellow
wing and stabilizer tips and the rudder tip and strip, then masked them off. I
painted the airframe with Tamiya XF-1 Flat Black, after which I masked off the
anti-glare on the upper nose.. The NMF was done with Vallejo metallics. I used
Dull Aluminum for the wings which were painted with aluminum lacquer. I used
Semi-Matte Aluminum for the wing fuel tank are on the lower wing surface. The
rest of the airfr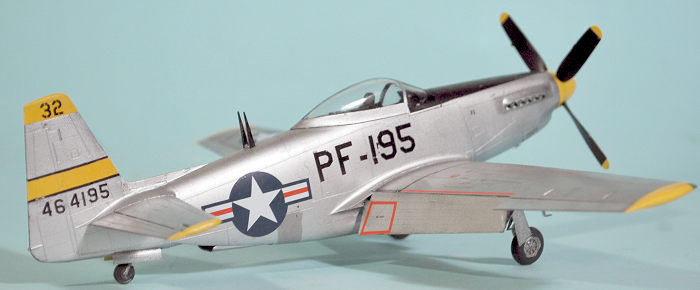 ame
was painted with Aluminum. I did the panels around the exhausts and the area of
the radiator with a mixture of Duraluminum and Aluminum.
ame
was painted with Aluminum. I did the panels around the exhausts and the area of
the radiator with a mixture of Duraluminum and Aluminum.
I used the kit decals for the insignia and the serial number, which I pieced together from the kit sheet. I also used the kit decals for the wing walk and no-step and stencils. I used the “Louisiana Heatwave” decals from the Eduard P-51D-5 kit. I had to slice the letters individually so they could be posed differently than they were on the P-51D. I did the buzz numbers using a letters-and-numbers sheet from Squadron.
I assembled and attached the main gear legs. These are designed to fit with the proper forward slant of the gear legs when they are positioned properly. I then attached the prop and called things done.
| CONCLUSIONS |
Once finished, if you’ve taken your time with assembly and painting, you can sit this model next to an Eduard P-51D and people would think the two kits came from the same place. Just remember that they didn’t, and that you’re dealing with a limited run kit, no matter how high-end it is, and all will be well.
This is still one of the nicest Mustang kits I’ve done. Recommended for those Mustang Fan(atics)with experience in assembling limited-run kits. Take care and you will have a great model to add to your Mustang collection.
Tom
Cleaver 14
December 2023 Copyright ModelingMadness.com. All rights reserved. No
reproduction in part or in whole without express permission from the editor.
Review Kit Courtesy of Modelsvit If you would like your product reviewed fairly and fairly quickly, please
contact
the editor or see other details in the
Note to
Contributors.