|
KIT: |
Airfix 1/24 Hawker Hurricane |
|
KIT # |
14002 |
|
PRICE: |
$54.98 MSRP |
|
DECALS: |
Two options: 85 & 87 Sq RAF |
|
REVIEWER: |
Julien Dixon |
|
NOTES: |
A big kit but worth the effort. |
|
HISTORY |
AThere has been much written concerning the Hurricane and I will not recite that here.
The main items is that the Hurricane was the RAF’s first monoplane fighter aircraft. This came about following the design work of the famous Mr Camm at Hawker and by Rolls Royce in privately developing the Merlin Engine.
The kit really features the Hurricane Mk I (Late Production) Aircraft. Following reports from Germany on the Me-109 UK aircraft manufactures were urged to accelerate the improvement of their fighter designs. Hawker concentrated it attention on re-designing the Hurricanes main wing; introducing both all metal skinning and localized strengthening (although fabric covering of the control surfaces and rear fuselage was to be retained).
 More significant than this though was the
introduction of variable-pitch propellers. Immediately available was the
three bladed de Havilland two pitch Hydromatic unit (a licence built
Hamilton Standard unit), this brought about improved take off
performance. Later the Rotol company started to deliver its new constant
speed units also. To cater for both the DH and Rotol units Rolls Royce
introduced the Merlin III with a universal prop shaft. The rotol unit was
found to be more beneficial as not only did it increase take off
performance (as did the DH unit), but a much improved climb performance
was observed. In addition the engines speed was not notably increased,
and overspeeding in a dive was eliminated.
More significant than this though was the
introduction of variable-pitch propellers. Immediately available was the
three bladed de Havilland two pitch Hydromatic unit (a licence built
Hamilton Standard unit), this brought about improved take off
performance. Later the Rotol company started to deliver its new constant
speed units also. To cater for both the DH and Rotol units Rolls Royce
introduced the Merlin III with a universal prop shaft. The rotol unit was
found to be more beneficial as not only did it increase take off
performance (as did the DH unit), but a much improved climb performance
was observed. In addition the engines speed was not notably increased,
and overspeeding in a dive was eliminated.
By the time of the Battle of Britain almost all Hurricanes were fitted with three bladed propellers, with the Spitifre-type Rotol spinner on many aircraft. These upgraded aircraft also featured, An all metal wing, Landing lights and eight 0.303 inch machine guns in the wings, a reflector gunsight, Standardised radio aerial, ventral underfin, a slightly enlarged rudder, and Rolls Royce ejector exhausts fitted to the engine.
One final point to note is the the Hurricane occupied a vital place in Britains history. No one can deny the Spitfires excellence, yet the Hurricane was the mainstay of the RAF’s fighter force in the Battle of Britain. The Hurricane then went on to serve in all other theatres of War, arriving in some cases upto two years ahead of the Spitfire. It is even argued by some that the Hurricane had destroyed more aircraft in air-to-air combat than any other allied fighter. I do not know the figures for this my self so will leave it up to the reader to decide.
|
THE KIT |
 Well it comes in a large box, which you can not
wait to open. You get one large bag with all the parts (many of them
loose), a decal sheet with fills the bottom of the box, and 10 page A-4
sized instruction booklet which is very comprehensive.
Well it comes in a large box, which you can not
wait to open. You get one large bag with all the parts (many of them
loose), a decal sheet with fills the bottom of the box, and 10 page A-4
sized instruction booklet which is very comprehensive.
All the parts are moulded in a light grey plastic which is fairly hard. The main wing consists of one large underwing and the 2 tops split by the fuselage. A separate sprue of clear items includes the front windscreen (armored type), the main canopy, instruments for the instrument panel. the reflector gunsight, navigation lights, and the front landing lights. Three rubber tyres are also included. For those who do not like to use these there are no plastic alternatives in the kit.
After checking all the parts it was evident that I was missing a few, I do wish Airfix would use regular sprues like other kit manufactures. However a quick phone call to Airfix had the re-placement parts to me with 10 days.
|
CONSTRUCTION |
When you first start construction you have to make the choice of whether you fit Rolls Royce engine into the kit or not? I chose to do this (and it would come back to bite me later on)
The engine contains approx 30 parts and makes into a nice representation of the Merlin III used in the Hurricane. A Rotol type propeller with a Spitfire type shirt spinner is the only option for the kit.
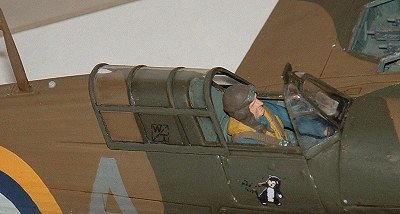 Then it’s on to the cockpit. As the main fuselage
was not metal the pilots area is of tubular construction, which sits
inside. This is very well represented in the kit. It is quite fiddly to
get this frame together, and I would recommend a quick setting glue. A
well moulded pilot figure is included if you wish a figure in the
cockpit.
Then it’s on to the cockpit. As the main fuselage
was not metal the pilots area is of tubular construction, which sits
inside. This is very well represented in the kit. It is quite fiddly to
get this frame together, and I would recommend a quick setting glue. A
well moulded pilot figure is included if you wish a figure in the
cockpit.
After the engine and cockpit were completed these two are joined together by the main firewall or engine bulkhead, the engine mounts to the front and the cockpit to the rear. This whole assembly is then glued into the main fuselage. In addition it is also time to build and install the rudder. This is designed to be moveable if you should wish. Also at this time the tail wheel assembly is glued in.
Once all of these are in and dry it is time to assemble the main fuselage, it should be remembered at this time to include a spacer bar to keep the bottom of the fuselage the right size to fit the wing. The next step is to build and install the tailplane assemblies. Again here the control surfaces can again be made to move if this is desired.
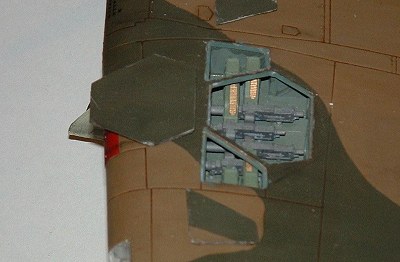 Then its on to the construction of the main wing
(the heart of the new Hurricane). First it is necessary to construct the
wing boxes, which will house the browning 0.303 inch machine guns (four
to each wing). Four fairly reasonable guns, ammunition boxes, and feed
trays are included for each side. These gun boxes are then glued to the
underside of the top wings. The next step is then the construction of the
main landing gear well. This is then glued to the bottom wing. Once these
two steps are completed the wings can be joined together. Now some will
glue the bottom wing to the fuselage and then attach the top wings, and
some will complete the whole assembly and then glue to the fuselage.
After a test fit I decided to join the wings together and them offer them
up to the fuselage. This went well with no fit problems.
Then its on to the construction of the main wing
(the heart of the new Hurricane). First it is necessary to construct the
wing boxes, which will house the browning 0.303 inch machine guns (four
to each wing). Four fairly reasonable guns, ammunition boxes, and feed
trays are included for each side. These gun boxes are then glued to the
underside of the top wings. The next step is then the construction of the
main landing gear well. This is then glued to the bottom wing. Once these
two steps are completed the wings can be joined together. Now some will
glue the bottom wing to the fuselage and then attach the top wings, and
some will complete the whole assembly and then glue to the fuselage.
After a test fit I decided to join the wings together and them offer them
up to the fuselage. This went well with no fit problems.
After this is done, the underside radiator was fitted, and the main landing gear.
It was then at this time that I went to fit the engine covers onto the aircraft prior to painting. The instructions would have you think these just fit on and can come of to display the engine. Well they did not fit! ARGHHHHHHH!
I then had to file the engine block down to get the top cowling to fit, now I don’t know if this was my construction? Or the kit? Either way it was frustrating. In then end all of the covers ended up having to be glued on thus covering up the Merlin engine I had spent so much time making and painting. A tip here it saves a lot of time bypassing all the engine steps if you wish to build the aircraft with the cowls/covers closed.
|
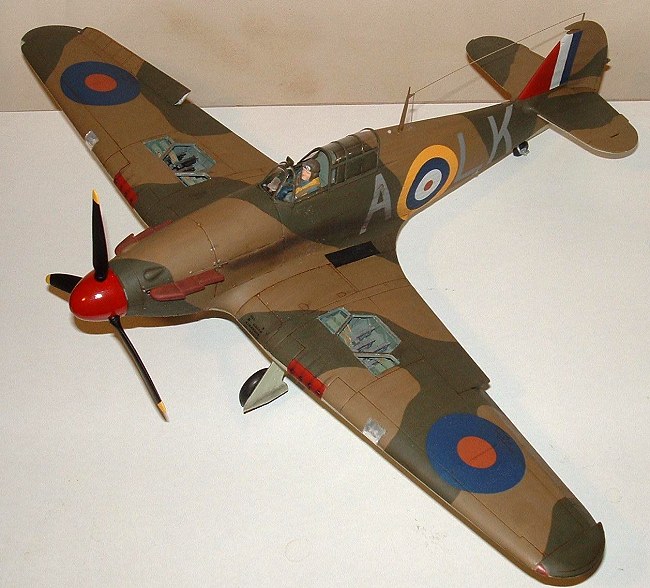
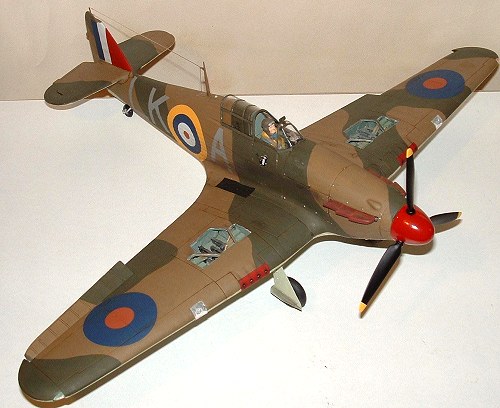
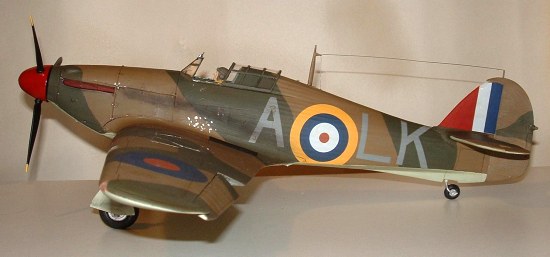
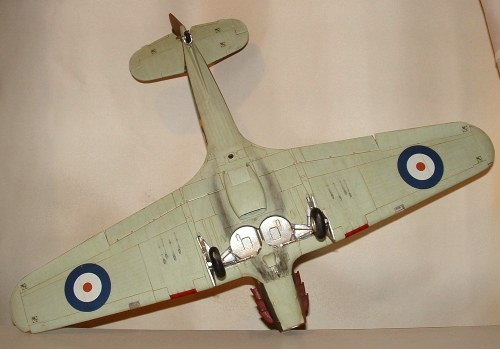
COLORS & MARKINGS |
The paint scheme was to be the standard RAF scheme of Green / Brown for the topsides, there is then some debate concerning the exact colour of the underside. The RAF went from white, to half black, back to white and to Sky Type S all in a very short period of time, and it was not unknown for aircraft in the same squadron to have differing undersides. The kit instructions give you no help on this so I chose to do mine Hurricane Sky undersides as I think it looks better than straight white.
 All the paints used were from the Xtracolor range
from Hannants. These were brush painted (I know people think I am crazy
brush painting these large kits but I am not airbrush friendly!)
All the paints used were from the Xtracolor range
from Hannants. These were brush painted (I know people think I am crazy
brush painting these large kits but I am not airbrush friendly!)
I was at this time awaiting a set of the excellent Techmod decals a couple of Polish Hurricanes from the famous 303 Squadron. However these seemed a long way off, so after careful examination I decided to use the kit decals for the 87 Squadron Aircraft. This does involve you having to paint the front of the fin Red as this is not supplied in the decals.
The kit was then given a coat of Klear (or Future) to ensure that the decals would go down with no problems. While the decals were going on I noticed that they were very slightly off register with a white line on one side. This was fixed by some very careful hand painting and I am pleased to say that you can not see this on the finished kit. Once on the decals were given a coat of Klear (future). When this was dry a coat of Humbrol Matt varnish was applied.
To finish of the kit I decided that some weathering was in order. Now I do not normally weather my aircraft as I prefer them in the “clean” state. However it is very unlikely a Battle of Britain aircraft would be totally clean. For this I used pastels, I have only just started using these and I am very pleased with the results. I did however keep this to a minimum. Oil stains from the engine (all Merlins leaked oil), the exhaust staining on the sides, and some gun residue. I know the gunports were covered when the gus were re-armed however I left these open on the kit.
|
CONCLUSIONS |
I have seen all of the main four Airfix 1/24 scale kits (Hurricane, Spitfire, Me-109 & Mustang), I would say that this is the best kit out of the four.
Overall in my view the kit builds up into an impressive representation of this famous Aircraft. If you want to avoid the problems with the Airfix decals then I would recommend the Techmod decal sheet. I now have my copy and it is excellent, so much so that I am now looking for another Hurricane kit so I can use them.
I would recommend this kit to anyone with at least a moderate level modeling skills. However you had better plan somewhere to display it as it is large.
August 2004
|
REFERENCES |
Airfix instruction booklet.
Wings Of Fame Vol 2
If you would like your product reviewed fairly and quickly by a site that has over 250,000 visitors a month, please contact me or see other details in the Note to Contributors.