| KIT #: | AZ272 |
| PRICE: | £15 |
| DECALS: | One option |
| REVIEWER: | Peter Chiu |
| NOTES: |
| HISTORY |
(from Wikipedia)
The Seafang was a Spiteful redesigned for Royal Navy carrier use, with the addition of an arrester hook, a contra-rotating propeller to eliminate engine torque effects, and power folding outer wing panels.
 The first Seafang flew in
1946; it was the first interim production Mark 31 VG471. Although 150 of the
interim variant were ordered, only nine were completed before the order was
cancelled as the urgency of an interim type was removed due to the end of the
war.
The first Seafang flew in
1946; it was the first interim production Mark 31 VG471. Although 150 of the
interim variant were ordered, only nine were completed before the order was
cancelled as the urgency of an interim type was removed due to the end of the
war.
The first prototype definitive Mark 32 VB895 was first flown in June 1946. It was powered by a Griffon 89 engine rated at 2,350 hp (1,752 kW) driving two three-bladed contra-rotating propellers. In August 1946, VB895 was demonstrated to the Royal Netherlands Navy at Valkenburg. The same aircraft was flown by noted test pilot Mike Lithgow in May 1947, during deck landing trials on HMS Illustrious. Compared to the Seafire F.47, its performance advantage was not deemed to be enough to disrupt series production of new navalised Meteor and Vampire jet fighters. Also, the Seafang's low-speed handling characteristics were not as good as hoped, and the contemporary Hawker Sea Fury was preferred as a fleet fighter.
In total 18 Seafangs were built before the project was cancelled.
| THE KIT |
When I first returned to model kit making after nearly 30 years, I had no idea there were such things as short run kits, photo etch or all the accessories now available. Only remembering the brands I had bought then (Airfix, matchbox el al) I was pleasantly surprised to find numerous brands I’d never heard of producing a wide variety of subjects many of which I never thought would be available.
 One such kit was the 1/72
scale Seafang from AZ model. Thinking it would make an interesting addition to
Spitfires I have built I ordered it from an online retailer. On opening the box
I was surprised by the quality of the mouldings. The parts had finely engraved
panel lines and rivets, the finish of the plastic had a slight scuffed
appearance. It being a short run kit there were no locating pins and many of the
parts did not have positive attaching points to the rest of the kit. This was
particularly so for the rear stabilizer and undercarriage.
One such kit was the 1/72
scale Seafang from AZ model. Thinking it would make an interesting addition to
Spitfires I have built I ordered it from an online retailer. On opening the box
I was surprised by the quality of the mouldings. The parts had finely engraved
panel lines and rivets, the finish of the plastic had a slight scuffed
appearance. It being a short run kit there were no locating pins and many of the
parts did not have positive attaching points to the rest of the kit. This was
particularly so for the rear stabilizer and undercarriage.
Instructions came in a small sheet of A5 sized paper in b/w. It has a sprue guide showing the part numbers as these were printed on the sprues plus blanks notifying you which parts were not needed for this kit. Instructions were relatively straight forward consisting of 11 steps to complete the build.
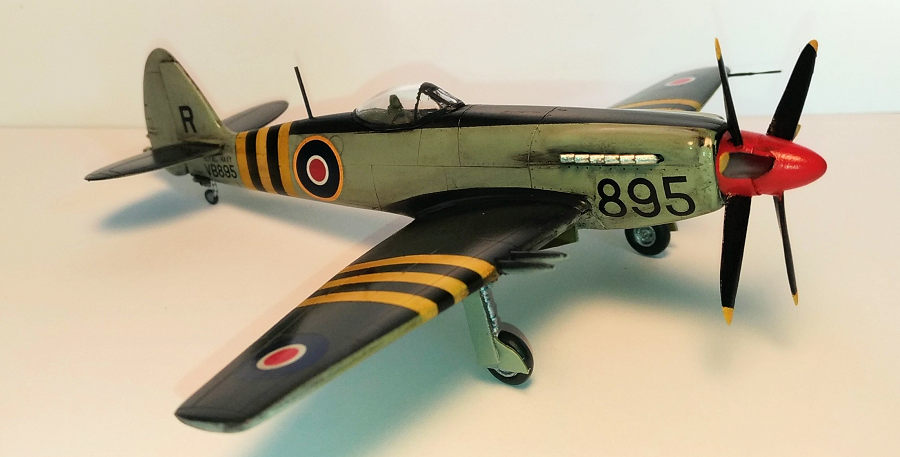
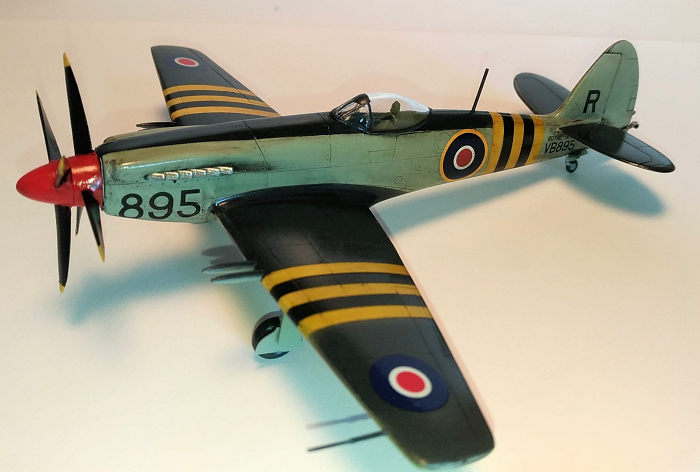
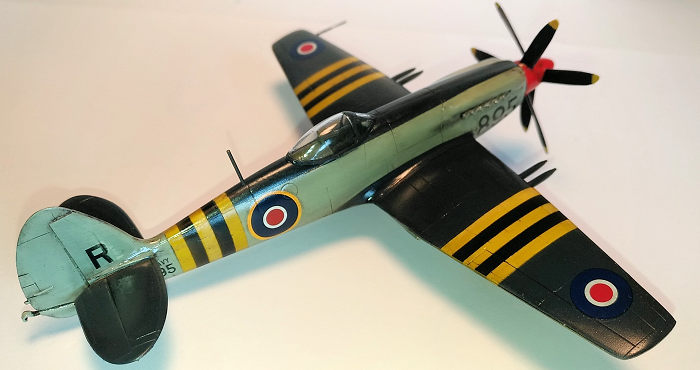
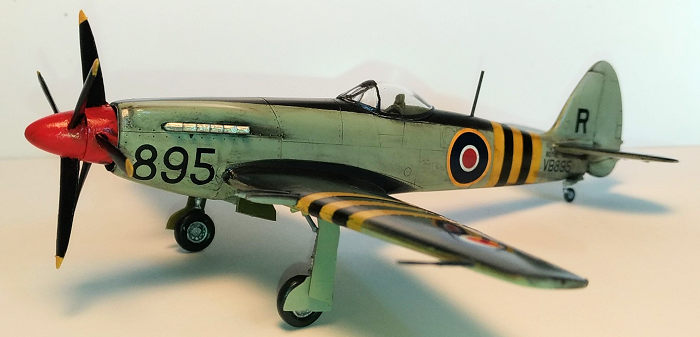
The paint scheme on the back of the box called for Dark Sea Grey matt and on the top with Matt Sky (Type s) on the underside, interior green for the cockpit and undercarriage bays. No specific brand of paint is identified. Decals were a bit basic, roundels and fin flash with marking for FAA squadron VB895. The box claims this is a ‘super decal sheet’. If this is a super sheet I would hate to see their regular ones.
| CONSTRUCTION |
I purchased this kit in 2014 and made several attempts at building it over the intervening years. I started the cockpit at least 3 times but the fit of the parts was at best approximate to the dimensions of the fuselage and the kit sat on the shelf of doom.
It was during the 2nd/3rd lockdown in UK that I finally resolved to finish the kit. Starting again with the cockpit I sprayed it with Vallejo model air interior green. Dry brushed the cockpit with Vallejo aluminium and added some seat belt from Tamiya tape.
 The fuselage halves were
then glued together, the lack of location pins did not make too much of a
difference to aligning the fuselage halves and they went together without too
many problems. I used sanding sticks and fine sandpaper to smooth out the seam
lines.
The fuselage halves were
then glued together, the lack of location pins did not make too much of a
difference to aligning the fuselage halves and they went together without too
many problems. I used sanding sticks and fine sandpaper to smooth out the seam
lines.
The wings consisted of a full width lower half and two upper parts, the wheel bays were a separate part. They didn’t fit exactly, and it took some careful positioning to get them setup. The wing halves went together, and the wing assembly was fixed to the fuselage. There were gaps on the underside where the wing met the fuselage that required some perfect plastic putty and smoothing out with cotton buds. Some filler was also required for the upper wing / fuselage joint.
The rear stabilizers were a butt joint that required careful positioning so that they were aligned in unison. I used super glue to attach them as this set much more quickly than regular glue.
The contra-rotating propellers came in 2 parts to form the spinner / propeller unit. They were not particularly well moulded with seam lines and they did not form a very smooth propeller spinner. I had to sand the two part spinner to get a reasonable finish. The canopy was masked with Tamiya flexible tape in preparation for the painting.
| COLORS & MARKINGS |
I first sprayed Vallejo grey primer over the kit in readiness for the painting. I then sprayed the undercarriage bays interior green along with the undercarriage. The oleos were sprayed aluminium. I generally wet tissue paper and stuff it into the undercarriage bays to prevent overspray.
I intended to do what if scheme for this kit. Historically the Seafang never went beyond a several prototypes. In my what if scheme it would have been in service with the Fleet Air Amr during the Suez Crisis.I used a scheme I saw offered on Trumpeters 1/48 Seafang. When I was researching this kit did I realise AZ models also offered a What If scheme for the Seafang for FAA and Spanish Airforce.
I sprayed yellow bands around the wings and fuselage, then masked that off with thin Tamiya flexible tape, then sprayed the black bands, then masked that off aswell.
Then the underside of the kit was sprayed using Vallejo Sky Type S. Then following images of the Trumpeter kit I masked off the fuselage and sprayed Vallejo Extra Dark Sea Grey. The canopy was also sprayed with this colour.
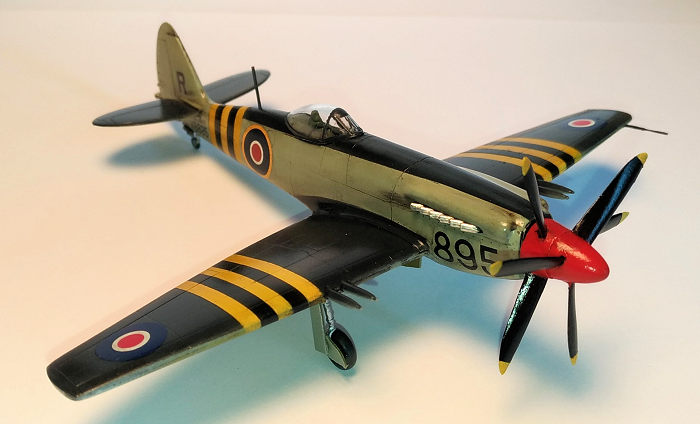 The propeller tips were
spayed yellow then masked off. I then sprayed the propellers black before they
too were masked off. I then sprayed the spinner Vallejo red. Once dry I removed
all the masking and attached the propeller to the kit.
The propeller tips were
spayed yellow then masked off. I then sprayed the propellers black before they
too were masked off. I then sprayed the spinner Vallejo red. Once dry I removed
all the masking and attached the propeller to the kit.
The undercarriage was then attached, as the instructions were a bit vague I found some images on google and used them as a guide to attaching the various parts, again I used superglue as it would set quicker.
On removing the masking, it was satisfying to see the masking had working well with very little touch up required.
I sprayed a coat of Alclad II acrylic gloss before applying the decals from the kit. They decals were fairly sparse so I added some from my spares box for the lettering on the rudder. I used Micro Set /Sol and they went down without any problem. I then applied Ultimate Weathering products Dark Dirt wash. I applied liberally over the kit, waited 30 mins before wiping off with cotton buds. I then spayed Alclad gloss again to finish the kit.
Finally, I had to scratch build the radio antenna and the pitot tube on the starboard wing as these were not provided as part of the kit. I was able to make these out of parts from the spares box. These too were attached with super glue.
| CONCLUSIONS |
After several false starts I finally managed to complete the kit. I was generally very pleased the result considering I’ve not had much experience with short run kits. I was happy with the paint and markings as they came out better than I had expected. I would recommend this kit if you are after something a bit more obscure though it would be advisable to have some prior experience of short run kits and the challenge they provide.
28 March 2024 Copyright ModelingMadness.com. All rights reserved. No
reproduction in part or in whole without express permission.
mailto:svanaken61@gmail.comIf you would like your product reviewed fairly and fairly quickly, please
contact
the editor or see other details in the
Note to
Contributors.