Kotare 1/32 Spitfire Ia
| KIT #: | K32001 |
| PRICE: | $109.00 |
| DECALS: | Three options |
| REVIEWER: | Otis Goodin |
| NOTES: | Great kit, very enjoyable build! |
| HISTORY |
The Spitfire story begins in the early 1930s when Supermarine began designing an aircraft to meet Air Ministry’s desire for a modern fighter capable of a flying speed of 250 mph. Initial designs were disappointing until the Reginald Mitchell-led design team began new designs based on their Schneider Trophy-winning seaplanes as a starting point. A satisfactory design was finally achieved in 1934, and by 1936 a final prototype was produced. Numerous improvements continued to be incorporated until on June 3, 1936, the Air Ministry placed an order for 310 Spitfires. Despite this, problems continued and the first production Spitfire, K9787, was not completed until mid-1938. Although Vickers and Supermarine were the primary contractors for the Spitfire, eventually over 150 subcontractors were involved in its production.
Mid-production Spitfires were produced between September 1939 and April 1940, incorporating improvements introduced late in the early series such as gun heating, the Rolls Royce Merlin III engine, 3-blade dual pitched propeller, a taller canopy hood for improved visibility, and an armored windscreen glass. Many of these aircraft participated in the Battle of Britain, supplemented by Late production models beginning in May 1940.
 Spitfire Mk.Ia color schemes were quite varied. The
interior areas were primed in light gray before being painted aluminum, except
for the cockpit between frames 8 and 11. The cockpit area was painted in what
was known as Supermarine Green or “apple green” with a few selected parts
painted Grey Green. The instrument panel was Black (“Night”), and various
components were a combination of green, aluminum and black. The exterior colors
were various shades of Dark Earth and Dark Green, applied in one of two
patterns, A or B, which were mirror images of each other. The undersides were
initially finished in aluminum until April 1939 when the port side was painted
Night, and the starboard side White, along with the wheel struts and hubs also
painted Night and White depending on which side they were located. From February
1940 until June 1940 the undersides were painted White, and then they were
painted various shades of “Sky” which ranged from Duck Egg blue to bluish green
to green. Commonly known as Sky type “S” for “smooth,” the color was often
applied in the field by hand and individual mixes varied according to supplies
available. The color was not uniformly produced or applied. The wheel wells and
struts were usually left in their original white and black.
Spitfire Mk.Ia color schemes were quite varied. The
interior areas were primed in light gray before being painted aluminum, except
for the cockpit between frames 8 and 11. The cockpit area was painted in what
was known as Supermarine Green or “apple green” with a few selected parts
painted Grey Green. The instrument panel was Black (“Night”), and various
components were a combination of green, aluminum and black. The exterior colors
were various shades of Dark Earth and Dark Green, applied in one of two
patterns, A or B, which were mirror images of each other. The undersides were
initially finished in aluminum until April 1939 when the port side was painted
Night, and the starboard side White, along with the wheel struts and hubs also
painted Night and White depending on which side they were located. From February
1940 until June 1940 the undersides were painted White, and then they were
painted various shades of “Sky” which ranged from Duck Egg blue to bluish green
to green. Commonly known as Sky type “S” for “smooth,” the color was often
applied in the field by hand and individual mixes varied according to supplies
available. The color was not uniformly produced or applied. The wheel wells and
struts were usually left in their original white and black.
The Spitfire was produced throughout WWII and the models continued to evolve all the way to the Mk 24, and numerous subvariants. Throughout its history and beyond, the Spitfire has been considered one of the most successful and, many consider, the most beautiful airplane ever made. It’s hard to argue that point.
| THE KIT |
With the demise of Wingnut Wings in 2020, the design
crew was deemed “redundant” and let go. However, it wasn’t long before many of
this talented bunch were picked up and, together with founder and proprietor
Mark Robson, formed a new model company, Kotare. Also based in New Zealand,
Kotare began looking for aircraft to model. The goal was very similar to Wingnut
Wings: to make high quality, detailed and accurate kits that would be as simple
to build as possible, no matter the modeler’s skill level. Under the guidance of Product Manager Richard Alexander, Kotare decided their first kit should be the
Spitfire Mk.Ia mid-production series. Apparently, this series had not been
produced in 1/32 scale in several decades, and certainly not in a form that
would measure up to modern standards. So, with that in mind, Kotare released
this kit in late 2022. It has since sold out, although you can probably find
them on eBay or through Faceboo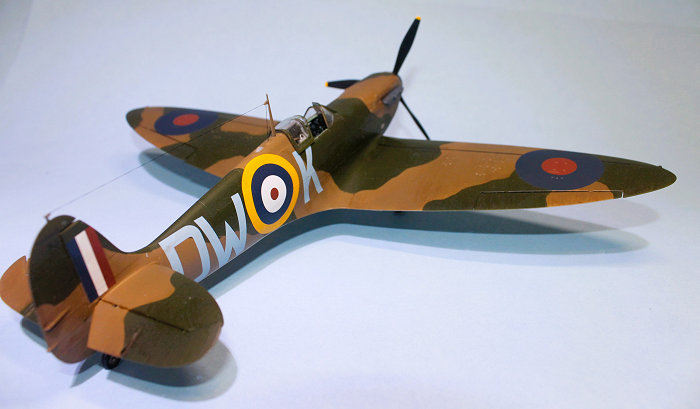 k sites, etc. Kotare has also released a
limited-edition version of it honoring British pilot Brian Lane, and an early
production version. They have also recently announced that their next kit will
be a 1/32 Messerschmitt Bf 109 K.
k sites, etc. Kotare has also released a
limited-edition version of it honoring British pilot Brian Lane, and an early
production version. They have also recently announced that their next kit will
be a 1/32 Messerschmitt Bf 109 K.
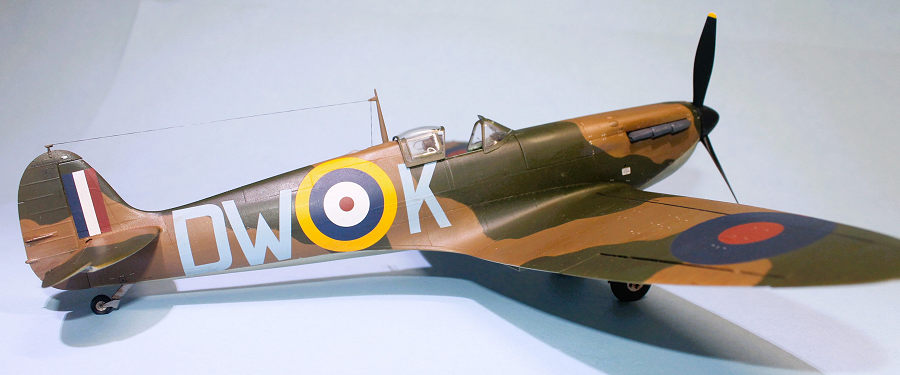
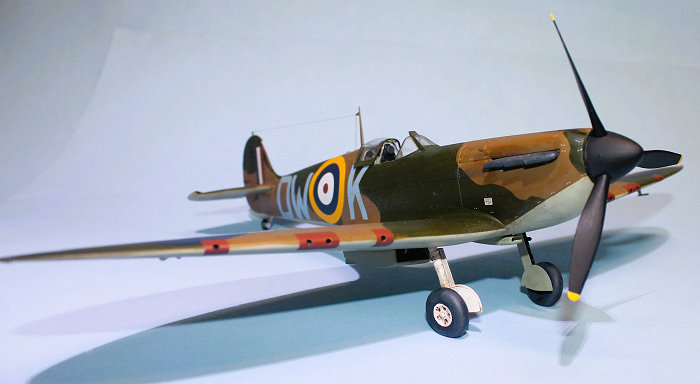
The Kotare Mid-Production kit consists of 117 parts, finely molded in light gray plastic except for the C sprue of clear parts for the canopy and lights. The production quality is excellent, reminiscent of Wingnut Wings kits. Parts are provided to enable one to build one of three aircraft (1) Spitfire Mk.Ia N3180 KL-B “Kiwi” flown by New Zealander Alan C. Deere. Deere survived the war and died in 1995. (2) Spitfire N3277 AZ-H “Dirty Dick” flown by Richard Hardy. Hardy was forced to land in France on August 15, 1940, where he was captured. He spent the rest of the war in a POW camp and left the RAF in 1946. He died in September 1997. (3) The aircraft I chose to build, Spitfire P9495, DW-K. It was posted to 610 Squadron and flown by four different pilots: DF Corfe, SJ Arnfield, John Ellis and Peter Litchfield. The plane was discarded August 12, 1940, after being irrevocably damaged in combat.
The instructions are patterned after the Wingnut Wings’ instructions, featuring 28 glossy pages of highly detailed drawings, supplemented by photos throughout of various Spitfires and their detail. Decals, printed by Cartograf, are provided for all three aircraft, including numerous instrument decals that allow you to completely detail the panel.
| CONSTRUCTION |
Construction begins in the cockpit at the most detailed part, the instrument panel. After painting the panel Flat Black (or “Night”), and the lower section Supermarine Green (SG), I then applied a drop of Future onto each dial before applying the decals. Once dry, I then applied the 24 separate decals for the instruments. Once dry I applied another drop of Future to each one to simulate the glass covers. The instrument frame was then attached to the fuselage bottom interior, along with the rudder bar, control tubes and the heel boards. The rudder pedals were also attached to this assembly. The control column was assembled by adding the Dunlop spade grip and elevator control rod & lever.
My attention next turned to the pilot’s seat. Two seats are provided, one with seatbelts molded on and one without. I chose to add my own seatbelts, a set from HGW that I assembled and dyed a darker tan using a thin wash of Burnt Umber. They turned out OK, although it’s my fault they weren’t better. My eyesight makes it hard to deal with photoetch and fabric, so I may use some 3d ones next time.
An armor plate is added between the back of the seat and the seat frame, also to aircraft frame 11. A headrest and voltage regulator are added to complete the assembly. Instructions recommend that you drill out holes in the frame to better represent the “lightening” holes employed to lessen the weight of the aircraft, so I did so on Frames 11, 12 and 13. The seat assembly was then attached to Frame 11, which I then attached to the fuselage interior bottom.
The rest of the cockpit floor was completed by attaching frames 12 and 13 to the bottom along with flare chutes on each frame. The chutes are really not visible once the cockpit is closed up, so you don’t need to spend a lot of time here unless you plan to do a “visible” version. There are a few rigging wires that run along the interior fuselage bottom, but again, these are difficult to see once everything is closed.
Work begins along the cockpit sidewalls by adding a few individual parts, although most is already molded on. Numerous decals attach to both sidewalls, and instructions for their placement are very clear. Once complete the sidewalls are attached to the cockpit frames. A few more items are attached to the fuselage halves such as a cine camera footage indicator, a wireless remote controller, and the propeller shaft to the port half, and a hydraulic reservoir for the undercarriage hand pump, and a Remote Contactor “Pip Squeak” with height and airspeed computer to the starboard side.
 The fuselage halves are joined together, fitting the
cockpit assembly in between. Next added is the fuselage spine. Make sure NOT to
forget to add clear part C2, because it’s not “addable” once the spine is
attached. Yours truly forgot to add his and didn’t realize it until several
steps later. I tried to create one out of clear parts cement, but the result was
less than satisfactory because it ended up very cloudy. The spine fits from just
behind the cockpit all the way to the tail section, so you don’t have to worry
about a join line here. The tailplanes are then glued together, and holes
drilled out on the rear before the elevator flaps are added. The right and left
tailplanes are then added to the fuselage. Cowling parts are then added to the
fuselage along with the elevator flaps. Don’t neglect to add the fairing part
A19 before installing the rudder. If you intend to build a model with the
fuselage door closed, now is the time to add it.
The fuselage halves are joined together, fitting the
cockpit assembly in between. Next added is the fuselage spine. Make sure NOT to
forget to add clear part C2, because it’s not “addable” once the spine is
attached. Yours truly forgot to add his and didn’t realize it until several
steps later. I tried to create one out of clear parts cement, but the result was
less than satisfactory because it ended up very cloudy. The spine fits from just
behind the cockpit all the way to the tail section, so you don’t have to worry
about a join line here. The tailplanes are then glued together, and holes
drilled out on the rear before the elevator flaps are added. The right and left
tailplanes are then added to the fuselage. Cowling parts are then added to the
fuselage along with the elevator flaps. Don’t neglect to add the fairing part
A19 before installing the rudder. If you intend to build a model with the
fuselage door closed, now is the time to add it.
There is no engine, leading to some criticism from the modeling community. Since I was going to show all the cowlings closed, it wasn’t an issue for me, plus it made construction easier.
Next attention turns to the wings by installing a spar (E12) to the bottom of the wing interior, along with four .303 Browning gun barrels along the front of the wing. These sit slightly back from the front of the wing in the gun portholes. The wheel wells are then added to the wing interior. Four additional outer Browning guns are added to the wing, and then the port and starboard wing tops are added to the wing bottom assembly. Next fillets are added to each wing half, along with the port and starboard ailerons. The fillets join the top portion of the wings to the fuselage and provide a nice transition that is relatively simple to putty and sand. A few more details are added to the underside of the wing including the radiator and oil cooler fairings. The completed wing is then added to the fuselage, with the instructions directing you to slide the wing assembly rearward for a good fit. I had no trouble fitting the wings. The bottom cowling is then added to the front of the fuselage.
The undercarriage is next, and while construction is not difficult, take care to be sure that the angle of the undercarriage struts and wheels is correct. The instructions provide a good diagram for how everything fits. The wheels come with flattened tires, which is a nice touch.
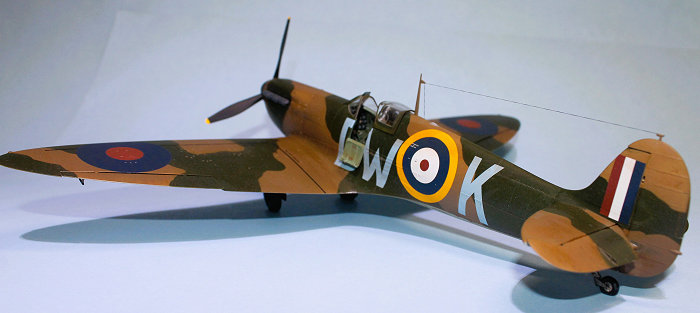
The propeller, spinner and backing plate are assembled next. There are two options depending on the aircraft you are building. The exhaust pipes are then added. Because the kit release was delayed by several months, Kotare included some bonus exhaust pipes that are more detailed than the original ones. The rudder is then added, along with the undercarriage down indicators. These are small vertical parts that stick up from each wing to let the pilot know that the wheels are successfully down. I forgot to add mine until after I had discarded the remaining plastic parts, so I made replacements out of plastic rod. The antenna mast is then added, depending on the version you are building. In some mid-production models, a TR.1133 VHF radio was installed, making an external antenna wire unnecessary. The picture of DW-K showed an antenna wire, so I added one using EZ Line.
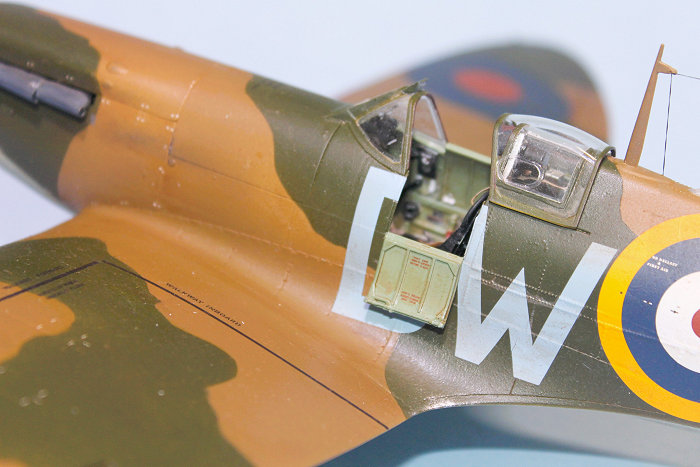
The canopy was added last. I wanted an open canopy and open-door version, so I used the parts indicated for those.
| COLORS & MARKINGS |
For the most part, I used Vallejo paints from their Battle of Britain set, which are part of their Air Series of paints designed for use in an airbrush. I still thinned them slightly using Vallejo thinner and Flow Improver. The instrument panel was painted Black, and the lower part painted IDF/IAF Interior Grey Green to represent Supermarine Green (“SG”). Other cockpit parts were also painted this color green except for the control column, the elevator control rod and the seat which were all painted Vallejo Interior Grey Green. This color is slightly lighter and greyer than the color used to represent Supermarine Green (SG). The control grip was painted Black with the gun button painted brass.
The front of fuselage frame 11 was painted SG as was the floor. The back of Frame 11, and all of Frames 12 and 13, along with the floorboard section after Frame 11, were painted Vallejo Aluminum. I painted the head rest and voltage regulator Black. As mentioned earlier, the seatbelts were painted with a thinned Burnt Umber. The harness attachment between Frame 11 and 12 was painted Tamiya Khaki.
The fuselage sidewalls were painted SG with details
picked out in Black and Aluminum. The interior was weathered using thinned
Griffin’s Burnt Umber, then cleaned up some after drying. The sidewall tanks
 were painted Black and Aluminum as noted, and decals applied. The rest of the
fuselage interior was painted Aluminum. There are numerous decals added to the
sidewalls.
were painted Black and Aluminum as noted, and decals applied. The rest of the
fuselage interior was painted Aluminum. There are numerous decals added to the
sidewalls.
The interior of the wing was painted Aluminum although virtually nothing shows. The wheel wells were painted White for the starboard and Black for the port. The wheels were painted Vallejo Dark Grey, with the hubs and struts White for starboard and Black for port. The propeller, spinner and backing plate were painted Black, with Tamiya Yellow tips on the blades.
The underside of the Spitfire was painted Vallejo Sky Type S, a light grey-green color. The top portion was painted Vallejo Dark Earth and Dark Green in the “B” camouflage pattern. Had I known to look for it, I would have used pre-made masks for the pattern, but since I didn’t, I made my own masks out of Tamiya tape. I found a pattern online for a 1/32 scale Spitfire and used it to draw the lines on the strips of tape. Looking back, it was a rather crude way to approach it now that I know there are masks for this sort of thing. Once the camouflage was painted, I applied the decals over a glossy surface, then I applied a Burnt Umber wash over the whole airplane. After it dried, I went back and removed the excess, leaving the main panel lines highlighted. I then applied a coat of Polly S satin to tone down the gloss. I painted the undercarriage down indicators Model Master Red. Finally, I removed the canopy masks, and applied the antenna rigging.
After about six weeks of work my Spitfire was finished.
| CONCLUSIONS |
The Spitfire is the first non-WWI airplane I have finished in several years. Building it was a most enjoyable experience, and I learned a lot in the process. Kotare is to be commended for an excellent kit, and I look forward to more in the future.
| REFERENCES |
Wikipedia. The Spitfire.
Kotare kit instructions.
11 March 2024
Copyright ModelingMadness.com. All rights reserved. No reproduction in part or in whole without express permission
If you would like your product reviewed fairly and fairly quickly, please contact the editor or see other details in the Note to Contributors.