Revell 1/32 Spitfire II
| KIT #: | 5516 |
| PRICE: | $20.00 or so |
| DECALS: | Two options |
| REVIEWER: | Martin McClendon |
| NOTES: | Revell/Hasegawa combo in one box |
| HISTORY |
I say, the Spitfire really needs no further introduction, eh what old boy?
| THE KIT |
 This is
the old “Reve-gawa” kit. I purchased it on Ebay back in 2010, and it sat in my
basement for years, for that seemingly inevitable day when I found the time to
get back into modeling. Last year it emerged from the depths. I have always
found the Spitfire to be the epitome of graceful aircraft design. This kit seems
to get the shape just right, despite detail issues that others have noted. Half
the kit is older Hasegawa with raised panel lines, half is a new wing suitable
for early Spitfire types. Parts are provided for the different propellers used
in the MK I and II, and the little blister for the Coffman starter used in the
MK II. The kit is long out of print but still can be found, and is probably the
most big-scale Spit you can get for a bargain price (but far superseded in
detail by Tamiya and Kotare).
This is
the old “Reve-gawa” kit. I purchased it on Ebay back in 2010, and it sat in my
basement for years, for that seemingly inevitable day when I found the time to
get back into modeling. Last year it emerged from the depths. I have always
found the Spitfire to be the epitome of graceful aircraft design. This kit seems
to get the shape just right, despite detail issues that others have noted. Half
the kit is older Hasegawa with raised panel lines, half is a new wing suitable
for early Spitfire types. Parts are provided for the different propellers used
in the MK I and II, and the little blister for the Coffman starter used in the
MK II. The kit is long out of print but still can be found, and is probably the
most big-scale Spit you can get for a bargain price (but far superseded in
detail by Tamiya and Kotare).
| CONSTRUCTION |
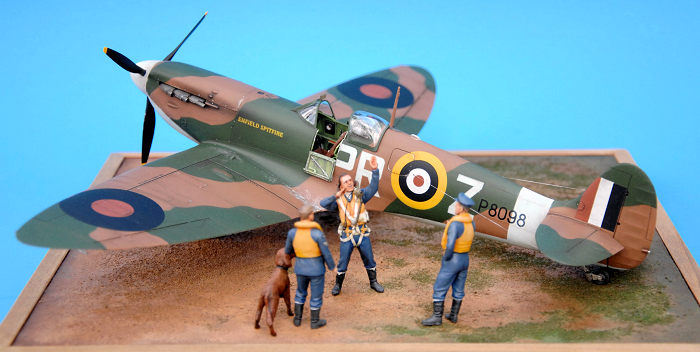
Parts fit is generally good. I did depart from the instructions in one way: I glued the upper wings to either side of the fuselage first, to get a nice seal at the wing fillet, and then attached the lower wing to the entire assembly. Problem areas: mating the early-type wingtips to the wings, and where the rear of the wing joins the fuselage. In each case I used white putty to carefully build up depressions, but other than these, seams were easily handled with a little sanding.
In the cockpit I made foil
seat belts and a putty backrest, but everything else was stock. Instruments were
painstakingly outlined in white by hand, and then drops of Krystal Kleer applied
over their faces. A scale compass card was printed and attached to the compass.
I don’t recall what I used for the interior green, but it was custom mi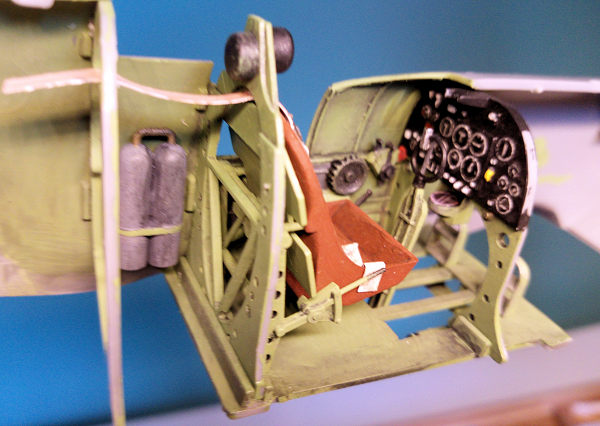 xed
from Tamiya base colors. Thinned Tamiya medium grey was used to shade.
xed
from Tamiya base colors. Thinned Tamiya medium grey was used to shade.
I used SAC metal landing gear as the kit parts didn’t look like they’d hold up over time. The SAC pieces are much nicer anyway. I used Mig elastic rigging for the IFF antennas: everything else is OOB. Though the kit provides an inaccurate solid cockpit floor, the reality is that this (and much other detail besides) is totally invisible once the kit is assembled.
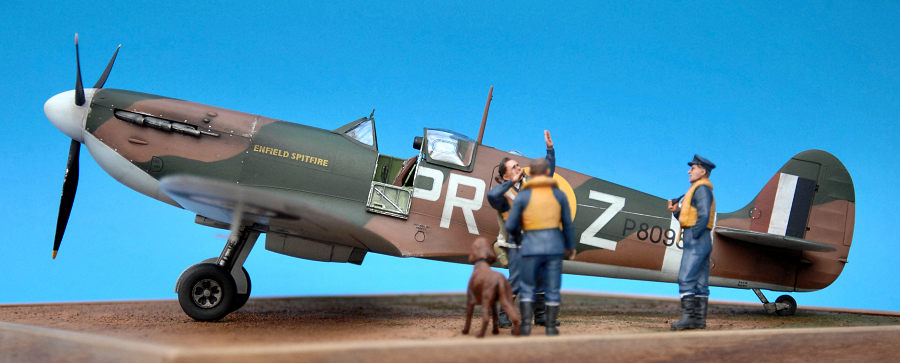
The figures are the popular set from Master Box, very well sculpted. However, the parachute is inaccurate. I have done a bit of research about parachutes (though I can’t claim to be an expert). Spitfire pilots used seat pack parachutes, but the chute depicted in the kit is an “observer” type chest pack, used by aircrew in bombers etc—which would have been quite impractical in a cramped fighter cockpit! The box art shows a fighter pilot wearing a chest pack harness and his chute detached—in reality the seat pack is not removable from its harness.
The conversion back to a seat pack is easy: scrape off the dog clips and risers on the front of the figure. Then remove the ripcord and grab handles from the pack. (you could also add a seat cushion to the back of the pack, though I skipped this step.) Then I made new thigh straps and back risers from metal foil, and used thin wire for a ripcord assembly on the pilot’s left side. Oh and then the pack was stuck to his butt! Headset cords were braided from fine electrical wire. For excellent photos of RAF and USAAF reproduction parachute rigs, I recommend the amazing website theriggerdepot.com.
| COLORS & MARKINGS |
 I have
always loved the combination of colors used in the early RAF camouflage
schemes—it seems to somehow trigger an aesthetic level of my brain and just
looks right. Tamiya paints were custom mixed and used throughout. My notes tell
me the green was XF-52 flat earth plus XF-26 deep green, the sky blue was flat
white with drops of yellow, blue, and green in tiny amounts, the brown was XF-68
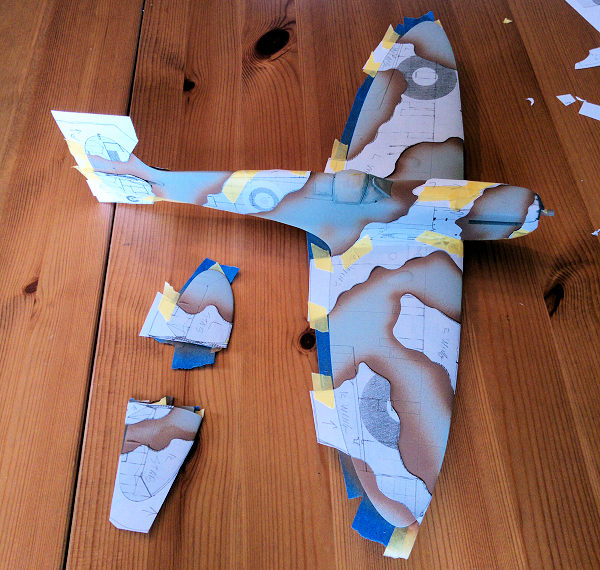
Nato Brown plus yellow and some white to desaturate. I used a three-view drawing
from the old Rikyu Watanabe Spitfire book as a guide to cut paper masks for
painting. I left the horizontal stabs off for easier painting. I believe
exhausts were painted Tamiya XF-56 metallic grey. After painting, a few coats of
Future prepared the fuselage for decals. (Interestingly, the box art bears an
uncanny resemblance to one of Watanabe’s paintings in the Spitfire book…)
I have
always loved the combination of colors used in the early RAF camouflage
schemes—it seems to somehow trigger an aesthetic level of my brain and just
looks right. Tamiya paints were custom mixed and used throughout. My notes tell
me the green was XF-52 flat earth plus XF-26 deep green, the sky blue was flat
white with drops of yellow, blue, and green in tiny amounts, the brown was XF-68
Nato Brown plus yellow and some white to desaturate. I used a three-view drawing
from the old Rikyu Watanabe Spitfire book as a guide to cut paper masks for
painting. I left the horizontal stabs off for easier painting. I believe
exhausts were painted Tamiya XF-56 metallic grey. After painting, a few coats of
Future prepared the fuselage for decals. (Interestingly, the box art bears an
uncanny resemblance to one of Watanabe’s paintings in the Spitfire book…)
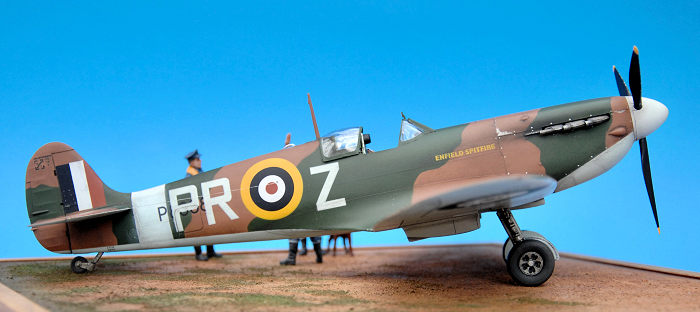
I used the kit decals. While the instructions give options for Mk I or Mk II versions and decals for one of each, research seemed to indicate that the two decal schemes included in the kit are both Mk II aircraft. The old decals were coated with decal saver before use. The thick roundels cracked when placed over various bumps, before I could even use any solvent. I touched them up with paint. Also, looking at it now, the red portions look a little too brown.
Wear areas were drybrushed with Tamiya chrome silver, and weathering was done with oils—a first for me, but it was so easy and enjoyable that it won’t be the last time. if you haven’t tried oils yet, I recommend it! I bought a cheap starter sets of oil paint at a craft store, and even the small tubes in the set will last for years.
 There are
almost no engraved panel lines on the fuselage, and I don’t yet trust myself to
carve them, so I used a Windsor & Newton 0.1mm art pen to draw the panel lines
around the cowling and over the roundels. Worked great.
There are
almost no engraved panel lines on the fuselage, and I don’t yet trust myself to
carve them, so I used a Windsor & Newton 0.1mm art pen to draw the panel lines
around the cowling and over the roundels. Worked great.
The model was coated with Tamiya flat from a spraycan. Though I waited about two weeks after weathering, I got some weird reactions between the lacquer and the oil paint—next time I’ll give it another week or two to let the oils cure before sealing.
Figures were base painted with Tamiya and MM acrylics. The uniforms were a mix of Tamiya blue and XF-20 medium grey. Then oils were used for shading.
I threw a quick base together with Elmer’s water-based wood putty. I smeared it on a piece of plywood with a putty knife and then dabbed it with a piece of foam rubber for texture, then painted it with Liquitex artist acrylics, and added a little shredded foam greenery.
| CONCLUSIONS |
A great depiction of the classic English fighter, without a lot of fuss. Looks great to me, but it is not a wunderkit…seek elsewhere for the bells and whistles, but as for me, it certainly looks good enough to fly around the living room: “angels one-five, tally-ho, chaps!”
| REFERENCES |
Spitfire, Rikyu Watanabe and Bill Sweetman, Random House, 1985.
14 March 2024
Copyright ModelingMadness.com. All rights reserved. No reproduction in part or in whole without express permission.
If you would like your product reviewed fairly and fairly quickly, please contact the editor or see other details in the Note to Contributors.