Revell 1/32 Spitfire I
| KIT #: | 00021 |
| PRICE: | 84$ |
| DECALS: | Two options |
| REVIEWER: | Francisco Santoro |
| NOTES: | Be ready to remove flash |
| HISTORY |
From the kit instructions: “The Vickers Supermarine Spitfire combined graceful lines, extreme maneuverability, and the speed and ruggedness required for an outstanding fighter plane. The exploits of the Spitfire in te desperate defense of England during the long Summer months of 1940 are now legendary. Germany’s legions, massed for invation across the British Channel, were being held back only by the threat of the British air defense. To destroy the Royal Air Force, the Germans unleashed the full force of the Luftwaffe, numbering about 1000 fighters and 1000 bombers.
Defending the narrow strip of water
and their homeland were 700 Spitfires and Hurricanes flown by young, hastily
trained pilots. Outnumbered 3 to 1, the Bristish pilots flew ‘round the clock,
gulping down tea and tosts while their planes were being refuelled, rearmed and
hastily repaired. As wave after wave of German bombers flew in to attack British
ports and airdromes, the Spitfires would intercept them and force them back
before they could reach their targets. From high above, the formidable German
Messerschmitt Bf 109
 flying escort, would dive down on the Spitfire squadrons
and engage them in aerial duel. Faster at higher altitudes, but heavier and less
maneuverable, the Bf 109 found in the Spitfire a valiant and nimble antagonist.
The 109 would scream in head-on in a direct pass, only to find the elusive
Spitfire had turned hard and was no longer in front, but training its guns on
the German from the rear. The Spitfire’s wide wings had so much lift that
heavily damaged planes could glide down without power to land on the friendly
fields of England. Many British airmen glided to safety this way several times,
they and their aircraft surviving to fight again.
flying escort, would dive down on the Spitfire squadrons
and engage them in aerial duel. Faster at higher altitudes, but heavier and less
maneuverable, the Bf 109 found in the Spitfire a valiant and nimble antagonist.
The 109 would scream in head-on in a direct pass, only to find the elusive
Spitfire had turned hard and was no longer in front, but training its guns on
the German from the rear. The Spitfire’s wide wings had so much lift that
heavily damaged planes could glide down without power to land on the friendly
fields of England. Many British airmen glided to safety this way several times,
they and their aircraft surviving to fight again.
The Spitfire soon became a symbol of resistance, a legend of invincibility. So highly esteemed was the Spitfire among friend and foe that German ace Adolf Galland, when asked by Göring what he needed to ensure victory, replied: “Give me a squadron of Spitfires.” For its time, the Spitfire was undoubtedly the world’s finest interceptor. Its design was so sound that it was able to endure throughout the War and beyond. The mark of an exceptional aircraft is its ability to go through many modifications without departing radically from its original conception. Twenty two major modifications were done on the Spitfire without ever changing the basic configuration. During this continuous upgrading process, the Spitfire’s top speed went from 350 mph in 1936, to 454mph in 1945. Its rate of climb doubled, and when the last production Spitfire left the factory in 1947, more than 20,000 of these superlative machines had been built.
It is a tribute to the genius of Reginald Mitchell, who designed the Spitfire, that his airplane was able to endure for nearly two decades. As late as the mid-fifties, various air forces were still flying Spitfires. Unfortunately, he did not live to see his handiwork’s greates triumph, as he died in 1937 at the age of 42. But his design became a legend in its own time, and will remain immortal as long as there’re men who remember the gallant and graceful airplane hovering over England a quarter century ago.”
| THE KIT |
You may ask yourselves, why should
I build this 60s era kit when the more recent Revell Spitfire Mk.II only has to
have the Coffman engine starter bump removed to make it a Mk.I? The reason is,
my first 1:32 Bf 109 and Hurricane were the Revell Classics kits issued in 2010.
I bought the Classics Bf 109F in London, when Modelzone still had its store in
High Holborn, and the Hurricane Mk.I when Puzzlemania in Buenos Aires still
traded model kits and puzzles (the now only sell the latter). The Bf 109F was
actually a G-6 (with wing bulges), and the Hurricane Mk.I was a Mk.II that
needed to have the 20mm cannon bulges removed. The Spitfire was next in the
line, but Pu zzlemania never got it in stock. Now I’m trying to find the other
Classics, but only the 2010 reboxings, as I don’t want to spend more cash on
aftermarket decals.
zzlemania never got it in stock. Now I’m trying to find the other
Classics, but only the 2010 reboxings, as I don’t want to spend more cash on
aftermarket decals.
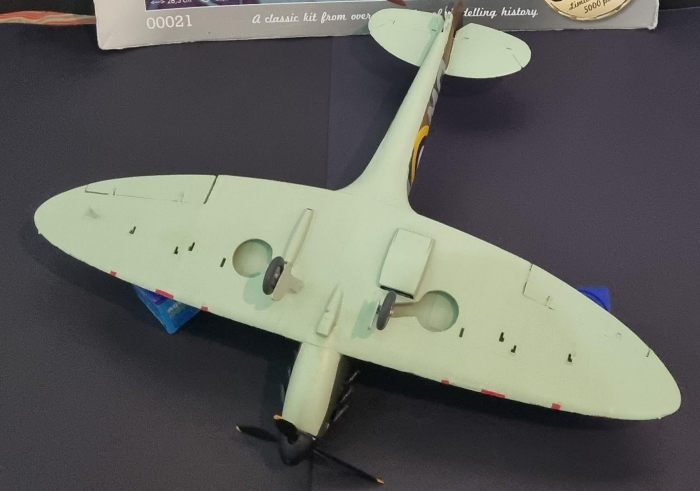
The kit is a child of the 60s, and that means it has several play features that modern kits don’t have, such as movable ailerons, movable horizontal and vertical stabilizers, retracted or extended landing gear, movable wheels, spinning propeller, and sliding canopy. Another part of getting a 60+ year old kit is the prevalence of flash in every part. The sprues were also put together haphazardly inside the poorly sealed bag, which meany many parts were rattling loose inside it. The fact that the kit was bought without the complete box (I only had the boxart), meant I was lucky no parts had been lost in transit.
The kit has little less than 70 parts, and they’re all molded in a whitish grey plastic. Flash is at the order of the day, and it’s over most parts, except on the clear parts. Panel lines and rivets are recessed on the wings, with the fuselage having raised rivets. There’re parts included to build the Spitfire Mk.V.
The instruction booklet has 10 pages and divided in 20 steps. The construction drawings are the same as when the kit was released in the 60s (Airfix does this with their Vintage sets). It’s printed in black and white with the usual historical paragraph on the first page, the colour callouts in Revell only colours, and several safety indications that most of us won’t read. Colours are called out while you build the kit. The most detailed part of the instructions is the painting guide, showing where each camouflage colour and decals go. Speaking of decals, these are of Cartograf quality, I.E excellent. They may look thick on the decal sheet, but previous experience has shown Microsol will eat through this thickness and make the decal conform to the underlying detail of the kit. There’re two decal options provided: The classic DWoK of 610th Squadron, and LOoQ of 602nd Squadron, both painted on the early war Dark Earh, Dark Green and Sky underside colour.
| CONSTRUCTION |
Rather than going guns blazing, I decided to be cautious and dry fit the main parts. I removed the upper and lower wings and fuselage halves, and taped them together. First hurdle were the wings, which didn’t fit into the opening of the fuselage. I had to sand the lower wing while constantly dry fitting. The hard plastic made things no easier. I was able to fit the wings later and realised it had some ugly gaps on the top side at the wingroots, while the lower side also had gaps. The wingroot gaps were eliminated by adding a spreader bar inside the fuselage, the underside gaps would need filler.
Putting the fit issues above aside,
I began work proper on the kit by painting as many parts as possible on the
sprues. Cockpit parts were painted with Revell 48 Sea Green for Interior Green,
with the instrument panel being painted in Revell 08 Matt Black. The wheels were
painted Revell 90 Silver for the hubs and the tyres in 78 Pa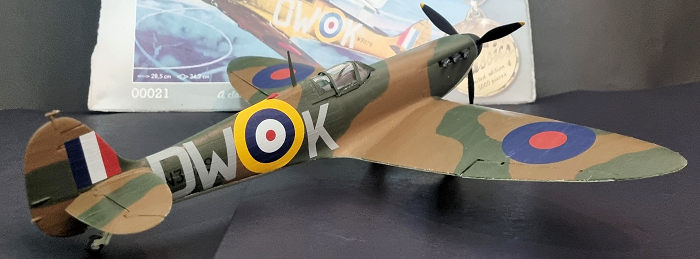 nzer Grey. The tailwheel strut was painted Revell 59 Sky Blue, and the main landing gear doors
were painted on the outside and inside in the same colour as the tail strut. The
main gear struts were painted Revell 90 Silver too. After much pre-painting, I
put together the engine sans exhausts, cockpit, side fuselage details and the
bulkheads. These assemblies were left to dry while I worked on other stuff.
nzer Grey. The tailwheel strut was painted Revell 59 Sky Blue, and the main landing gear doors
were painted on the outside and inside in the same colour as the tail strut. The
main gear struts were painted Revell 90 Silver too. After much pre-painting, I
put together the engine sans exhausts, cockpit, side fuselage details and the
bulkheads. These assemblies were left to dry while I worked on other stuff.
These other stuff were the stabilizers, ailerons, landing gear struts and their installation to the wings. I glued the aforementioned assemblies together. When I dry fitted the gear legs to the wings, I found they wouldn’t allow the top wings to close over the bottom wing. By trimming the locking tab of both struts, I was able to make the join with almost no gaps. Before closing the wings, I painted black and glued the radiator, then I glued the landing gear legs pointing a bit outwards. I left the gear dry before gluing the upper wings. Once the gear had cured, I glued the ailerons and placed the top wings in place. I then went back to the fuselage, and glued the halves together, not forgetting to add the rudder and tailwheel strut before closing them. The rear join had almost no gaps, but the front one needed sanding with some coarse sand paper, followed by polishing with a finer grit one. Not forgetting about the dry fit of the day before, I glued a spreader sprue to the forward part of the fuselage, and closed everything together. I then added the horizontal stabilizers, and left everything to dry. Some hours later, I filled all the gaps with Vallejo’s putty, re-applying wherever I needed to fill again. Before starting the painting stage, I glued the engine covers in place.
While the aircraft was curing, I painted the propeller and nosecone matt black, with yellow tips for the propeller.
| COLORS & MARKINGS |
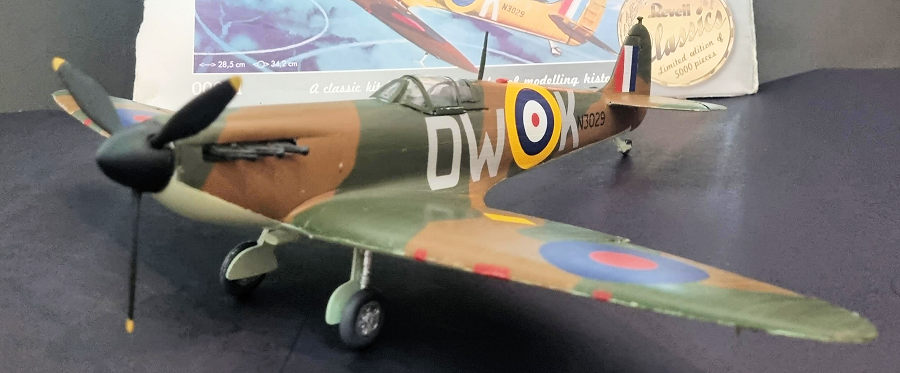
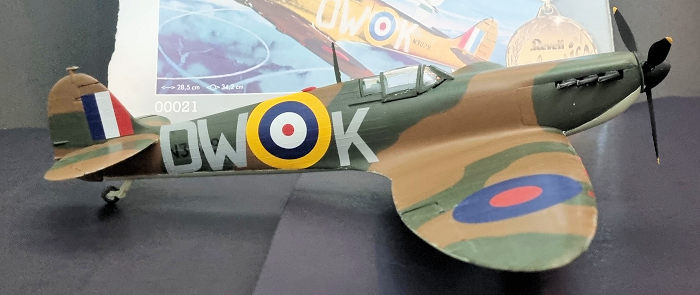
 I chose the most famous Spitfire
from the Battle of Britain, DWoK N3029 of 610th Squadron. For the top sides I
used Revell 82 RAF Dark Earth, 68 RAF Dark Green, and 59 RAF Duck Egg Blue/Sky.
The patches for the machineguns were masked and painted in Revell 36 Matt Red.
The model was the gloss coated with Revell 01 Gloss. The decals were applied
after leaving the gloss dry. These decals were awesome, no cracking, no
immediate sticking, no nothing. After I applied the main stencils (and leaving
off the smaller ones, don’t let the experts find out), I left the decals dry for
some minutes before applying Microsol. After some back and forth with the decal
softener, and happily finding out the fuselage decals conformed beautifully to
the raised rivets, I matt coated the aircraft with Revell 02 Matt.
I chose the most famous Spitfire
from the Battle of Britain, DWoK N3029 of 610th Squadron. For the top sides I
used Revell 82 RAF Dark Earth, 68 RAF Dark Green, and 59 RAF Duck Egg Blue/Sky.
The patches for the machineguns were masked and painted in Revell 36 Matt Red.
The model was the gloss coated with Revell 01 Gloss. The decals were applied
after leaving the gloss dry. These decals were awesome, no cracking, no
immediate sticking, no nothing. After I applied the main stencils (and leaving
off the smaller ones, don’t let the experts find out), I left the decals dry for
some minutes before applying Microsol. After some back and forth with the decal
softener, and happily finding out the fuselage decals conformed beautifully to
the raised rivets, I matt coated the aircraft with Revell 02 Matt.
I glued the wheels, gear doors, pitot tube, antenna mast and clear parts. Then turned the model upside down, and put it over its wheels. The exhausts were painted matt black and glued to the engine. The model was finished.
| CONCLUSIONS |
Not a difficult kit. It’s been superseded by more modern kits, obviously, such as the Revell Mk.II and the newest Kotare kits. However, if found cheaply, pick it up and give it new life by scratch building more detail, or just giving it a shiny camouflage.
11 December 2023
Copyright ModelingMadness.com. All rights reserved. No reproduction in part or in whole without express permission.
If you would like your product reviewed fairly and fairly quickly, please contact the editor or see other details in the Note to Contributors.