| KIT #: | SW 70031 |
| PRICE: | 23.53 euros direct |
| DECALS: | Seven options |
| REVIEWER: | Dan Lee |
| NOTES: | Kit includes pretty much everything you need. |
| HISTORY |
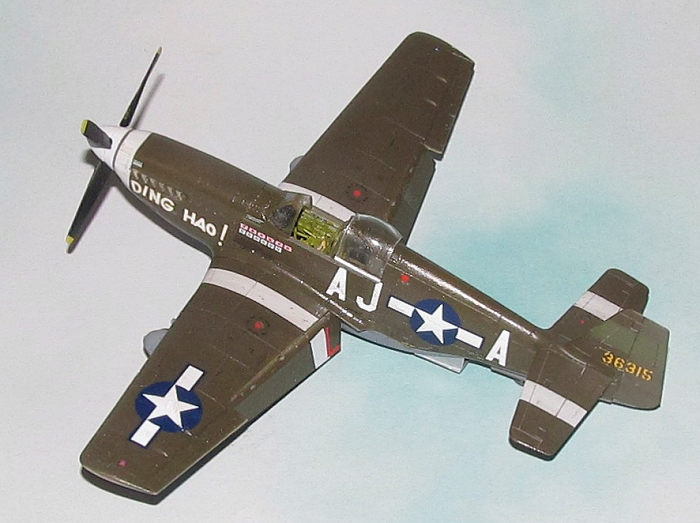
 James O
Howard is the only member of the 8th
Air Force Fighter Command who won the Congressional Medal of Honor during WW2.
He won it for his singled handed defense of a B-17 formation against
overwhelming odds. What makes him a unique WW2 ace is that he was an ace in both
major theatres (the Pacifc and Europe) shooting down six Japanese as a Flying
Tiger and six German planes. He flew his plane named Ding Hao! (which translates
to roughly You're the best! Or Thumbs Up!) after his time in China with the
Flying Tigers.
James O
Howard is the only member of the 8th
Air Force Fighter Command who won the Congressional Medal of Honor during WW2.
He won it for his singled handed defense of a B-17 formation against
overwhelming odds. What makes him a unique WW2 ace is that he was an ace in both
major theatres (the Pacifc and Europe) shooting down six Japanese as a Flying
Tiger and six German planes. He flew his plane named Ding Hao! (which translates
to roughly You're the best! Or Thumbs Up!) after his time in China with the
Flying Tigers.
| THE KIT |
 The Arma
kit reminds me a lot of the 1/48 Tamiya P-51B kit in terms of parts and layout.
The basic kit comes on two sprues of grey plastic, one sprue of clear plastic as
well as a decals sheet (the expert kit decal sheet has seven different markings
including one P-51B that was captured by the Japanese.) Meanwhile the expert kit
has an additional Photo etched parts fret including seatbelts and harness. The
basic kit has 87 grey plastic parts and 12 clear plastic parts.
The Arma
kit reminds me a lot of the 1/48 Tamiya P-51B kit in terms of parts and layout.
The basic kit comes on two sprues of grey plastic, one sprue of clear plastic as
well as a decals sheet (the expert kit decal sheet has seven different markings
including one P-51B that was captured by the Japanese.) Meanwhile the expert kit
has an additional Photo etched parts fret including seatbelts and harness. The
basic kit has 87 grey plastic parts and 12 clear plastic parts.
The detail on the parts is very fine that would more suitable for a 1/48 scale kit. There was a little bit of flash on my copy and the usual mold markings on the parts. Otherwise the parts are pretty clean. The kit comes with flattened tires, two different options for fuel tanks and exhausts as well as three different options for the cowling exhaust vents.
| CONSTRUCTION |
It all started with the cockpit as it requires a fair amount of detail painting, decals and PE needed for this expert edition. I found the cockpit to be a fiddly and took a fair amount of time to paint, glue and decal. The 1//72 scale detail can be kind of intense and the small details can be someone troublesome if you don't have optical enhancement (glasses or optivisor.) There were several steps needed to be done if you choose other options especially the F-6B photo recon version.
 Once all the
interior parts were painted, decaled and glued in place, I glued the fuselage
halves together with CA glue for the exterior seams and Tamiya extra thin cement
for the interior portions as well as the seams that were done on a panel line. I
had to do some serious filling/sanding on the top of the fuselage behind the
cockpit which again was a lot like the Tamiya 1/48 version.
Once all the
interior parts were painted, decaled and glued in place, I glued the fuselage
halves together with CA glue for the exterior seams and Tamiya extra thin cement
for the interior portions as well as the seams that were done on a panel line. I
had to do some serious filling/sanding on the top of the fuselage behind the
cockpit which again was a lot like the Tamiya 1/48 version.
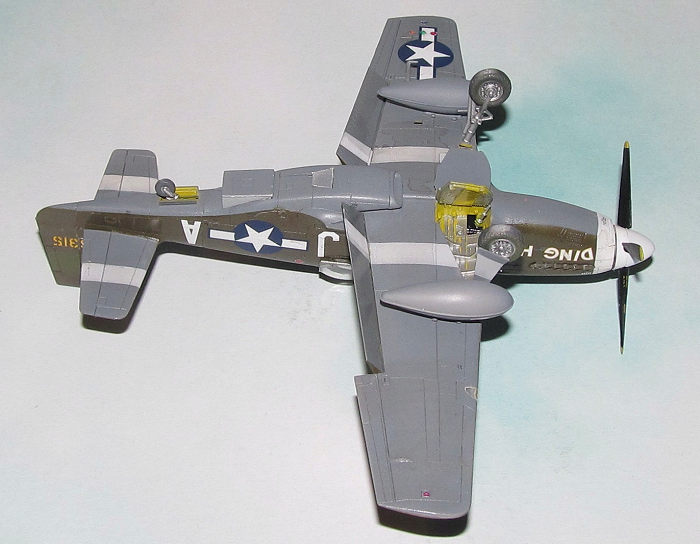
The wings were easier to assemble. The interior portions were painted using a 50/50 mix of Tamiya Flat Yellow and Flat Yellow-Green. Don't forget to add part B27 before adding the wings to the fuselage (I did and it took some frustrating moments to pull apart a very nice done glue job.) Also remember to drill out all the holes for the fuel tanks if you so choose to use them.
I carefully filled the seams with CA glue and sanded them smooth with various grades of wet/dry sandpaper. Next I added the ailerons and tail to the fuselage using CA glue. The seams were quickly dealt with careful sanding. Various small parts were added before painting such as the antennas, canopy rails (plastic and PE parts) and the pitot tubes. I found the canopy rails to be the most fiddly part of assembly for the entire kit. The rest of the kit parts were removed and glued together in their various subassemblies except the prop as the blades were kept separate from the hub until all the painting was done.
| COLORS & MARKINGS |
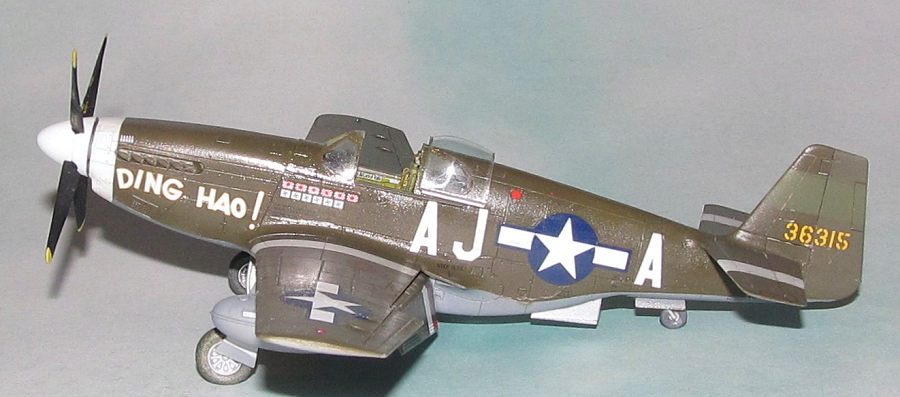
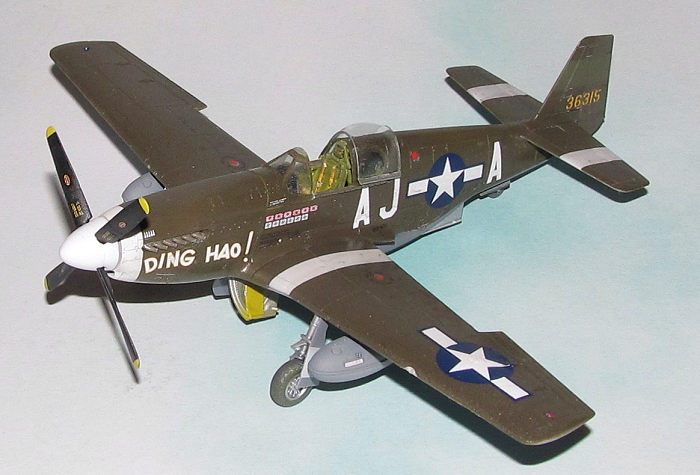
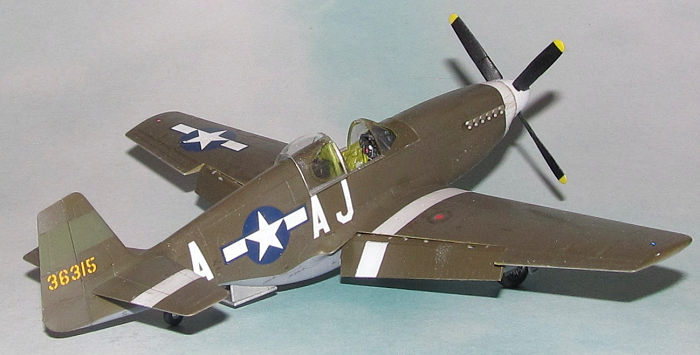
I opted for Jimmy Howard's markings. I sprayed on Gunze Olive Drab H54 over Tamiya Neutral Grey XF-53. Next I masked off the flaps and rudder and sprayed on Khaki Drab to emulate the slight difference in color for the fabric covered surfaces. Finally I carefully masked off all the sections (including the nose and prop hub) to be painted in white for the ID bands and sprayed them using a thin coat of flat white.
 There are
some white bands on the rudder that were oversprayed with what appears to be
British Dark Green which would have been available in the UK. I masked off then
sprayed that portion of the rudder with Tamiya XF-82 RAF Dark Green. The prop
blade was sprayed with Badger black Stynylrez primer. When it was dry, the tips
were masked off and painted flat white then yellow.
There are
some white bands on the rudder that were oversprayed with what appears to be
British Dark Green which would have been available in the UK. I masked off then
sprayed that portion of the rudder with Tamiya XF-82 RAF Dark Green. The prop
blade was sprayed with Badger black Stynylrez primer. When it was dry, the tips
were masked off and painted flat white then yellow.
I used the kit supplied masks for the canopy pieces. Each part was first sprayed interior green, then when dry dark grey and finally OD. I find this extra step of dark grey allows the parts to look all the same color.
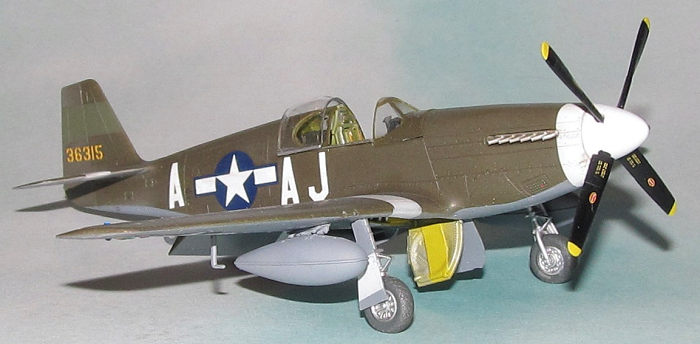
The landing gear were primed using Dark Grey Stynylrez and when the primer was dry, I sprayed on Vallejo Metal Color Aluminum. The wheels were masked off and painted Aluminum hubs and Tamiya XF-63 German Grey (RLM-66) for the tires. Meanwhile I masked off the closed canopy parts and painted them as per instructions (the Malcom hood was painted aluminum instead of OD as per instructions.) After the painted parts were dry, I sprayed on Vallejo Acrylic Gloss Coat in two thin layers to allow for a smooth surface for the decals.
The kit supplies a lot of stencils as well as the regular markings. Due to the size of the decals, it took several sessions of an hour each (roughly) to add all the necessary decals for James Howard's Ding Hao! I don't recall any major issues with the decals. I didn't do much in the way of weathering as I flat coated the plane using two thin layers of Vallejo Flat Varnish sprayed on with an airbrush for the final coat.
| FINAL CONSTRUCTION |
 The
landing gear was glued in place. No issues with the angle. Next the prop was
assembled with the blades being added to the hub pieces and then mounted
onto the nose of the Mustang. I removed the masking for the canopy parts and
glued them in. I put the Malcom Hood in closed position.
The
landing gear was glued in place. No issues with the angle. Next the prop was
assembled with the blades being added to the hub pieces and then mounted
onto the nose of the Mustang. I removed the masking for the canopy parts and
glued them in. I put the Malcom Hood in closed position.
The 75 gallon metal tanks were glued on instead of the later 100+ gallon doped aluminum paper tanks. Mostly because the metal tanks were the only ones available at the time as paper tanks were a late war addition and I didn't want to tackle and fix the ugly seams of the paper tanks.
I drilled a small hole where the whip antenna was supposed to go and put in a fine steel wire to emulate the antennas secured with a small drop of CA glue.
| CONCLUSIONS |
The Arma Hobby P-51B is a fine kit. A little fiddly in the interior (although I have had similar issues with the Tamiya P-51B) but goes together quickly after that. It looks like a bigger scale.
Despite it being a touch fiddly with the interior I had fun building this kit and recommend this kit for modelers of all levels. Arma does a good enough job with these 1/72 scale kit that even folks like me who build mostly in 1/48 scale will want to build them.
6 February 2024
Copyright ModelingMadness.com. All rights reserved. No reproduction in part or in whole without express permission.
If you would like your product reviewed fairly and quickly, please contact the editor or see other details in the Note to Contributors.