| KIT #: | A07005 |
| PRICE: | $38.50 |
| DECALS: | Two options |
| REVIEWER: | Dave Cummings |
| NOTES: | Reboxed Italeri kit. Kits-world decals |
| HISTORY |
Designed in the 1930’s, the Douglas DC-3 was one of the first airliners to provide fast, comfortable, and safe travel for passengers as well as a reliable and profitable machine for airlines. It was key in the development of the modern air travel industry. The military identified its potential as a cargo/troop carrier and the type was modified for military service as the C-47. Total production of the C-47 was 10,123 aircraft. It was a useful tool that served the US military for decades serving on active duty into the 1970s.
 C-47
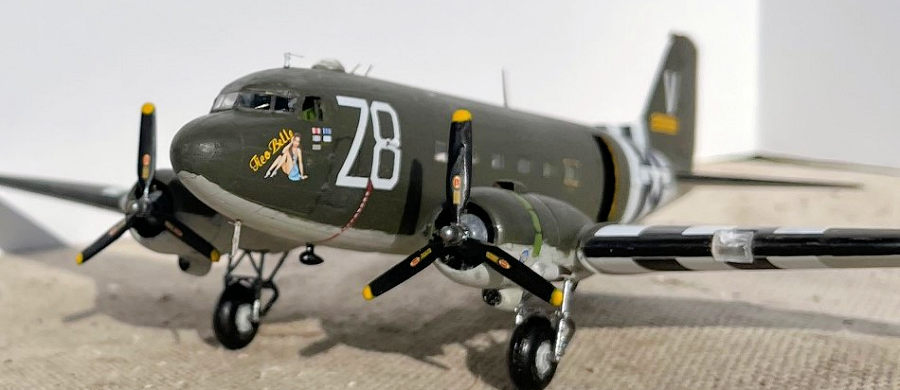
42-100591 was built in November 1943 and assigned to the 84th Troop Carrier
Squadron, 437th Troop Carrier Group. Tico Belle was a warrior that
participated in the following notable events:
C-47
42-100591 was built in November 1943 and assigned to the 84th Troop Carrier
Squadron, 437th Troop Carrier Group. Tico Belle was a warrior that
participated in the following notable events:
June 1944 – D-Day she towed a CG-4 Glider of the 82nd Airborne Division to St. Mare Eglise, conducting three missions over Normandy.
July 1944 – Operation Dragoon, France.
Sept 1944 – Operation Market Garden, Holland.
Dec 1944 – Battle of the Bulge, Belgium.
 March
1945 – Operation Varsity, Germany.
March
1945 – Operation Varsity, Germany.
1948-49 – The Berlin Airlift, Germany.
In the 1950’s ownership was passed to the Royal Norwegian Air Force, then the Danish Air Force where she served into the 1980s. Valiant Air Command Warbird Museum obtained her in the mid-80s. She was restored and continues to operate out of Space Coast Regional Airport in Titusville, Florida as a living memorial. Today she wears the paint scheme and markings of her wartime service. Many of today’s warbirds are painted to represent a historically significant aircraft. But it is rare to see a historically significant warbird represented by itself.
 Phantom
Airborne Brigade is a non-profit organization that provides airborne
qualified military personnel; active, veteran, and retired, an opportunity
to gather in brotherhood and conduct military style parachute operations.
Formed by volunteers, they have conducted over 20,000 parachute descents
without an injury or equipment malfunction. They are partnered with Valiant
Air Command who provides the lift for these jumps which occur several times
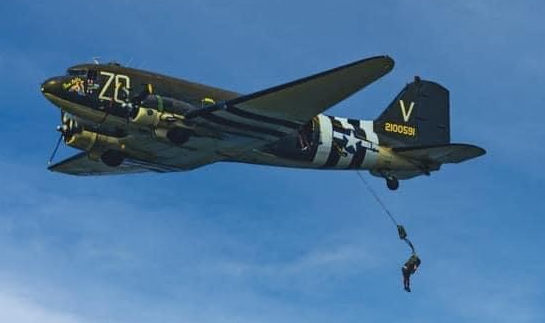
a year. Tico Belle is one of the aircraft used in these operations. On
Veterans Day 2023, 160 fat old ex-paratroopers jumped into Lake Eustis
Florida as a part of that towns Veterans Day celebration. I am privileged to
have participated in that jump from this historic aircraft. My first since
retiring from the US Army in 1991. Videos of the event are available on
U-Tube. (Picture of me exiting Tico Belle)
Phantom
Airborne Brigade is a non-profit organization that provides airborne
qualified military personnel; active, veteran, and retired, an opportunity
to gather in brotherhood and conduct military style parachute operations.
Formed by volunteers, they have conducted over 20,000 parachute descents
without an injury or equipment malfunction. They are partnered with Valiant
Air Command who provides the lift for these jumps which occur several times
a year. Tico Belle is one of the aircraft used in these operations. On
Veterans Day 2023, 160 fat old ex-paratroopers jumped into Lake Eustis
Florida as a part of that towns Veterans Day celebration. I am privileged to
have participated in that jump from this historic aircraft. My first since
retiring from the US Army in 1991. Videos of the event are available on
U-Tube. (Picture of me exiting Tico Belle)
| THE KIT |
This is a re-box of an older Italeri kit. Now in a
sturdy Airfix box are 79 parts molded in OD and clear on 3 sprues. The clear
parts are bagged separately to prevent scratching. It is well molded with
recessed panel lines and little flash. Panel lines are a bit deep but look
good under paint. Fabric control surfaces look good. The 2-piece engines are
Ok for the scale and housed in two-piece cowlings split left and right.
Interior detail is simple but adequate for the scale. There is a one-piece
floor that runs nose to tail with troop benches molded on. Three bulkheads
and a cockpit consisting of instrument panel, control columns, seats an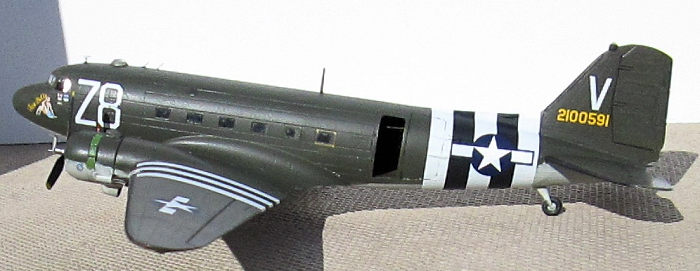 d
two descent pilot figures. There is no rib and stringer detail on the
interior should one wish to pose the cargo hatch open. So, a bit sparse but
with the small windows and thick clear parts, you are not going to see much
anyway. The seven-page instruction booklet provides adequate construction
drawings with color references for Humbrol paints. The paint and decal
guides are well done 4-views in full color. Decals are well printed and look
of good quality. There is an RAF Dakota that, ironically, is also a warbird
as displayed at Coningsby in 2008, and a 1948 USAF Berlin Airlifter. There
are long or short carb air scoops and a tail fairing for the two options.
The cargo hatch and troop door are separate so each can be posed open if
desired. Nose mounted radar antennae are provided for the USAF bird {though
the instructions make no mention of them except for the mounting stubs).
d
two descent pilot figures. There is no rib and stringer detail on the
interior should one wish to pose the cargo hatch open. So, a bit sparse but
with the small windows and thick clear parts, you are not going to see much
anyway. The seven-page instruction booklet provides adequate construction
drawings with color references for Humbrol paints. The paint and decal
guides are well done 4-views in full color. Decals are well printed and look
of good quality. There is an RAF Dakota that, ironically, is also a warbird
as displayed at Coningsby in 2008, and a 1948 USAF Berlin Airlifter. There
are long or short carb air scoops and a tail fairing for the two options.
The cargo hatch and troop door are separate so each can be posed open if
desired. Nose mounted radar antennae are provided for the USAF bird {though
the instructions make no mention of them except for the mounting stubs).
| CONSTRUCTION |
The simple interior builds quickly. I
painted the floor a red-brown wood color. The rest was painted interior
green. The instrument panel was painted black, and the instrument detail dry
brushed with silver (it can’t be seen). I didn’t use the pilots. I drilled
some holes in the bulkheads to run a piece of wire through to make my anchor
line cable. I used some scrap to hint at some stringer detail on the inside
opposite the door.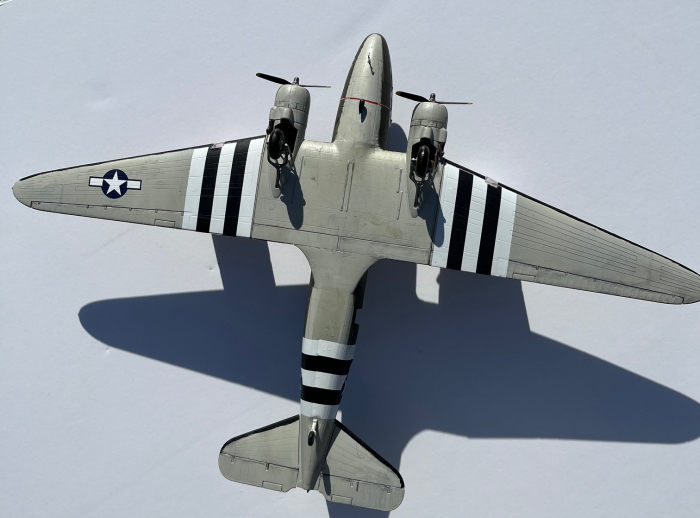 Test fitting revealed the fit of the fuselage at the rear underside left
considerable gap. I did some scraping of the rear floor and bulkhead which
solved much of it. Side windows are glued on from the inside. The fuselage
halves were then mated with some gap remaining on the bottom rear. Mr.
Surfacer 500 was applied to the fuselage joint seam in several spots where
needed. The seam was scraped and sanded. Sanded out panel lines were
re-scribed. Then some real fun in masking all those side windows with Tamiya
tape.
Test fitting revealed the fit of the fuselage at the rear underside left
considerable gap. I did some scraping of the rear floor and bulkhead which
solved much of it. Side windows are glued on from the inside. The fuselage
halves were then mated with some gap remaining on the bottom rear. Mr.
Surfacer 500 was applied to the fuselage joint seam in several spots where
needed. The seam was scraped and sanded. Sanded out panel lines were
re-scribed. Then some real fun in masking all those side windows with Tamiya
tape.
It’s a relatively simple kit to build and overall parts fit is good in general but will need a little filler here and there. Beside that lower rear fuselage gap, there is one other potential issue to be aware of. The wing is five pieces that begins with a lower wing center section mated to the fuselage. Fit is good but there are no alignment pins for this piece. Insure to get this aligned properly because it is easy for this part to shift off center. If that happens, you will have problems with the outer wing parts. One will be too short leaving a wing root gap and the other will be too long requiring some filing to fit (Ask me how I know). The seams of the vertically split cowlings must also be dealt with. Tico Belle has short exhaust stubs requiring the kit exhausts to be cut in half. The War Birds instruction sheet has one mistake, the profile shows long carb air scoops, but they are the short ones. There is an anti-collision beacon on top of the fin. I cut a notch in the fin and concocted a beacon from scrap and canopy glue. I completed the model minus landing gear, props, and sticky outy things and prepped her for painting. Openings were packed with dampened tissue.
| COLORS & MARKINGS |
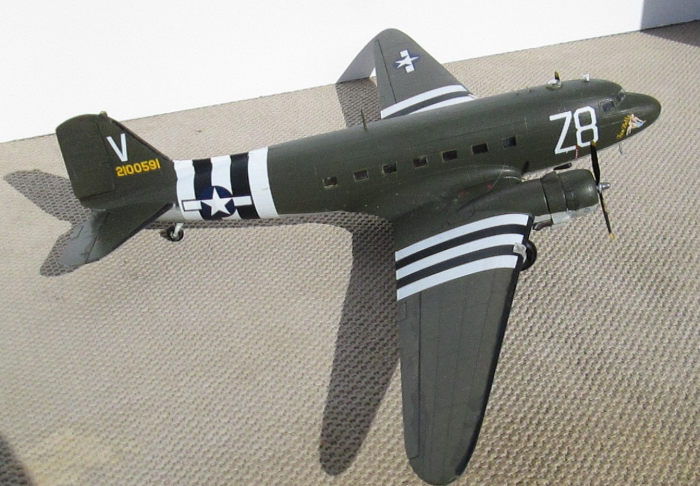
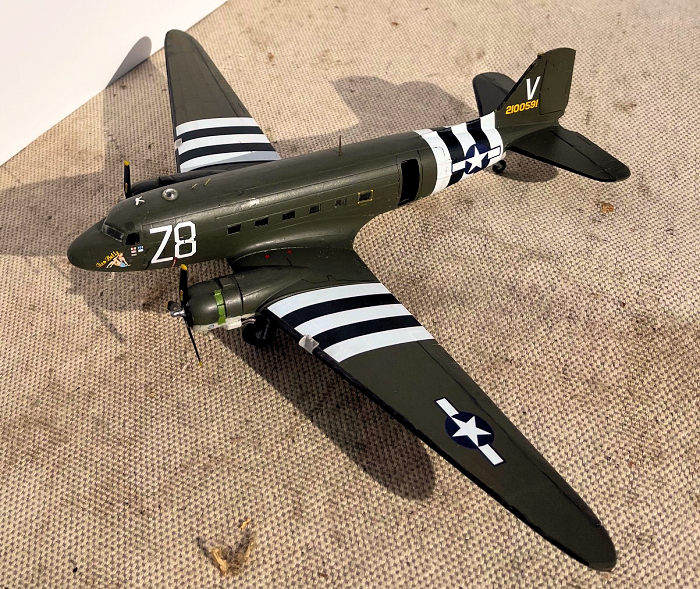
The War Birds instruction sheet show these aircraft painted in the standard OD over gray with the black and white invasion stripes. Being a modeler, I had noticed that the warbird Tico Belle had its underside in a lighter shade of gray than the standard USAAF Neutral Gray. The decal instruction guide notes this lighter color, so I painted the underside AV Model Air 71.296 Curtiss Gray. I masked the demarcation lines with Tamiya tape and sprayed the uppers AV Model Air 70.889 US Olive Drab to which I added some US Forest Green to better match the original. It was like 1 part green to 5 parts OD. Next, I mixed a dab of light gray with highly thinned OD and misted the top of the fuselage, ailerons and such for some tonal variation, very subtle. Of note, at the time of our airborne operation the upper cowl flaps on the left engine were in green Zinc Chromate. Another detail is a yellow with red stripes attention getter framing the inside of the troop door. When dry the model was given a coat of rattle can Testor’s Gloss Coat. I applied a black acrylic wash to control surface hinge lines and the cowlings.
 The
theme of the War Birds decal sheet is just that, warbirds currently seen at
airshows painted in D-Day markings. The instructions warn there are minor
differences between the wartime and non-wartime aircraft such as different
antennae, markings, and such. So, one must check photos if available to do
the wartime versions. For instance, warbird Tico Belle has small Valiant Air
Command logos on the cowlings and wears her wartime citation ribbons. The
War Birds decals offer full color profiles of each of the three options on
the sheet. These are Z8 Tico Belle, T9 Southern Cross, and ID Placid Lassie.
The War Birds decals are top quality. Well printed and easy to work with.
They are a bit resistant to Micro-Sol but repeated coats will help them
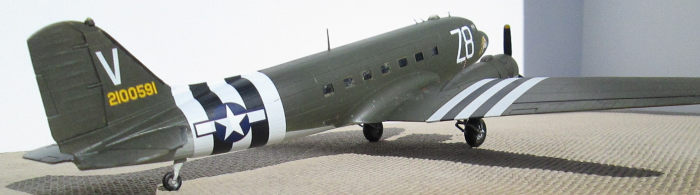
settle into panel lines. One problem is the large Z8 on the left side must
settle over a molded-on venturi. Had to slice the decal a bit and slather on
the Micro-Sol. It came out OK. As to the large invasion stripes, I wrestled
with using the decals or painting them on. If decals, should I cut them up
into smaller sections to make them easier to work? I figured the wing
stripes would be easy being a flat surface and the large decals went on
without a hitch with perfect fit. Encouraged I tried a fuselage half decal.
Had to work it a bit, but with copious amounts of Micro-Sol it came out
pretty good. Same with the other side. Bit of a gap at the fin but War Birds
provides spare decal to patch any glitches. Probably would have been easier
to work out wrinkles by cutting the panels in half. But it worked and looks
good. The decals are opaque and no OD shows through the white stripes.
However, the fuselage national insignias go over the stripes and there was a
slight bit of shadow showing through from a black stripe. So, on the other
side I put some white decal from the spares over the black stripe where the
insignia goes which cures that issue. Much as I like the decal sheet there
is one inaccuracy to be aware of. I noted the data stencils on the prop
decals were in white. Done a lot of WWII props and never seen a data stencil
that wasn’t yellow. Checked my Tico Belle photos and sure enough they are
yellow. I replaced those with the stencils from the kit decals which are
correct. With decaling finished I gave it a coat of AV Satin Varnish as the
warbird’s paint is not totally flat and has a little bit of sheen.
Weathering was minimal as Valiant Air Command takes pretty good care of her.
The
theme of the War Birds decal sheet is just that, warbirds currently seen at
airshows painted in D-Day markings. The instructions warn there are minor
differences between the wartime and non-wartime aircraft such as different
antennae, markings, and such. So, one must check photos if available to do
the wartime versions. For instance, warbird Tico Belle has small Valiant Air
Command logos on the cowlings and wears her wartime citation ribbons. The
War Birds decals offer full color profiles of each of the three options on
the sheet. These are Z8 Tico Belle, T9 Southern Cross, and ID Placid Lassie.
The War Birds decals are top quality. Well printed and easy to work with.
They are a bit resistant to Micro-Sol but repeated coats will help them
settle into panel lines. One problem is the large Z8 on the left side must
settle over a molded-on venturi. Had to slice the decal a bit and slather on
the Micro-Sol. It came out OK. As to the large invasion stripes, I wrestled
with using the decals or painting them on. If decals, should I cut them up
into smaller sections to make them easier to work? I figured the wing
stripes would be easy being a flat surface and the large decals went on
without a hitch with perfect fit. Encouraged I tried a fuselage half decal.
Had to work it a bit, but with copious amounts of Micro-Sol it came out
pretty good. Same with the other side. Bit of a gap at the fin but War Birds
provides spare decal to patch any glitches. Probably would have been easier
to work out wrinkles by cutting the panels in half. But it worked and looks
good. The decals are opaque and no OD shows through the white stripes.
However, the fuselage national insignias go over the stripes and there was a
slight bit of shadow showing through from a black stripe. So, on the other
side I put some white decal from the spares over the black stripe where the
insignia goes which cures that issue. Much as I like the decal sheet there
is one inaccuracy to be aware of. I noted the data stencils on the prop
decals were in white. Done a lot of WWII props and never seen a data stencil
that wasn’t yellow. Checked my Tico Belle photos and sure enough they are
yellow. I replaced those with the stencils from the kit decals which are
correct. With decaling finished I gave it a coat of AV Satin Varnish as the
warbird’s paint is not totally flat and has a little bit of sheen.
Weathering was minimal as Valiant Air Command takes pretty good care of her.
| CONSTRUCTION CONTINUES |
 I put the
windshield in and had a deuce of a time with it. It fits good, kind of pops
into place. But I repeatedly popped it through the opening into the cockpit
and had to fish it out. Got it finally but a tricky bit. Left off the left
side window and glued a clear piece in to represent the window slid back to
the open position. The landing light lenses had to be filed down a little on
the ends to fit. Landing gear went together with no issues. Various antennae
were made from photo etch scrap to represent the warbird’s modern avionics.
I put the
windshield in and had a deuce of a time with it. It fits good, kind of pops
into place. But I repeatedly popped it through the opening into the cockpit
and had to fish it out. Got it finally but a tricky bit. Left off the left
side window and glued a clear piece in to represent the window slid back to
the open position. The landing light lenses had to be filed down a little on
the ends to fit. Landing gear went together with no issues. Various antennae
were made from photo etch scrap to represent the warbird’s modern avionics.
| CONCLUSIONS |
The kit is a bit of an oldie, but the finished model looks great to my eyes. No major assembly issues. Couple of annoying fit issues but all easily dealt with (check your filler supply). Airfix has produced a new tool (2014) C-47 kit which I am sure is superior. But the old Italieri/Airfix kit still makes into a presentable model and probably much cheaper. Can’t say enough about the War Birds decals, good stuff. All highly recommended.
| REFERENCES |
Personal photos and the War Birds Instruction sheet.
1
2 February 2024
Copyright ModelingMadness.com. All rights reserved. No
reproduction in part or in whole without express permission.
If you would like your product reviewed fairly and fairly quickly, please
contact the editor or see other details in the
Note to
Contributors.