| KIT #: | 914 |
| PRICE: | $20.00 |
| DECALS: | One option |
| REVIEWER: | John Summerford |
| NOTES: | Scavanged an engine |
| HISTORY |
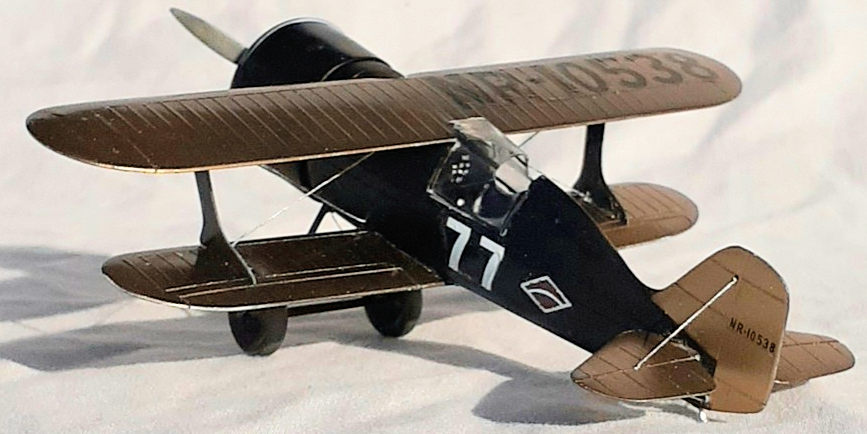
Three weeks before the 1930 Thompsom Trophy race, held in Chicago, Lee Shoenhair of the Goodrich Co. placed an order with the E.M. Laird Airplane company for a racer based on their Speedwing designs of commercial aircraft and featuring the new Pratt & Whitney Wasp Jr. engine. (He later back out of the deal.) Dubbed the Solution in reference to the dominance of the Travel Air Mystery Ship, it was a biplane with conventional landing gear, having a welded steel fuselage, wooden spars and ribs, and covered in fabric.
 The factory
was located across town from the racecourse and the only test flight was 10
minutes long to the track. Not only was work done around the clock by Laird
personnel, a P & W rep was present to conduct a test run of the engine and make
final adjustments prior to take off. Six foot 5 and ½ inch tall Charles “Speed”
Holman was selected as the pilot.
The factory
was located across town from the racecourse and the only test flight was 10
minutes long to the track. Not only was work done around the clock by Laird
personnel, a P & W rep was present to conduct a test run of the engine and make
final adjustments prior to take off. Six foot 5 and ½ inch tall Charles “Speed”
Holman was selected as the pilot.
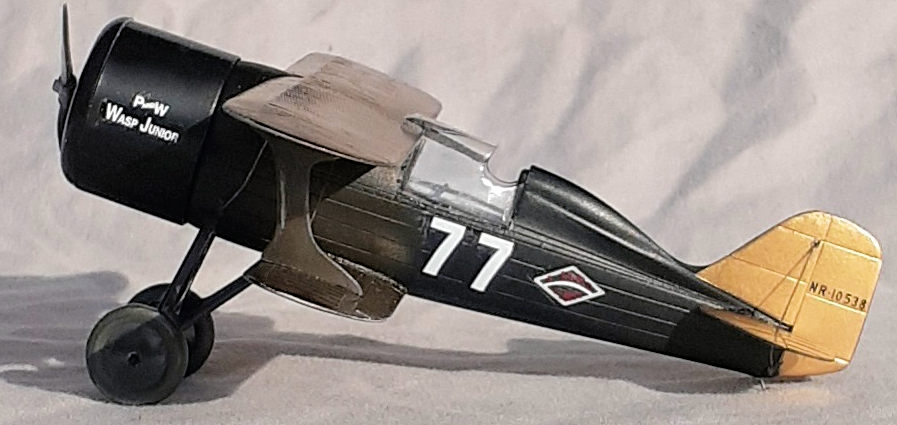
After landing at the race field, the engine was tweaked again and the rigging given a final adjustment. Race number 77 was hurriedly whitewashed on the fuselage and the fuel tank was topped off. The preparations were completed just minutes before the start of the race.
To nobody’s surprise, Capt. Arthur Page quickly grabbed the lead in his heavily modified Curtiss Hawk. Frank Hawks followed but dropped out after the third of 20 five-mile laps. Jimmy Hazlip, in his Mystery Ship and Holman fought for second place. Tragedy struck on the 17th lap when Page was overcome by carbon monoxide fumes and crashed. That left it as a duel between Hawks and Holman. The Solution was faster, but Holman was also fighting fumes and had difficulty concentrating. At times, he wandered off course as he stuck his head out of the cockpit. He barely finished ahead of Hawks with an average speed of 201.9 mph versus Hawks’ 199.8 mph. In addition to winning the first-place prize of $5,000, the Solution was the only biplane to win the Thompson Trophy.
| THE KIT |
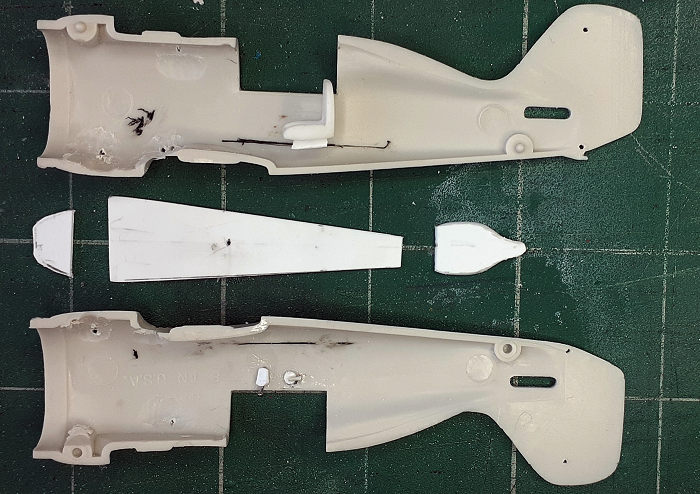
 According to
Scalemates, this kit was first released in 1949 under the Hawk label. The last
boxing was in 1993. The molding is looking long in the tooth with some dense
flash on numerous parts and mold ejection points. Most of the 22 (including a
six-part racing pylon stand) white parts were still attached to the sprues with
the lower wing detached. The one clear part was left loose in the bag. Of note
is that the radial engine, without pushrod tubes, is molded into the cowl nose
ring. Nor is there any interior detail. As was customary in the era of the kit’s
release, raised outlines for the race and registration numbers are molded on the
surfaces. The decal sheet of the numbers is sandwiched into the folded size 11 X
17 instructions.
According to
Scalemates, this kit was first released in 1949 under the Hawk label. The last
boxing was in 1993. The molding is looking long in the tooth with some dense
flash on numerous parts and mold ejection points. Most of the 22 (including a
six-part racing pylon stand) white parts were still attached to the sprues with
the lower wing detached. The one clear part was left loose in the bag. Of note
is that the radial engine, without pushrod tubes, is molded into the cowl nose
ring. Nor is there any interior detail. As was customary in the era of the kit’s
release, raised outlines for the race and registration numbers are molded on the
surfaces. The decal sheet of the numbers is sandwiched into the folded size 11 X
17 instructions.
| CONSTRUCTION |
Several sessions were spent on scraping, sanding, scribing, drilling, scratch building, adding shims, plus figuring out the assembly, painting, and rigging sequence.
Starting with the single-piece wings, the registration numbers were highlighted with Smoke tint to make it easier to see where to scrape off the raised outlines. Next, the plywood leading edge panels and tips were scribed. The rib detail sanded from them by taping over the detail that was to remain. Lost rib detail from the scraped areas was restored by drawing a knife blade along a straight edge. The resulting cut raised ridges along both sides. The cuts were left for filling with primer when that time arrived. The hope was to have the ridges appear from under the decals.
 The
ailerons, which were only on the lower wings, and also plywood covered, along
with the area from the rear spar to the aileron’s hinges. These areas were also
scribed and sanded.
The
ailerons, which were only on the lower wings, and also plywood covered, along
with the area from the rear spar to the aileron’s hinges. These areas were also
scribed and sanded.
After taping the fuselage halves together, the placement of the rigging holes was determined, and the test fitting the wings also identified where to drill those holes. Once the rigging strategy was settled upon, the holes were drilled out. The same followed for the tail surfaces. The stabilizers showed gaps along the fuselage during their test fit, so shims were added to them.
Still with the halves taped together, the shape of the rear bulkhead and instrument panel was determined, as well as the dimensions of the floor piece. Those pieces were cut from sheet styrene with the bulkhead left extra tall with the final size to be determine later.
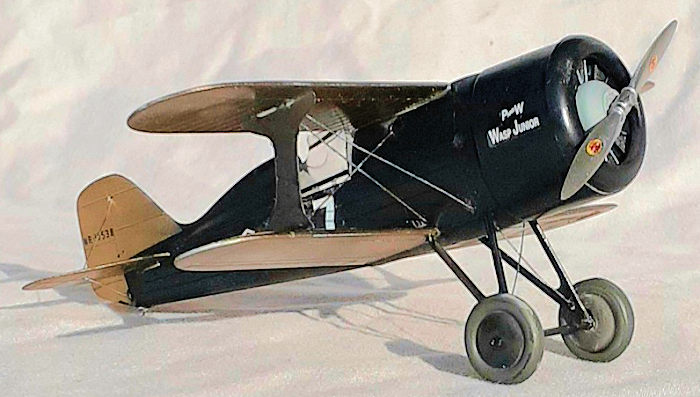
A throttle handle and a crank that operates some unknown apparatus (stabilizer trim?) on the left side plus a seat and control stick were the only cockpit details to scratch build. The Solution’s cockpit was lined with black Pyrolin sheet, which was based on nitrocellulose, and covered the frame, so the interior surface of each half was painted black.
An unusual sequence was used to build the cockpit. The fuselage was glued together, leaving the cowl off so that the nose was open. The floor was inserted from the front, then the rear bulkhead trimmed to fit and installed, followed by the instrument panel. Then the scavenged seat was wedged into place and the stick glued in front of it. A headrest was shaped and glued in place, then painted black along with the instrument panel. When the paint dried, a scavenged instrument decal was slid into place.
A rotary tool was used to remove the engine face and a replacement was test fitted without a problem.
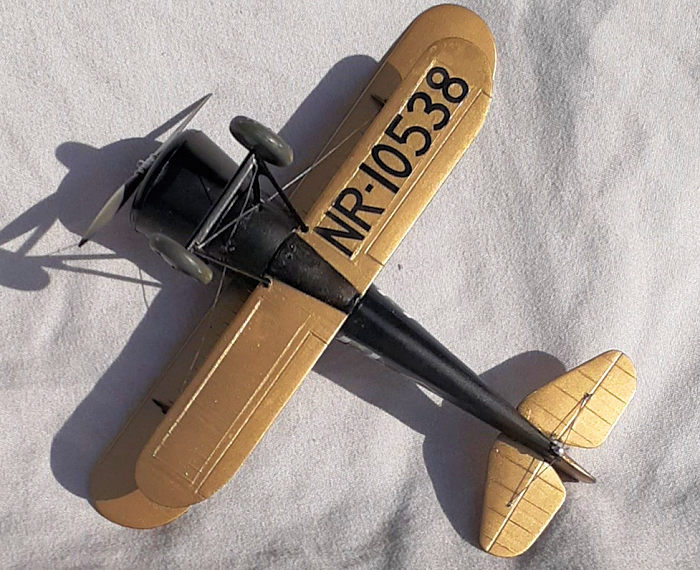
Both wings needed shims to close gaps with the fuselage, as did the wing struts. The clear piece was masked and tacked glued in place with water soluble glue. That left the wheels and their struts plus the prop to clean up and the parts were ready for paint.
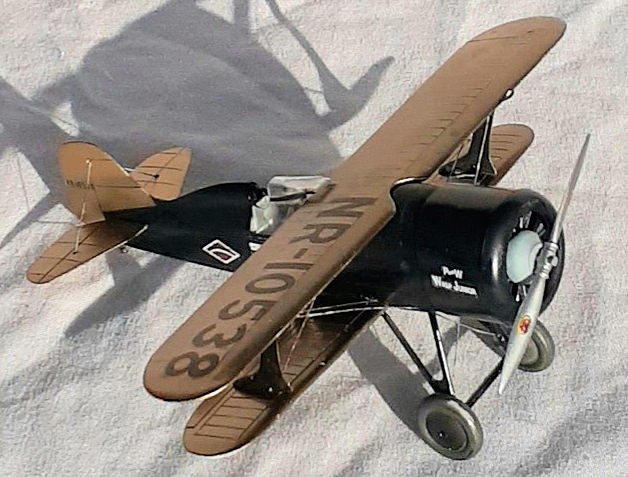
| COLORS & MARKINGS |
 Complex
masking was avoided by painting the wings and fuselage separately. Alclad gray
primer with filler was sprayed over the parts and another session of filling and
sanding followed. The next step was to apply Alclad’s gloss black base. The
fuselage parts were done at this point. The fuselage fairing on the underside of
the lower wing was masked as was the fuselage except for the fin/rudder. The
flying surfaces were misted with Alclad Gold
Complex
masking was avoided by painting the wings and fuselage separately. Alclad gray
primer with filler was sprayed over the parts and another session of filling and
sanding followed. The next step was to apply Alclad’s gloss black base. The
fuselage parts were done at this point. The fuselage fairing on the underside of
the lower wing was masked as was the fuselage except for the fin/rudder. The
flying surfaces were misted with Alclad Gold
| CONSTRUCTION CONTINUES |
Continuing with deviations from the norm, an atypical assembly sequence was utilized. Before adding the engine and cowl to the fuselage, the lower wings offered up first, then their struts. Quilting thread was glued to the bottom of the struts and pulled through the holes in the fuselage and secured from the inside. These, and the rigging that followed, was painted Vallejo Steel after installation. The upper wing was attached and its rigging completed. When the wing rigging was completed, the engine and cowl were attached.
 The
horizontal tail surfaces were attached. Their fit was not as tight as needed and
more shims were used. After the glue set up, the tail rigging was added.
The
horizontal tail surfaces were attached. Their fit was not as tight as needed and
more shims were used. After the glue set up, the tail rigging was added.
Two “V” struts, an aerodynamic shaped axel, and two wheels compose the landing gear. Except for the wheels, none of the attachment points are firm, so getting the parts aligned properly was tricky. When the glue for the struts and axel had set, they were rigged and the wheels added.
Getting the clear part to fit required some filing where it met the wing trailing edge. The molded in place tail skid was broken at some point, so a sewing pin was used as a replacement.
At this point, there was little handling left to do, so the decals were applied and left to dry overnight. As per my custom, the prop was the final part added.
| CONCLUSIONS |
The phrase, “you get out of it what you put into it” was coined for this project. A presentable model can be made from this kit out of the box, but extra work is required to make an historically accurate model. This model is not contest worthy, but, could function as a test build to create a model that is contest worthy. The biggest change that I would make is to fabricate new stabilizers and elevators
Testors racers of the30’s are fun kits to build. They would make great subjects for a modern-day manufacturer.
| REFERENCES |
The Golden Age of Air Racing by S.H. Schmid and Truman C. Weaver
Thompson Trophy Racers by Roger Huntington
John Summerford
9 February 2024
Copyright ModelingMadness.com. All rights reserved. No reproduction in part or in whole without express permission from the editor.
If you would like your product reviewed fairly and fairly quickly, please contact the editor or see other details in the Note to Contributors.