Azur/FRROM 1/72 Super Mystere B.2
| KIT #: | 09194 |
| PRICE: | $40.00 or so |
| DECALS: | Three options |
| REVIEWER: | Rob Hart |
| NOTES: |
| HISTORY |
See Scott Van Aken's preview at this link.
| THE KIT |
Again, see Scott Van Aken's kit preview here:
 This is the
third boxing of the Azur Fromm/Special Hobby 1/72 Super Mystere kit. As near as
I can tell, the contents of the “Early” and “Late” releases of the kit differ
only in the decal options.
This is the
third boxing of the Azur Fromm/Special Hobby 1/72 Super Mystere kit. As near as
I can tell, the contents of the “Early” and “Late” releases of the kit differ
only in the decal options.
I used the following aftermarket parts sets:
Eduard EDUSS683 1/72 Super Mystere B.2 color photo etch “Zoom” set
Eduard UCX548 1/72 Super Mystere B.2 Mask set
Reskit RS72-0004 1/72 Dassault Super Mystere wheels/tires set
Reskit RSU72-0190 1/72 SMB-2 Super Mystere Exhaust Nozzle
| CONSTRUCTION |
The kit has recessed panel lines. To my eyes, the lines appear to be ever so slightly too wide. I ran a scriber through all of the lines and sanded down the outer surface of all the kit parts that feature panel lines. This reduced the width of the lines and changed them from having a “u” shaped cross section to having a “v” shaped cross section. The “v” shaped cross section makes it much easier to apply a pin wash in the panel lines. For the reminder of the construction I followed the numerical step sequence in the kit instructions.
Step 1 is gluing the upper and lower halves of the intake together. The lower half of the intake has the roof of the nose landing gear bay molded on its outside wall. A part representing the walls and cross bracing of the bay is then attached to the bay roof. This step is completed by fitting the part representing the front of the turbine to the aft end of the intake.
 Step 2 is
joining the two halves of the kit's jet pipe and attaching the aft end of the
turbine to the front of the pipe and the afterburner can to the rear. I
substituted the Reskit parts for this assembly. The 3D printed Reskit parts have
a higher level of detail and are also seamless. The Reskit parts fit so well to
each other that the join lines could not be seen by the naked eye.
Disappointingly, the exquisitely detailed flame holder cannot be seen after the
fuselage halves are joined.
Step 2 is
joining the two halves of the kit's jet pipe and attaching the aft end of the
turbine to the front of the pipe and the afterburner can to the rear. I
substituted the Reskit parts for this assembly. The 3D printed Reskit parts have
a higher level of detail and are also seamless. The Reskit parts fit so well to
each other that the join lines could not be seen by the naked eye.
Disappointingly, the exquisitely detailed flame holder cannot be seen after the
fuselage halves are joined.
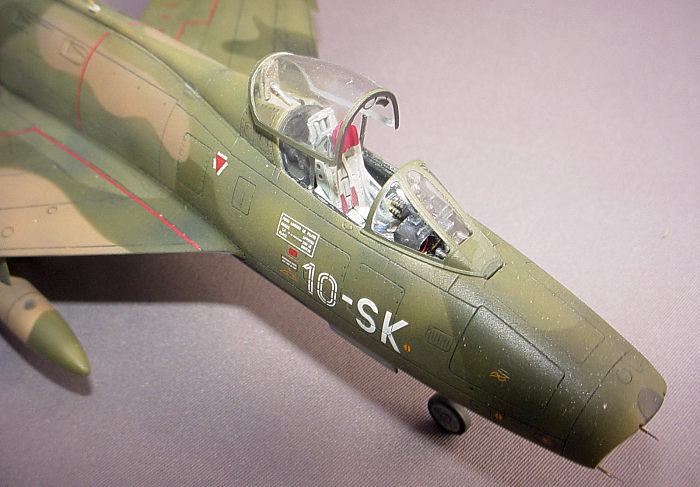
Step 3 calls for attaching the back wall of the cockpit and the rudder petals to the cockpit tub. Since I was using the photo etched cockpit details from the Eduard set, I took the opportunity to file the raised details off of the tops of the tub's side consoles. I did the same with the kit's instrument panel. I held off on installing the photo etched rudder petals until later on during the rest of the cockpit assembly as they are very small and fragile. The kit's instrument panel has the gauge cases molded on the back of the panel. I drilled out each case and attached short lengths of red, black, and yellow .0075” insulated wire to simulate the real aircraft's electrical wiring. I ran the wires off to the sides and under the side consoles. The Super Mystere does not have the forward section of the cockpit interior completely shrouded from view and you can see the back of the instrument panel through the windshield. I glued the photo etched console tops and the photo etched instrument panels to the respective kit parts with white glue and set them aside to dry.
In step 4 the control stick, cockpit side walls, and instrument panel are joined with the cockpit tub.
Steps 5 and 6 call for attaching the two main landing gear bays to their respective fuselage halves. This step would also have you attach the two sides of the afterburner shroud the the aft ends of the fuselage halves. I substituted the Reskit part as it is one piece and seamless. It also has slightly better detail on its interior and exterior sides.
In steps 7 and 8 the intake, jet pipe, and cockpit tub sub-assemblies are attached to the fuselage halves and the fuselage is closed. I added a small piece of a flattened automobile wheel weight above the forward end of the intake tube to reduce the possibility of the model being a tail sitter. I recommend caution when doing this as the nose wheel strut is to scale and fragile. The weight that I used weighed slightly less than six grams. I glued the fuselages halves together with thin super glue and almost immediately sanded the seams smooth. I prefer to use super glue on any seams in areas that will be visible on the finished model to minimize the possibility of ghost seams occurring. I was pleased to see that their were no gaps requiring filler and I rescribed all the panel lines that crossed the seams.
 Steps 9 and
10 deal with joining the upper and lower halves of the wings to each other. The
upper halves incorporate the leading and trailing edges of the wings. I prefer
this method as it allows for sharper edges than if the seams had been along the
leading and trailing edges. I opened the holes for the attachment points of the
inboard set of pylons and filled the holes for the attachment points of the
outboard pair of pylons as I was only going to have my model carry drop tanks.
Although the seams where the lower wing half met the upper fell along panel
lines, I judged the gaps to be too large to pass as panel lines and filled them
with super glue and rescribed. Some of the seams also crossed through some
access panels and filled and rescribed those lines too. This step is completed
by gluing the tiny clear formation light lenses to the wingtips. I used super
glue to both attach and fill the seams of the lenses/wingtips join before
sanding and polishing the lenses back to clarity with 400 through 12,000 grit
sanding pads.
Steps 9 and
10 deal with joining the upper and lower halves of the wings to each other. The
upper halves incorporate the leading and trailing edges of the wings. I prefer
this method as it allows for sharper edges than if the seams had been along the
leading and trailing edges. I opened the holes for the attachment points of the
inboard set of pylons and filled the holes for the attachment points of the
outboard pair of pylons as I was only going to have my model carry drop tanks.
Although the seams where the lower wing half met the upper fell along panel
lines, I judged the gaps to be too large to pass as panel lines and filled them
with super glue and rescribed. Some of the seams also crossed through some
access panels and filled and rescribed those lines too. This step is completed
by gluing the tiny clear formation light lenses to the wingtips. I used super
glue to both attach and fill the seams of the lenses/wingtips join before
sanding and polishing the lenses back to clarity with 400 through 12,000 grit
sanding pads.
In step 11 the wings are attached to the fuselage, the fin/rudder is attached to the fuselage, the horizontal stabilizers are attached to the fin/rudder, and the nose intake ring is attached to the forward end of the fuselage. The wings/fuselage join uses multiple tongues and grooves to obtain a very positive and solid assembly. Be sure to set the anhedral (2 degrees). Again, although the wing to fuselage seam fell along panel lines, I felt that the gaps were too large and I filled them with super glue, and, after sanding them smooth, rescribed the lines. I attached the horizontal stabilizers to the fin/rudder and filled, sanded and rescribed the seams before attaching the fin/rudder to the fuselage. Had I waited to attach the horizontal stabilizers after the fin/rudder was glued to the fuselage, I would have had a difficult time trying to fill and sand seams as there is very little clearance between the underside of the horizontal stabilizers and the top of the rear fuselage. As it turned out, the fin/rudder to rear fuselage join was the worst fit on the model. I filled the seam with epoxy putty that I smoothed with a damp q-tip. The filled seam was less than perfect, but trying to sand the join would have eliminated a lot of surface detail that would have been impossible to restore due to the tight confines. The last task in this step is to attach the nose intake ring to the forward fuselage. Care needs to be taken to insure the inside surface of the ring sits flush with the walls of the intake tunnel. Once I had the intake ring aligned, I glued, filled, sanded, and rescribed the seam
With the major airframe assembled and before attaching the ancillary details, it was time to paint the overall color scheme.
| COLORS & MARKINGS |
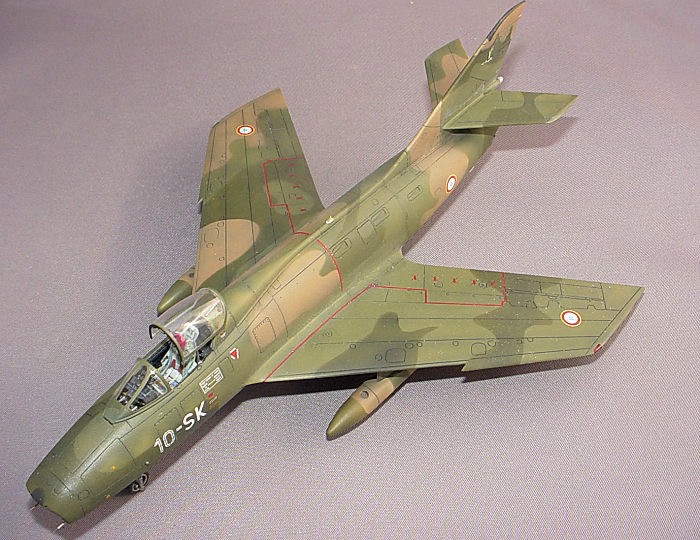
Sometime in the early
1970's The French painted eight (or twelve, depending on the reference source)
Super Mysteres in “Vietnam Style” camouflage. The colors and patterns were
roughly similar to those seen on USAF tactical aircraft during the same time
period. The kit's decal options are for three Super Mysteres painted in the
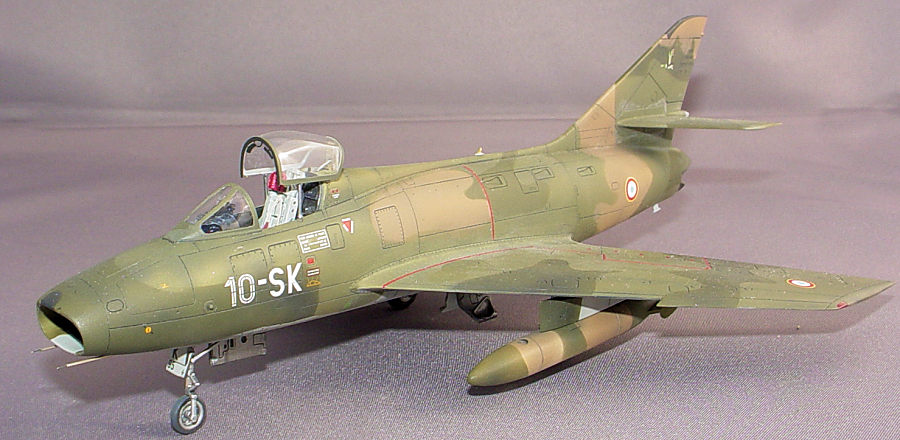
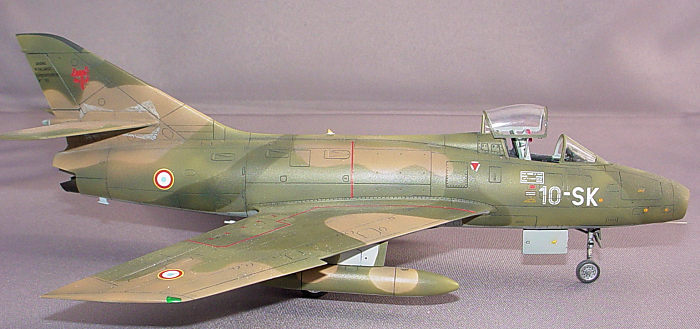
“Vietnam Style” camouflage. The option that I chose was for an aircraft assigned
to EC 01/10 “Valois” from 12/22/1969 to 04/05/1973. This aircraft had fin
markings of a mallard in flight on one side and the face of a red fox on the
other side. Special Hobby's painting guide calls out FS numbers that match the
colors used by the USAF. To that end, I used paints from the Hataka lacquer USAF
paint set (Vietnam War Era). Before I painted the airframe I painted the postion
light lenses on the wingtips with Tamiya Clear Red and Clear Green Acrylics.
After the paints dried I masked the lenses with the tiny pre-cut masks in the
Eduard mask set. With the cockpit, wheel wells, and intake and exhaust openings
masked off, I applied a primer coat of Tamiya gray lacquer primer that I
smoothed with a 4000 grit sanding pad.. I applied mottling over the entire
airframe surface with Tamiya black and white lacquers. I smoothed the mottling
coats with the same 4000 grit sanding pad that I used on the primer. I then
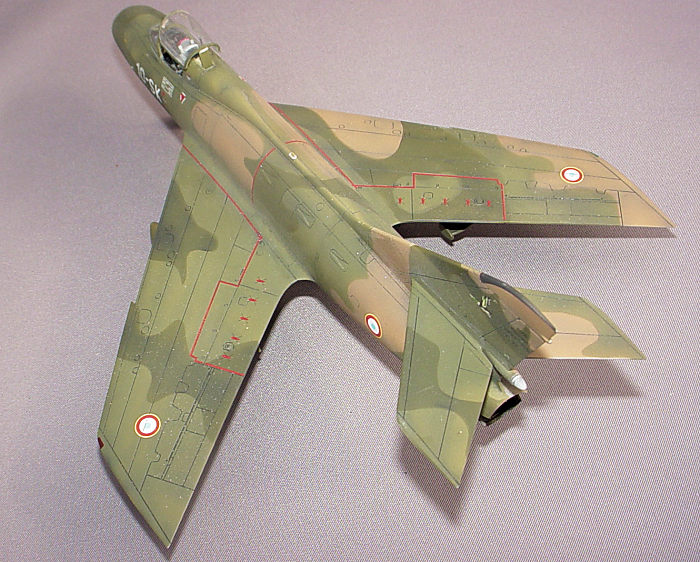
applied the camouflage colors. The color separation lines on the real aircraft
had soft edges with no visible over spray. To reproduce that effect in 1/72
scale, I masked the individual colors
 with thin
rolls of Blu Tack using the pattern shown in the kit's painting guide. I filled
the inside of the Blu Tack outlines with paper masks cut from tissue paper. I
had not previously used Hataka Lacquer paints and I decided to experiment to see
which thinner(s) worked best. I used Mr Color standard lacquer thinner, Mr Color
leveling lacquer thinner, and Tamiya lacquer thinner. All three thinners
delivered excellent results with no discernible difference in performance. I was
impressed by the Hataka lacquer paints. They sprayed evenly, dried quickly, and
cured to a very smooth finish. They are also about the easiest paints to clean
out of an airbrush that I have encountered. I simulated the scuffing on the fin
at the bases of the all flying horizontal stabilizers with a prismacolor silver
pencil. After some minor touch-ups to the camouflage colors, I sprayed a coat of
Tamiya Acrylic Gloss Clear X-22 in preparation for applying the decals.
with thin
rolls of Blu Tack using the pattern shown in the kit's painting guide. I filled
the inside of the Blu Tack outlines with paper masks cut from tissue paper. I
had not previously used Hataka Lacquer paints and I decided to experiment to see
which thinner(s) worked best. I used Mr Color standard lacquer thinner, Mr Color
leveling lacquer thinner, and Tamiya lacquer thinner. All three thinners
delivered excellent results with no discernible difference in performance. I was
impressed by the Hataka lacquer paints. They sprayed evenly, dried quickly, and
cured to a very smooth finish. They are also about the easiest paints to clean
out of an airbrush that I have encountered. I simulated the scuffing on the fin
at the bases of the all flying horizontal stabilizers with a prismacolor silver
pencil. After some minor touch-ups to the camouflage colors, I sprayed a coat of
Tamiya Acrylic Gloss Clear X-22 in preparation for applying the decals.
The kit's decals are printed by Cartograph. They are crisply printed, with perfect registration and rich colors. However, in common with previous Cartograph decals that I have used, they are somewhat stiff and prone to silvering. I applied the decals in stages: topside, underside, left side, right side,etc., allowing 24 hours drying time between each application session. The kit's decals are pretty comprehensive with many stencils, walkways, and warning symbols. As expected, I had to run a scalpel through the decals that spanned panel lines and apply a solvent to get them to lay down in the lines. I also had to apply solvent to most of the smaller decals to eliminate silvering. I managed to get a satisfactory result from the decals, but it took some patience and effort. After letting the decals dry and removing the adhesive and solvent residue, I applied a paynes grey oil paint pin wash to the panel lines and then sealed the wash and decals with a coat of Tamiya Acrylic Flat Clear XF-86.
| FINAL CONSTRUCTION |
 Step 12
is for assembling the landing gear and attaching the gear to the airframe.
Each gear leg has a wheel/tire and a strut. I used the Reskit 3D printed
wheel/tire set and had to drill out the hubs to accept the kit's axles. This
step is completed by adding 5 small probes/sensors to the underside of the
wings and rear fuselage.
Step 12
is for assembling the landing gear and attaching the gear to the airframe.
Each gear leg has a wheel/tire and a strut. I used the Reskit 3D printed
wheel/tire set and had to drill out the hubs to accept the kit's axles. This
step is completed by adding 5 small probes/sensors to the underside of the
wings and rear fuselage.
In step 13 the landing gear doors are attached to the fuselage and gear leg. The Super Mystere's main landing gear doors only opened when the landing gear was cycled. However, I opted to leave the doors opened to show off the nice detail in the landing gear bays on on the inside of the doors. The big nose gear door has a blade \antenna on its outer surface. Due to molding limitations it is a little thick. I replaced it with a photo etched antenna that came in the Eduard set and repeated the process for the blade antenna molded on the dorsal spine of the fuselage. This step also calls for the two pitot tubes to be attached to the nose of the forward fuselage. The pitot tubes supplied in the kit are thin, tapering, styrene rods. I considered my chances of successfully cleaning the mold parting lines off of these pieces without breaking them to be near zero so I replaced them with .010 mm aluminum tubes with short lengths of .004” wire inserted in the ends. At this point I attached a 2 mm AK interactive white lens to represent the landing light under the forward fuselage. The Eduard photo-etched set supplies a surround for the the light and I attached it as well.
Steps 14 and 15 are for constructing the six part ejection seat. The seat is very nicely detailed, but I replaced the kit's firing handles with photo-etched parts from the Eduard set. The tiny yellow and black safety stripes are pre-painted to a much higher standard than I could achieve and, with the addition of the restraint belts provided in the Eduard set, the seat looks very busy and convincing.
In step 16 the gunsight is attached to the instrument panel shroud and the completed assembly is glued to the top of the instrument panel. I had to trim about 1 mm off of the bottom edges of the shroud to get enough clearance for the windshield to fit properly. This step is completed by attaching the pilots head and shoulder armor to a shelf directly behind the ejection seat position.
Step 17 sees the ejection seat installed in the cockpit. I was concerned that the addition of the aftermarket parts would cause fit issues, but the seat dropped into place without a struggle.
 In step
18 the windshield and canopy was installed. I had to sand a little off of
the windshield's lower rear corners to get a flush fit with fuselage. The
kit provides two canopies; one for displaying the canopy closed and the
other for displaying it open. I chose to display the canopy open. The Eduard
set provides a part that has rear view mirrors for the forward bow of the
canopy and the latch mechanisms for the bottom sides of the canopy. The
latch mechanisms require eight tiny prongs to be bent ninety degrees before
the entire piece is attached to three very thin sides of the canopy. The
canopy has the prongs molded on the lower edges so I decided to only use the
U shaped piece with the mirrors and separated it from the side pieces. The
Super Mystere's canopy is attached by arms on either side of the cockpit and
a large L shaped hinge on the spine of the fuselage immediately behind the
cockpit. When the canopy is opened it moves back and up to end in a position
that is above and slightly staggered to the rear of the cockpit. The
Republic F-84F uses an identical arrangement. I found that getting the
canopy, the arms, and the hinge in the proper position relative to the
fuselage was the fiddliest aspect of the build. The inner face of the hinge
had a photo etched piece from the Eduard set that interfered with the fit. I
had to file down the lower edge of the piece in order to get the bottom of
the hinge deep enough into the fuselage for the forward edge of the canopy
to sit at the proper angle. In the end I managed to get the canopy on and
correctly positioned, but it took multiple starts and stops to get the job
done.
In step
18 the windshield and canopy was installed. I had to sand a little off of
the windshield's lower rear corners to get a flush fit with fuselage. The
kit provides two canopies; one for displaying the canopy closed and the
other for displaying it open. I chose to display the canopy open. The Eduard
set provides a part that has rear view mirrors for the forward bow of the
canopy and the latch mechanisms for the bottom sides of the canopy. The
latch mechanisms require eight tiny prongs to be bent ninety degrees before
the entire piece is attached to three very thin sides of the canopy. The
canopy has the prongs molded on the lower edges so I decided to only use the
U shaped piece with the mirrors and separated it from the side pieces. The
Super Mystere's canopy is attached by arms on either side of the cockpit and
a large L shaped hinge on the spine of the fuselage immediately behind the
cockpit. When the canopy is opened it moves back and up to end in a position
that is above and slightly staggered to the rear of the cockpit. The
Republic F-84F uses an identical arrangement. I found that getting the
canopy, the arms, and the hinge in the proper position relative to the
fuselage was the fiddliest aspect of the build. The inner face of the hinge
had a photo etched piece from the Eduard set that interfered with the fit. I
had to file down the lower edge of the piece in order to get the bottom of
the hinge deep enough into the fuselage for the forward edge of the canopy
to sit at the proper angle. In the end I managed to get the canopy on and
correctly positioned, but it took multiple starts and stops to get the job
done.
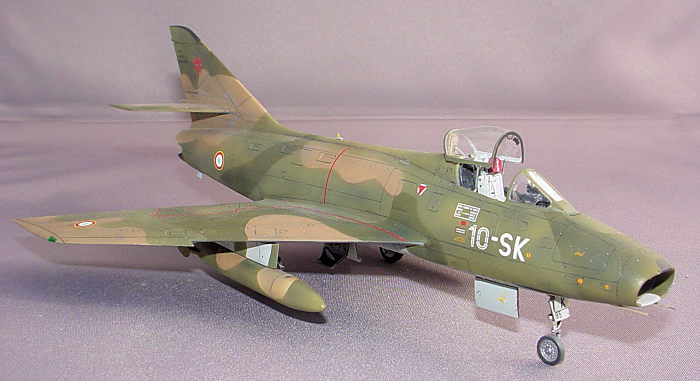
Step 19 is for attaching the underwing stores. I used the smaller of the two pairs of drop tanks provided in the kit. The kit also provides a pair of sidewinders and their distinctive pylons, but I couldn't find any photos of Super Mysteres in the Vietnam style camo carrying the missiles so I left them off.
| CONCLUSIONS |
I recommend this kit to anyone with an interest in cold war aircraft. It fits well, has an impressive level of detail, and is thoughtfully engineered. I also recommend all of the aftermarket parts that I used, but, to be honest, none of them are essential. I enjoy adding detail and using aftermarket parts, but this kit will build into an impressive model straight out of the box. The Hataka lacquer paints exceeded my expectations and I have added several more of their paint sets to my supplies inventory.
4 December 2023
Copyright ModelingMadness.com. All rights reserved. No reproduction in part or in whole without express permission of the editor.
If you would like your product reviewed fairly and fairly quickly, please contact the editor or see other details in the Note to Contributors.
Back to the Main Page Back to the Review Index Page Back to the Previews Index Page